Last updated: Oct 6, 2025
The following new routes (940), variations (87), and notes (273) have been compiled for 327 areas. This supplements the information in the second edition of Adirondack Rock. To contribute updates or new routes, simply email us (Jim or Jeremy) with your information.
Note: We are saving some content for the next edition, including first ascent data, cliff and route histories, maps, topos, and cliff photos. However, when reporting new routes, please include this information.
Printing Note: If you want background colors (like this box) to print in IE and Mozilla, turn on background printing by checking File/Page Setup/Print Background Colors and Images.
Click here for the newroutes page that accompanied the first edtion.
Click here for a list ordered newest to oldest.
Baby Dome (2)
Beyond, The (2)
Crown, The: The Amphitheater (3)
Deer Fly Ridge (5)
Dome, The (4)
Fortress, The: Center Tower (1)
Fortress, The: Right Tower (1)
Frontiertown Crags: The Main Cliff (18)
Frontiertown Crags: The Towers (10)
Jim's Cliff (5)
Little Johnson (1)
Northway Express Wall: The Greenhouse (1)
Outpost, The (4)
Poke-O Moonshine: Main Face (4)
Poke-O Moonshine: Slab: Left Side (3)
Poke-O Moonshine: Upper Tiers: Headwall
Poke-O Moonshine: Upper Tiers: Second Tier (1)
Poke-O Moonshine: West Side: Carl Mountain Cirque: Southeast Wall (9)
Split Rock Canyon: Crime Scene Wall (18)
Split Rock Canyon: Left End (2)
Split Rock Cliff (5)
Sweet Fern Hill (5)
Underwood Canyon: Left Side (5)
Underwood Canyon: Right Side (5)
Aquarium, The (1)
Beer Walls: Case Wall: Lives of the Hunted Area (1)
Beer Walls: Case Wall: Shotgun Face (6)
Bikini Atoll (3)
Boquet Ridge Cliffs: Cliff #2 (2)
Boquet Ridge Cliffs: Cliff #3 (2)
Boquet Ridge Cliffs: Cliff #4 (2)
Boquet River Crags: Boxcar (1)
Boquet River Crags: Shark Fin Cliff (2)
Boquet River Crags: Whitewater Walls: Wall #1
Camalot Cliff (14)
Chapel Pond Gully Cliff: Foot Patrol Face (1)
Emperor Slab (1)
Ice Brook Cliffs: Lower Cliff (1)
Ice Brook Cliffs: Upper Cliff (3)
King Wall (8)
Lonely Hearts Club Cliff Band (3)
Lower Mossy Cascade Cliff: Left Section (1)
Lower Mossy Cascade Cliff: Right Section (1)
Ranney Cliffs: Quarantine Buttress (5)
Serac Wall (5)
Spanky's Area: Nestle Wall (1)
Spanky's Area: Sunshine City (1)
Spider's Web (3)
Upper Washbowl (5)
Upper Washbowl: Left Descent Wall (2)
Upper Washbowl: Routes that start on the Slanting Ledge (1)
Washbowl Pond: Future Wall (3)
Washbowl Pond: The Body Shop: Main Wall (4)
Washbowl Pond: The Body Shop: Right End (1)
Barkeater Cliff (2)
Between the Lakes: Cascade Cliff (1)
Between the Lakes: UFO Wall (2)
Peregrine Pillar Area: Banzai Wall Left (4)
Peregrine Pillar Area: Lower Banzai (4)
Beaver Brook: The Pump Factory (9)
Cloudspin Cliff (12)
Cobble Cliff (12)
Dannemora Wall (1)
High Falls Crag (1)
Hueco Wall (1)
Moss Cliff (1)
Moss Cliff: Ausable Buttress (3)
Notch Mountain (1)
Olympic Acres: Polar Soldier Wall (8)
Avalanche Lake: East Face of Avalanche Mountain (2)
Avalanche Lake: East Face of Avalanche Mountain: Above the Fin (2)
Avalanche Lake: West Face of Mt Colden (2)
Avalanche Lake: West Face of Mt Colden: Campsite Wall (2)
Gothics Mountain: South Face (3)
Knob Lock Mountain: Left End (2)
Knob Lock Mountain: Main Wall (2)
Knob Lock Mountain: Right End (1)
Little Siberia (4)
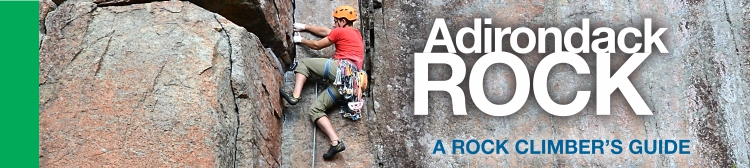
Mt Haystack: Panther Gorge: No Man's Land (4)
Mt Haystack: Panther Gorge: North End (1)
Mt Haystack: Panther Gorge: Ramp Wall (6)
Mt Haystack: Panther Gorge: South End (1)
Mt Haystack: Panther Gorge: V Wall (3)
Mt Marcy: Panther Gorge: Agharta Wall (11)
Mt Marcy: Panther Gorge: Chimney Wall (3)
Mt Marcy: Panther Gorge: East Face (2)
Mt Marcy: Panther Gorge: Feline Wall (6)
Mt Marcy: Panther Gorge: Panther Den (13)
Mt Marcy: Panther Gorge: The Huge Scoop (3)
Pyramid Peak (5)
Ragged Mountain (9)
Ragged Mountain: Summit Cliff (2)
Rooster Comb (1)
Ark Wall (5)
Buck Mountain: Eagle Cliff (1)
Devil's Washdish (3)
Devil's Washdish: Lichen Boobies Terrace (4)
Devil's Washdish: Right End (2)
Devil's Washdish: Treadway Face (4)
Middle Sister (2)
Padanarum Cliff (2)
Potash Cliff (4)
Rogers Rock: Campground Wall (1)
Rogers Rock: Last of the Mohicans
Rogers Rock: Last of the Mohicans: Center Section (6)
Rogers Rock: Last of the Mohicans: Left Side (3)
Rogers Rock: Last of the Mohicans: Right Side (2)
Shelving Rock: Desert Shield Area
Shelving Rock: Jackass Buttress (1)
Shelving Rock: Neanderthal Cave (2)
Sleeping Beauty (1)
Stewart's Ledge (6)
Stewart's Ledge: Stewart's Shops (2)
Wild Pines (10)
Cedar River Crag (6)
Cedar River Crag: Lower Wall (2)
Chatiemac Cliff: Main Face (4)
Chatiemac Cliff: Main Face: Nature's Pocket Wall (3)
Chatiemac Cliff: North of Nowhere Wall (7)
Chimney Mountain: True Summit Slabs (1)
Crane Mountain: Central Crane: Connector Slab (1)
Crane Mountain: Crane Ease: East Path Boulder (1)
Crane Mountain: Crane East: Belleview Area: Bellavista Slab
Crane Mountain: Crane East: Belleview Area: Belleview Slab (1)
Crane Mountain: Crane East: Belleview Area: Lower Long Slab (1)
Crane Mountain: Crane East: Belleview Area: Springfield (10)
Crane Mountain: Crane East: Belleview Area: Unnamed Slab (3)
Crane Mountain: Crane East: Belleview Area: Upper Long Slab (1)
Crane Mountain: Crane East: Belleview Area: Water Slip Downs
Crane Mountain: Crane East: Black Arches Wall: Amphitheater (1)
Crane Mountain: Crane East: Caterpillar Cliff (2)
Crane Mountain: Crane East: East Nose (1)
Crane Mountain: Crane East: Measles Group: Above-the-Measles Wall (1)
Crane Mountain: Crane East: Measles Group: Campsite Wall (2)
Crane Mountain: Crane East: Measles Group: Lower Measles Wall (2)
Crane Mountain: Crane East: Measles Group: Upper Measles Wall (3)
Crane Mountain: Crane East: Scout About Slab (3)
Crane Mountain: Crane East: Scout About Slab: Left End Blockade (3)
Crane Mountain: Crane East: Slanting Cracks Wall: Prone to Wander Area (8)
Crane Mountain: Crane East: Slanting Cracks Wall: Underworld (4)
Crane Mountain: Crane East: South Corner Cliffs: Land of Overhangs (3)
Crane Mountain: Crane East: South Corner Cliffs: Long Play Wall (1)
Crane Mountain: Crane East: South Corner Cliffs: Mad Cows Wall (3)
Crane Mountain: Crane East: South Corner Cliffs: TeePee Wall (1)
Crane Mountain: Crane East: South Corner Cliffs: Upper Walls (8)
Crane Mountain: Crane East: South Corner Cliffs: Upper Walls: Animal Charm Wall (9)
Crane Mountain: Crane East: South Corner Cliffs: Upper Walls: Jammer Wall (6)
Crane Mountain: Crane East: The Laboratory (11)
Crane Mountain: Crane East: Waterfall Wall (13)
Crane Mountain: Crane West: Beaverview Cliff (4)
Crane Mountain: Crane West: Beaverview Cliff: Beardsley Buttress (1)
Crane Mountain: Summit Cliffs: Firecamp Wall (2)
Crane Mountain: Summit Cliffs: Sweeper Wall (1)
Crane Mountain: Summit Cliffs: The Prows
Harris Rift Mountain: Greek Crag (2)
Harris Rift Mountain: Harris Rift Cliffs (1)
Indian River Crag: Low Side (4)
Indian River Crag: Midship (8)
Kettle Mountain (2)
Moxham Mountain: Lower Ridge (7)
Moxham Mountain: Summit Dome (1)
Shanty Cliff (10)
Snowy Mountain: Summit Cliff (3)
Snowy Mountain: Tsunami Wall (1)
Lake Pleasant Quarry: Toy Story Wall (18)
Lost Crags, The: Lost Hunters Cliff: Main Face (5)
Lost Crags, The: Lost Hunters Cliff: Trailside Wall (2)
Lost Crags, The: Lost Hunters Cliff: Welcome Wall (1)
Lost Crags, The: Lost T Cliff (1)
Lost Crags, The: McMartin Cliff (2)
Moose Mountain (3)
Pinnacle Mountain: Main Face (3)
Pinnacle Mountain: Peanut Butter and Jelly Crag (18)
Pinnacle Mountain: The Peninsula (3)
State Brook: Biscuit Buttress (7)
State Brook: Monsters Wall (9)
Bald Mountain (1)
Eagle Falls (20)
Ice Cave Mountain: Raven Wall (1)
Goodman Mountain (3)
Lake Lila (aka Mt Frederica) (1)
Twin Falls Cliff (2)
Blueberry Hill: Blueberry Wall (4)
Blueberry Hill: Wonka Wall (3)
Frenyea (2)
Inman Slabs: Blackfly Slab (1)
Loon Lake Mountains: Easter Island (8)
Loon Lake Mountains: Easter Island: Upper Tier (1)
Loon Lake Mountains: Northwest Peak (1)
Loon Lake Mountains: Ramp Wall (5)
Loon Lake Mountains: South Crag (2)
Loon Lake Mountains: The Slab (4)
Loon Lake Mountains: West Crag (2)
Loon Lake Mountains: X Face (2)
Santa Clara Tract: The Pinnacle (4)
Silver Lake: Backwater Wall (2)
Silver Lake: C Chimney Cliff (2)
Silver Lake: Center of Progress (13)
Silver Lake: Little Potter Mountain (3)
Silver Lake: Mud Pond Cliff (19)
Silver Lake: Never Never Land (4)
Silver Lake: Potter Mountain Cliff: Shangri La (7)
Silver Lake: Potter Mountain Cliff: The Ghetto
Silver Lake: Potter Mountain Cliff: Upper East Side
Silver Lake: Wayback Cliff: Begonias Wall (5)
Silver Lake: Wayback Cliff: Mr Peabody Area (1)
Six Nations Crag (3)
South Colton (4)
❏The [now closed] campground parking has been improved with new gravel, so you no longer have to park on the road. The DEC sign marking the campground has been removed. Look for the fenced-in area and boarded-up campground host building.
❏The P1 and P2 fixed anchors of Freedom Flight [route #47, volume 1, page 50] have been upgraded.
❏The route Gun Control and the variation Gun Control Now should be ★★★★.
❏V1 (Mother's Day Variation) of Phase III [volume 1, page 39] should be ★.
❏V1 (The FM Direct) of The FM [volume 1, page 59] should be ★.
❏V1 of Spectacular Rising Traverse (aka SRT) [volume 1, page 62] should be ★★★.
❏V1 (Changing of the Guard) of Great Dihedral [volume 1, page 64] should be ★★.
❏V1 (Persecution) of Bloody Mary [volume 1, page 76] should be ★★.
❏V1 (Goombay Finish) of Fastest Gun [volume 1, page 78] should be ★★★.
❏V2 (The Cogito) of Fastest Gun [volume 1, page 78] should be ★★★.
❏V4 (Dunn Finish) of Fastest Gun [volume 1, page 78] should be ★★★.
❏V1 (Fastest Shark) of Shark Week [volume 1, page 79] should be ★★.
❏V1 (The Arch Crack) of Pilgrim's Progress [volume 1, page 87] should be ★.
❏V2 (Matrix) of Pilgrim's Progress [volume 1, page 87] should be ★★★★.
❏P3 (The Fingercrack Buttress) of Snow Blue [volume 1, page 87] should be ★★.
❏V1 (Munchky Microarête) of Earthly Night [volume 1, page 89] should be ★★★★.
❏V1 of Macintosh [volume 1, page 94] should be ★★★★.
Gear: Handful of cams from 3/8" to 1.25"; full set of RPs.
No Higher Authority 5.11d G 110' ★★★★
Demanding and sustained face climbing that follows the underside of a right-rising roof system.
Start: At the P1 anchor of Freedom Flight [route #47, volume 1, page 50].
◉ P1 5.11d G: Step right from the belay, climb left up to a short open book, then up this to some good holds on the right. Make a huge move right to an obvious small flake. Continue straight up through a serious of technical side-pulls and smears to the roof (a bit runout here on the easier ground). Pull through the first roof (crux) into a short, right-facing corner, then up to a flake. Undercling right on the flake to a final right-facing corner, and climb this up to a slab. At the last bolt, traverse right to join the last 15' of Freedom Flight to the fixed anchor. 110'
Gear: An optional yellow or green Alien reduces the runout to the roof.
Keep Off Flake 5.12b PG 180' ★★★★★
This demanding route has been cleaned and, after 43 years, freed. The fixed hardware has been upgraded. Double ropes helpful given the wandering nature of the route.
Start: From Sunburst Arête, walk right along the cliff base until a point just past the right-arching Keep Off Flake, which you can see on the wall above.
P1 5.10a PG: Starting on the right, wander up and left to the top of a block. Climb a face (bolt) to a comfortable ledge. Gear belay. 40'
P2 5.12b PG: Climb the right-facing flake to a stance on an edge. Undercling right, then up the corner to another stance. Continue up the corner, then undercling right to a difficult stance below the final corner. Climb the corner (RPs, bolt shared with In Vivo) to the top. Fixed anchor. 140'
Descent: Rappel with two ropes.
Gear: 3/8" to 2.5" cams, RPs. A 4" cam helpful.
In Vivo 5.12a PG (5.8 R) 170' ★★★★
As of 2022, the route has been recleaned and all hardware upgraded to modern standards. The follow description replaces that in the guidebook [route #173, volume 1, page 102]. The name refers to a method of experimental research that uses whole organisms, like animal testing. This gem of a route waited 30 years for someone to reclean and make it climbable.
Start: Begin on the right end of Keep Off Ledge (see Keep Off Flake), just right of a boulder perched on some blocks.
P1 5.12a PG (5.8 R): Climb rightward, then to the top of a thin pillar and the first bolt, then back left to vertical cracks in pink rock to a triangular orange scar. Up a small left-facing corner to reach the right end of Keep Off Flake, then face-climb past several flexing flakes to the tree ledge of the North End Rappel. 170'
Gear: Nine bolts plus cams from 3/8" to 1"; RPs, and a set of HB offsets (or equivalent).
Sharpening the Blade 5.12a PG 100' ★★★★
Much like its neighbors to the left, great climbing on great rock.
Start: On Keep Off Ledge, 20' right of In Vivo below a short, shallow left-facing corner.
P1 5.12a PG: Climb the corner and then move right to a bolt. Up the tricky face to a stance below a small overlap. A section of sustained difficulty yields to an easier crack. 100'
Gear: Small to medium nuts, RPs, and a single set of cams from 0.75" to 1.5".
❏P1 of Le Poisson [volume 1, page 112] should be ★★.
Poke-O Moonshine ● Slab
Left Side
Several routes have been discovered on the clean, black slab left of Catharsis [route #2, volume 1, page 107].
Let Them Eat Flake 5.5 PG 80' ★★
Start: From Catharsis, follow the cliffline left past a slab with a roof 15' up. Just pass this go up the steep slope, then up and right to the highest point of the terrain (now above the roof). This is also below the left side of the tree ledge 80' up, the same tree ledge where P1 of A Fine Line ends.
P1 5.5 PG: Go straight up the face past 2 bolts to a horizontal (small cam), then up to a hanging, left-facing flake (small nuts and cams). Undercling this to its top, then up the slab to a tree with a fixed anchor. 80'
Shake and Flake 5.5 PG 85' ★★
Climbs an interesting series of left-facing flakes.
Start: The right side of the tree-covered slope right of Let Them Eat Flake.
P1 5.5 PG: Step right on the slab to reach a shallow left-facing corner. Follow this as it leans left (piton), then straight up to a bulge with a flake whose right side looks chopped off. Over the bulge at this flake, then follow flake-jugs up and right to a ledge. Either walk right to the fixed anchor of Hot Bricks, or up and left to the treed terrace (in which case you can walk left to the tree anchor of Let Them Eat Flake). 85'
Gear: Standard rack to 1.5".
Hot Bricks 5.6 G (5.2 R) 120' ★★★
The longest route on this end of the cliff.
Start: 90' left of Catharsis at a large, double-trunked oak tree.
◉ P1 5.6 G (5.2 R): Go straight up the bolted slab (5.2 R at the bottom) to a bulge (small nut here, or a #0.4 or #0.3 Camalot in a flake also work). Up over the bulge to a ledge with a fixed anchor just below the tree ledge of P1 of A Fine Line. 120'
Poke-O Moonshine ● Upper Tiers
Headwall
❏P1 of Hydrophobia [volume 1, page 124] should be ★★★.
❏P1 of Flash Flood [volume 1, page 126] should be ★★★.
❏P1 of Retrograde Motion [volume 1, page 127] should be ★★.
❏V1 (Trilogy) of Darkest Africa [volume 1, page 130] should be ★★★.
Poke-O Moonshine ● Upper Tiers
Second Tier
❏V1 (After the Gold Rush) of Gold Wall [volume 1, page 136] should be ★★★.
Straight Shot 5.8+ G 40' ★
An alternative start to Bee's Knees. Could use additional cleaning.
Start: 15' uphill and right of Bee's Knees [route #95, volume 1, page 135].
P1 5.8+ G: Go up a ramp with fingercracks in a left-facing corner to a ledge. Make a hard move left to meet Bee's Knees just above at the roof. Finish the cracks of Bee's Knees to the top. 40'
Poke-O Moonshine ● West Side ● Carl Mountain Cirque
Southeast Wall
The southeast wall of Carl Mountain Cirque is mentioned in Adirondack Rock [volume 1, page 140] as "...sheer with several clean sections but offers no obvious lines of ascent." These routes are located on this wall, the leftmost wall in the horseshoe-shaped cirque of rock walls.
At the very lowest point of the terrain is a large, blunt arête where two walls meet; the left-hand wall faces south and the terrain goes steeply uphill; the right-hand wall faces southeast, and is steeper and taller.
Directions: There is a faster, more direct approach to the Cirque. From the parking, follow the Observer's Trail to where it joins an old road. Follow the old road to a newly cut "shortcut". After this shortcut rejoins the old road, continue 90' further and look for the obscure remains of a woods road on the left 617839,4916176, directly across from a large white birch. Turn left off the hiking trail and follow this obscure woods road northwest. The woods road becomes better defined and follows the right-hand side of a valley with a stream, past Little Deerfield Mountain. The terrain levels out at some rock fencing and old cellar foundations, some with recognizable doorways 617442,4917181. The woods road becomes faint here, but some cairns help. Continue north into the Cirque, a giant horseshoe of rock. The left side of the horseshoe is the Southeast Wall 617255,4917523 where these routes are located.
Smitty 5.7 G 100'
Start: On the south-facing wall, 30' uphill and left from the toe, at a 6'-tall, 2'-wide tombstone-like flake below an offwidth slot.
P1 5.7 G: Go up the flake past the offwidth slot into a right-facing corner. Go up the corner, then up cracks to a small overlap with a nose below it. Step right into a large open book corner. Up this, then into a right-facing corner with a chimney slot. At its top, continue up a face to a fixed anchor. 100'
Unnamed (project)
Closed project. Begin at the toe of the southeast-facing wall. Go up the blunt arête past a block, then step right and climb thin cracks in black rock to a good ledge with a fixed anchor (shared with the next two routes). 80'
Unnamed (project)
Closed project. Begin 15' right of the previous route at the left side of a roof 6' up. Up a crack past the left side of the roof, then past a bolt to a right-facing flake in black rock. Up this to a fixed anchor shared with the previous and next routes. 80'
Unnamed (project)
Closed project. Begin 10' right of the previous route (and 25' right of the prow) just right of a roof 6' up. Go up a deep handcrack to where it fades, step left to another crack, then left again to a slashy crack in black rock. Follow this up and left to a ledge with a fixed anchor shared with the previous two routes. 80'
Unnamed (project)
Closed project. Begin 20' right of the previous route (45' right of the prow) at a handcrack just right of a 2'-diameter maple tree, and just right of a left-facing corner with a roof 12' up. Follow the handcrack to a ledge, then up a right-leaning fingercrack to a right-rising ramp. Go up this 10' to a fixed anchor at its top. There appears to be a second pitch, partially cleaned with a fixed line. 80'
Unnamed 5.7 G 140'
Start: 15' right of the previous route (and 60' right of the prow) at a giant, double-trunked maple tree, below a shallow, rectangular inset slot 6' up.
P1 5.7 G: Go up past the slot to a right-facing flake. Follow this to its top, then go up and right on blocky terrain to a left-facing corner a chimney slot. Go up the slot, then break left to a fixed anchor shared with the previous route. 80'
P2 5.7 G: Step back right and climb a large left-facing left-leaning corner that is right of a sheer, orange face. At the top of the corner, go up an open book corner, then go left to a fixed anchor. 60'
Unnamed (project)
Closed project. Begin 60' right of the previous route, up on a higher terrace, below the left side of a right-rising, tiered roof system 25' up. Climb up to the roofs, then follow the roofs up and right to a right-facing open book. Up this to a ledge with a fixed anchor, 70'. For the second pitch, walk left on the left 20' to a cleaned swath of reddish-orange rock. Face climb up to a high fixed anchor. 50'
Unnamed (project)
Closed project. Begin 25' right of the previous route below a shallow, right-facing corner 15' up. Up the face to the corner, then up this to a shallow crack in black rock. Up this to where it fades, then step left to a sloping ledge (joining the previous route here). Up a right-facing open book to a ledge with a fixed anchor, 5.10+, 70'. For the second pitch, step left and climb a seam/fingercrack in a V-groove, past a horizontal, to its top.
Unnamed (project)
Closed project. Begin 4' right of the previous route at a shallow right-facing corner 2' up. Up the corner to a seam that opens to a handcrack. Up this, then up left-facing flakes in black rock to an overlap. Go past this on the left to the right end of a ledge. Step left to a fixed anchor shared with the previous routes, 5.8, 70'. For the second pitch, step right to black rock and climb a seam through an overlap. Continue up a black streak on hidden horizontals to a fixed anchor. 35'
Location: North of Westport in the Split Rock Wild Forest
Aspect: South
Height: 100'
Quality: ★
Approach: 25 min, easy
Summary: Large, inland cliff near Lake Champlain with some potential for new routes.
The Split Rock Wild Forest is known for the Palisades, the large cliff facing Lake Champlain. The Split Rock Cliff is inland with a much shorter approach, and offers an alternate destination when climbing in this area. This inland cliff is about 350' wide with generally clean, steep rock, in a very quiet, private valley with excellent views of Lake Champlain and some the High Peaks from the top.
So far the routes are concentrated on the left half of the cliff. The right half of the cliff is higher and has potential for many additional routes, but has considerable brittle rock.
There is a dirty, wooded corner right of No Monster that provides 3rd class access to the top of the cliff.
Be aware that this area is known for melanistic (black-colored) timber rattlesnakes. There's a large population of these little fellas from Westport to Willsboro.
Directions: Park as for Palisades [volume 1, page 141]. Follow the hiking directions past the 6 min fork. At 12 min, just past a subtle ridge in the woods on the left side of the trail, a cairn marks a faint old forest road that curves left 629862,4898732. (From the last intersection, this turnoff is 200' past the third culvert.) Follow the forest road, which becomes obscure, but some cairns mark a gentle uphill route, first through open pine woods, and then through unusual grasslands with scattered trees and rocks. Reach the cliff at 25 min at a striking, razor-thin, left-leaning crack 630224,4898988 of The Borehole Inspector, which is used as a landmark for the routes. This route with the razor-thin crack is at the lowest point of the cliff.
Watch for poison ivy in the talus below the cliff.
Third Edition 5.7 G 90' ★
Start: From the razor-thin crack of The Borehole Inspector at the lowest point of the cliff, walk 30' up and left on a wide terrace. Begin below the left end of a ledge 10' up with two cedars on it.
P1 5.7 G: Scramble up onto the ledge, then traverse past the cedars to the right end of the ledge. Climb a crack up and right to its end, and then climb straight up to the top. 90'
The Borehole Inspector 5.9 R 90'
Start: At the obvious razor-thin crack at the lowest point on the cliff.
P1 5.9 R: Climb the razor-thin crack to a small ledge on left. One hard move (crux) leads to another ledge (#0 Friend). Move up crack on good holds, then left towards Third Edition. Step left to finish. 90'
No Monster 5.5 G 75'
Start: On an arête formed by a right-facing corner 30' right and uphill of the razor-thin crack of The Borehole Inspector.
P1 5.5 G: Climb easily up the low-angled right side of the arête; when you reach some tree branches and loose looking blocks, step around to the left side and climb a few more feet up, then back right. 75'
Jack's Lament 5.8 TR 75' ★
Begin 20' right of No Monster at a pile of blocks. Follow a thin vertical crack to a brushy ledge. Step left and follow another thin vertical crack to overhanging orange rock. Move left and up through the overhangs to the top. There is a fixed rappel anchor on a tree 20' to the right.
Out of the Box 5.9- G (5.7 R) 85' ★★
Start: 30' right of Jack's Lament, just right of the bushy cedar, at the base of a white slab.
P1 5.9- G: Climb up and left across the slab onto the main wall. Climb through a small, low overhang and then up and left (5.7 R) to a nice stance (piton). Follow a thin crack straight up into the large box-like overhang. Exit left out of this (crux) and up to the top. There is a fixed rappel anchor on a tree just to the right. 85'
Gear: Standard rack plus a #3 Camalot for the overhang.
Location: North of Westport in the Split Rock Wild Forest
Aspect: Southeast
Height: 140'
Approach: 24 min, easy.
Quality: ★★★★
Summary: Large, inland cliff near Lake Champlain with some potential for new routes.
This is the second newly discovered cliff in the Split Rock Wild Forest. Like Split Rock Cliff, this cliff has a reasonable approach.
The 400'-wide cliff is divided into two sectors and is generally very steep.
Be aware that ground bees are active in several areas of this cliff.
Directions: Park as for Palisades [volume 1, page 141] 629145,4899096. From the parking lot (0 min), walk south across a small brook, then uphill to a forest road and follow it south. At 8 min, keep right at a fork and cross over an exposed, very large, old, rusty culvert pipe. You will come to an area where DEC is flagging to reroute the trail around a tiny corner of private land. 200' further, at 10 min, the road joins the yellow marked "Cross-Over Trail" 629163,4898529. Go south on the Cross-Over Trail as it gently climbs. At 18 min, find a cairn 629059,4898116 on the right side of the trail. (If you miss the cairn and come to a flat open area with a small stream crossing, you have gone about 1 min too far.) At the cairn, turn right and walk west through open woods following a dry stream drainage downhill. At 21 min reach a larger stream and cross it; the cliff runs downhill facing this stream. Turn right and travel downstream to reach the cliff at 24 min 629010,4898368.
The DEC has an online map of the Split Rock Wild Forest here.
This is the left-most sector 628987,4898273. It faces south and features a steep wall with the terrain rising to the left. In the middle are two chimney-like alcoves. The right side of this sector faces east and consists of 4th-class rock capped by large roofs.
To reach the top of the cliff, walk left to a deer trail that circles around a large block, then switches back to the right up to the top.
Descent from these routes is best by walking (climber's) left around the end of the cliff. Watch for bees.
Zig Zag 5.5 G 70' ★
Start: 160' up and left of the toe of the cliff, at a thin right-rising crack behind a dead tree and a live, squat spruce. This is 50' up and left from the two chimney-like alcoves.
P1 5.5 G: Go up and right, then diagonal back left on easy, loose rock. Diagonal up and right again to finish. 70'
Silhouette 5.7 G 140' ★
Start: At the lowest point of the terrain, at a cluster of small trees that grows out of the base of the cliff. After starting the route, you will see a large juniper at the top dramatically silhouetted against the sky.
P1 5.5 G: Climb up low-angled rock and then up to the top of a dark dome. Continue up low-angled rock to the base of a short, steep wall; up this (crux), to finish on blocks up to the juniper. 140'
Split Rock Canyon
Crime Scene Wall
In the center of the cliff 629014,4898317 is a 60'-tall, east-facing, 10° overhanging face laced by crack-like seams, a few horizontals, and peppered with holds. On the right side of this sheer wall is a ships prow-like arête (formed by two overhanging faces) that rises above a small boulder pile that stays dry, a good place to stash your gear out of the rain. Right of the cave is a gully that narrows to a chimney, the home of a porcupine family.
The cliff is a good destination for hot days, as the wall is shaded by tall trees, and there is a seasonal stream 80' in front of the face. The base of the cliff is open and pleasant, but there are some stinging nettles in the area. Also, watch for stinging thingies (e.g., wasps and bees), both in the ground and nesting on the cliff face. It may be wise to bring some projectile aerosol spray for this purpose.
You can reach the top of the wall by walking (climber's) right through boulders, then past a shorter "bouldering" wall, to a left-rising ramp. At the base of this ramp, go up a chute with a giant root, then scramble up the slope. Walk (climber's) left along the top of the cliff until past the wall, then walk down an easy gully (skier's) left to a flat area above the wall. There are several huge oak trees here that make convenient anchors from which you can rappel to the individual route anchors.
More recently, in addition to the seven independent routes, eleven linkups have been established that really maximize the climbing on this tiny cliff. They are all hard.
Click here for a topo of the wall.
Directions: Follow the normal approach to the yellow-marked "Cross-Over Trail". Follow this for 2 min to a cairn on the right. Turn right and follow a path through an A-frame notch formed by trees, cross a small stream, then go downhill, then turn left following the left side of a stream. In another 2 min, you will see the cliff across the stream; cross it and walk to the cliff through stinging nettles.
The Witness 5.12d/5.13a G 60' ★★★★★
Three distinct cruxes. The black cracks are wet in the spring; best to wait until summer/fall for this one. Extend draws 2, 5, and 8.
Start: 10' left of Climb Against Humanity are four right-leaning cracks in mostly black rock. Begin in the rightmost of these, just before the terrain staircases up and left.
● P1 5.12d/5.13a G: Climb the crack until you can move up and left across three more cracks (the first crux is moving from crack two to crack three). Hand traverse left along a horizontal seam, then up (second crux) to better holds below a final headwall. Devious moves up the headwall lead to a fixed anchor. 60'
Climb Against Humanity 5.13b G 50' ★★★
Crosses Criminal Minds at the 3rd bolt.
Start: At a boulder merged into the cliff face, 6' left of Criminal Minds, below a horizontal bucket 7' up.
● P1 5.13b G: Stick clip. Latch the bucket, then up sidepulls and compression moves (first crux) to a crack. Up this to a good horizontal break. Move right and go up the face to a final dynamic move leftwards to a hold (crux), then up to a stance on the right side of a mini-tower. Climb to the top of the tower and fixed anchor shared with Criminal Minds. 50'
Criminal Humanity (linkup) 5.12c G 50' ★★★
● This linkup provides another quality 5.12. Begin as for Climb Against Humanity. At the break, follow Criminal Minds to the shared fixed anchor.
On the Human (linkup) 5.12d G 70' ★★★
● Another fine linkup. Begin as for Climb Against Humanity. At the break, traverse right along the horizontal to join On the Take to the top.
Climb and Punishment (linkup) 5.13b G 70' ★★★
● The big daddy of linkups. This one requires a #10 stopper in a mailbox slot. (The stopper is good, and can be backed up with a #0.5 Camalot; unfortunately, that takes up the good hand position.) Begin as for Climb Against Humanity. At the break, traverse right along the horizontal to join On the Take for the crux. Continue right along a seam (#10 stopper) to join Punishment Fits the Climb to the top. As with many of the linkups, a couple long quickdraws are useful to reduce rope drag.
Punish the Human Enemy (linkup) 5.13a/b G 70' ★★★
● Another difficult linkup, and a tad easier than Climb and Punishment. Begin as for Climb Against Humanity. At the break, traverse right along the horizontal to join On The Take for that route's crux. Continue right along a seam (#10 stopper) and join Punishment Fits the Climb to the "walnut" pinch. Finish on Public Enemy.
Criminal Minds 5.11c G 50' ★★★
Aesthetic, devious movement on the traverse. Crosses Climb Against Humanity at the third bolt.
Start: Below a 15'-tall left-facing edge.
● P1 5.11c G: Up the left-facing edge to an overlap. Traverse left using the overlap to a crack, then up to a good horizontal break. Step left and climb up black, featured rock (5.9) to a right-rising ramp that forms the left side of a mini-tower. Fixed anchor on top of the tower shared with Climb Against Humanity. 50'
Criminal Climbs (linkup) 5.10+ PG 70' ★★★
◉ This linkup can be climbed completely on trad gear (or using existing bolts plus Camalots #1 and #0.75). Begin by climbing the initial crack of On the Take. At the horizontal, traverse left to join the top section of Criminal Minds to the top.
On the Take 5.12b G 50' ★★★
A nice crack on the first half followed by a hard and sequential upper half.
Start: At a left-leaning crack that snakes up the full height of the wall, 20' left of the overhanging arête that defines the right edge of the face. There's a flat boulder at the base.
● P1 5.12b G: Up the crack (5.10) to where it diminishes to a vertical, featured seam. Follow this (crux) to where it leans left again. Move up and right on jugs to a fixed anchor. 50'
Take the Punishment (linkup) 5.13a/b G 70' ★★★
● Begin on On the Take and climb this to the horizontal break. Traverse right along a seam (#10 stopper) and join Punishment Fits the Climb to the top.
Take the Enemy (linkup) 5.13a G 70' ★★★
● Begin on On the Take and climb this to the horizontal break. Traverse right along a seam (#10 stopper) and join Punishment Fits the Climb to the "walnut" pinch. Finish on Public Enemy.
Punishment Fits the Climb 5.13a G 60' ★★★
This excellent line takes a path up the left side of a discontinuous crack–seam that splits the face.
Start: 2' left of Public Enemy.
● P1 5.13a G: Go straight up the face making long moves between horizontals. Move left, to some slash cracks, up these, then go back right to a slanting hold shared with Public Enemy. Move up to the "walnut" pinch, then go left on crimps and sidepulls to make a final deadpoint to a jug. Mantel up to a fixed anchor shared with Public Enemy. 60'
Punishment Enemy (linkup) 5.12d G 60' ★★★
● Go up Punishment Fits the Climb to the "walnut" pinch, then finish on the crux of Public Enemy.
Public Enemy 5.12c G 60' ★★★★
Absolutely superb with a dramatic deadpoint finish.
Start: Below the discontinuous crack–seam that splits the face and begins just left of the overhanging arête on the right side of the face.
● P1 5.12c G: Climb up to a horizontal crack, then go straight up to a good incut face hold. Move right 6' to a jug–sidepull, then up to a horizontal seam. Follow this up and left 10' to a slanting hold at its end shared with Punishment Fits the Climb. Move up to the "walnut" pinch, then move up and right to better holds. Step up onto a ledge, then go left to a fixed anchor shared with Punishment Fits the Climb. 60'
Public Crime (linkup) 5.12a G 60' ★★★★
● This linkup is every bit as good as the original routes. Begin as for Public Enemy. At the first horizontal (or higher at the jug-sidepull), step right and finish on Partners in Climb. This avoids the tall-person start to Partners in Climb.
Partners in Climb 5.12a G 55' ★★★★
The route climbs the arête formed by two overhanging faces. Incredible positions.
Start: At the tippy top of the boulders beneath the overhanging arête that defines the right side of the wall.
● P1 5.12a G: Stick clip, then pull onto the face and climb up the overhanging prow for 15'. Continue up the left face with increasing difficulty to a final pair of holds, then (V1) slide right around the arête to better holds. Step up onto a slab, then reach left to a fixed anchor. 55'
V1 5.12b G: Go straight up to the anchor. This changes the overall grade to 5.12b.
Partners in Public Punishment (linkup) 5.12d G 60' ★★★
● Begin on Partners in Climb and climb this route until just before the crux. Traverse left and join Public Enemy. At the "walnut" pinch, move left and finish on Punishment Fits the Climb.
Partners in Public (linkup) 5.12c G 60' ★★★★
● Yet another linkup, which [again] is as good as its neighbors. Begin on Partners in Climb and climb this route until just before the crux. Traverse left and join Public Enemy in the crux of that route.
Location: South of the intersection of US 9 and NY 73 (Malfunction Junction), accessed from the Underwood Club property boundary.
Aspect: Northwest and southeast
Height: 100'
Quality: ★★★★★
Approach: 35 min, moderate
Summary: A narrow canyon with well-established ice climbing, and several spectacular rock climbs.
Underwood Canyon, named for its proximity to the Underwood Club, is a narrow slot canyon with steep walls on both sides. The left side of the canyon with many of the rock climbs faces northwest and stays in shade until 4:00 PM. All winter routes with the exception of White Fang are on the left side of the canyon. The right side of the canyon faces southeast, and the rock is somewhat cleaner. The canyon has about two dozen winter routes (both pure ice and mixed), about half of which are documented in Blue Lines 2. The potential for additional rock climbs here is substantial.
The floor of the canyon is narrow, in places 40' wide, and chocked with boulders, downed trees, stinging nettles, chest-high ferns, bogs, and some open pools. Fortunately, the established climbs are near the mouth of the canyon, so you don't have to navigate much of this.
Directions: From Malfunction Junction (the intersection of US 9 and NY 73), drive towards the Northway (I-87) for 0.3 mile, make a U-turn and park next to the wire guiderail on the right (north) side of US 9 605500,4883596. This is well within view of the junction. On the left (south) side of the road you will see many red POSTED signs. Walk towards Malfunction Junction and locate the last red POSTED sign, clearly visible from the road; this is the intersection between state land and the Underwood Club. (To confirm, there is a yellow-painted iron pipe marking the boundary just inside the woods.) Enter the forest here and follow the property boundary, which has been cleared and marked with ample red trail markers, making it very easy to follow. The path goes gently uphill as it slowly veers away from US 9. At the top of a hill, the path makes a 90° turn to the right 605586,4882753; follow this and descend into a marshy valley. Cross a stream several times, then make another 90° turn 605030,4882677, this time to the left, and go steeply uphill. When the angle eases, look for a large boulder (with a cairn on top) located in the middle of the boundary line 605051,4882512. Turn right 45° and bushwhack 200' into the mouth of the canyon. The first wall you see is on the right side of the canyon. Continue a little further to the first large wall on the left 604947,4882330, with an open pool along the base. This is directly opposite the winter route White Fang. Total distance is 1.1 miles, and takes about 35 min. (From parking to first turn is 2,780'; first to second turn is 1,841'; second turn to cairn is 545'; cairn to cliff is 687'.)
Access: The cliff with the rock climbs is located on state land. However, the far right end of the cliff—several hundred yards to the right of the rock climbs and just right of the winter route Karen's Crack—is on Underwood Club property and is off limits.
The left side of the canyon, facing northwest. A nice feature is that you can scramble up a gully on the opposite side of the canyon and have an amazing view of the wall—a great place to take photos.
The top of the climbs can only be reached by a 50' rappel over a loose, steep slope. If you must reach an anchor this way, scramble up a 4th-class gully about 50' up and left of Cool Like Dat, and have bystanders stay in close to the cliff to avoid rockfall. The easiest anchor to reach is One Route to Rule Them All, since it's just below the rim of the cliff at its highest point.
One Route to Rule Them All 5.12a G 130' ★★★★★
A good warmup. The first half of the route ascends an overhanging wall with mostly large holds to a ledge with a mid-pitch anchor 70' up (lower from here if it's raining). The upper half goes up an exposed arête and face with mostly easier face climbing.
Start: 20' left of (and uphill from) Cool Like Dat on a small platform below several left-leaning, right-facing corners in an overhanging, black-and-white wall.
● P1 5.12a G: Go straight up past the corners to a blankish, overhanging section. Make a long move up to incut crimps, then up a V-groove to a large ledge with a fixed anchor (there is a raven's nest 10' right in a cave). Move left off the ledge and climb a black arête and face straight up, easy at first, then with increasing difficulty (10+) to a fixed anchor at the top of the cliff. 130'
Cool Like Dat 5.13a G 100' ★★★★★
From the ground, this route looks wet, dirty, and unappealing. But looks couldn't be more deceiving—it's long, overhangs 20', and has great holds on moderately-good rock. The climbing movement is exceptional and satisfying, nothing too hard, but the pump builds; a classic endurance route. It's one of the few routes in the park that stays totally dry in the rain (Kingdom Come at the King Wall is another such route).
Start: On some rocks at the very left end of the narrow pond that sits below the face. Just left, the terrain rises steeply uphill.
● P1 5.13a G: Go up 10' on good edges to where the angle changes. Continue up yellow-ish rock to a good jug, then punch it up to another good rail. Continue up another hard sequence (crux) to a cave. Exit the left side of the cave, then traverse right along the lip of the cave to a stance. Move up and left on well-spaced holds to a right-rising crack. Go past this to a final long move up and left to a jug at the top. Fixed anchor. 100'
The Undertaker 5.13a/b G 80' ★★★★★
Harder cruxes but better rests than its neighbor to the left. Overhangs 12'. There are multiple solutions to unlock the two cruxes, each of them nails hard.
Start: 15' right of Cool Like Dat, in the middle of the narrow pond, on stepping stones below a right-facing flake 8' up.
● P1 5.13a/b G: Step across the pond, stick clip, then go up the right-facing flake to sloping shelf and no-hands rest. Crimp up a black wall laced with horizontal seams (1st crux) to a good flake-jug on the right. Rest up, then move left, then up and right following sharp-edged underclings (2nd crux) to a fixed anchor. 80'
Iron Butterfly 5.8+ G 90'
Considerably dirty and not recommended in its current condition. Was the first summer route completed in Underwood Canyon.
Start: Locate a right-facing corner high on the cliff, 80' right of Cool Like Dat. Begin below a short, right-facing, right-leaning corner below the major corner above.
P1 5.8+ G: Ascend the short corner to its top, then up (bolt) to gain the upper corner. Climb a crack in the tan-colored left wall of the corner to its end (bolt), then angle up and right to the top. 90'
Welcome to the Jungle (aka Thunderwood) 5.12d G 90' ★★★
Ascends the distinctive tan strip in black rock high on the cliff.
Start: 100' right of Cool Like Dat and 20' right of Iron Butterfly, below a black, 10'-high, left-facing open book that begins 8' up.
● P1 5.12d G: Go up the open book, then move right up blocky terrain to an overlap below an overhanging wall with a shallow, left-facing edge. Layback over the overlap (crux) using the left-facing edge to better holds and a sloping ledge. Continue up the delicate face on the left side of the tan streak (5.12a) to a fixed anchor. 90'
This side of the canyon faces southeast. However, due to the narrow canyon walls, it stays shadier than most crags with this orientation.
To reach the top of the cliff, walk back on the trail 50', then go easily up a gully to the top. This is a great place to take photos of the northwest-facing side of the canyon.
Soil Sample 5.9 TR 80'
Begin 150' left of Cherty Girl on a black face that doesn't reach the ground, at a right-facing, right-leaning corner. Move up to a jug, then left around the corner and onto the face. Go up a left-facing, left-leaning corner, then back step right into a shallow groove. Go straight up to a roof, then up to the top of the wall.
Cherty Girl 5.10c G 70' ★★★★
A good warmup with a band of unusual, brown, chert-like rock welded into the anorthosite. You can reach the anchors from the top.
Start: At a right-facing corner 40' left of Ultra Instinct and 10' left of an open pool of water (the pool formed below the ice climb White Fang). The right-facing corner zig-zags up to form a roof 30' up.
● P1 5.10c G: Climb the arête of the right-facing corner to good, incut horizontals on the face. Continue up past the brown welded rock to some underclings, then up a thin face (crux) to ledge. Follow a right-facing flake-crack to a fixed anchor at the top. 70'
The Notorious 5.12d G 80' ★★★★
Another odyssey that trends rightwards up an amazing wall. The large, mid-height roof provides a distinct crux; harder if you're short.
Start: 20' left of Ultra Instinct at a chest-high roof, behind a pond that marks the base of the ice climb White Fang.
● P1 5.12d G: Muscle over the roof and up to another, smaller roof. Move over this, then rightwards to mantel onto the top of a triangular pod below the large roof. Move right to a stance under the roof; over this (crux) on sloped holds to a prominent horizontal crack. Traverse straight right, then up to the top edge of a prominent, 6'-high, right-facing, tongue-like flake. Go up a faint crack in a tan-colored face to another roof. Over this, then step right to another roof and a fixed anchor just above. 80'
Ultra Instinct 5.13a G 70' ★★★★★
This special route is characterized by technical traversing across a face to a boulder problem finish. This arching feature just begs to be climbed. The route is capped by a large overhang and therefore stays dry in the rain, unless it's also windy. The route was soft 5.13a, but a key rest-jug pulled off on Jul 26, 2020, combining the two crux sections into a single, long, bouldery crux. The new version was led, then on a repeat, a key hold from that broke off, adding even more difficulty. Hopefully the route won't shed any more critical holds! A permadraw facilitates clipping in this sustained section.
Start: On the southeast-facing wall directly across the canyon from Cool Like Dat, 25' below the left end of a right-arching angle-change in the wall (where the off-vertical slab joins the overhanging wall above). This is 20' right of the winter route White Fang, which has a small pond at its base.
● P1 5.13a G: Stick clip. Boulder up to a ledge at the base of the arch. Follow the arch up to a small roof, then continue the line traversing up and right to a right-hand pinch below a bulge in the wall above. Boulder up the bulge (V6) to a slab, then more easily up to a giant roof with a fixed anchor on the underside. 70'
Burly Squirrel 5.10d G 90' ★★★
Start: Walk right from Ultra Instinct below a wet black wall, then go partway up the gully that leads to the top of the cliff. Begin below a left-facing, left-leaning corner 6' up.
P1 5.10d G: Undercling straight left then up the left-facing, left-leaning corner. Go up over a bulge, then leftwards again. Move up the face past a ladder of evenly-spaced horizontals to a large, right-rising overlap. Go straight over this, then up an easier face to the tallest point on the cliff. 90'
Gear: Standard rack to 2", with extra finger-sized cams.
There's been quite a bit of activity here since the second edition [volume 1, page 150]. The cliff has yielded some excellent, hard routes. Unfortunately, there are no easy warmups.
The cliff is now divided into two sections. The far left end is known as The Amphitheater and is capped by an enormous 25'-deep horizontal roof. The wall is overhanging, stays mostly dry in the rain, and has a shady base, so it's good for hot days. The right end of the cliff is the Main Face. There is a wide terrace that splits the cliff into an upper and lower section. The upper section overhangs 35 degrees and is where the routes are located. The Main Face and terrace stay totally dry in the rain, and it's sunny here in the afternoons.
Directions: There is now a good path to this area, reducing the approach to about 45 min. From the base of Springtime [route #2, volume 1, page 149], walk away from the cliff on a good path to some open slabs. Turn left and walk through some trees to another open slab area. Follow this south parallel to the highway, down a steep slope, and onto the west side of a beaver swamp. Traverse around the edge of the swamp to the south end, then go directly south through a narrow canyon paralleling the Northway. At the other end of the canyon pick up a trail that heads southwest, then west. The trail crosses a seasonal stream, then some open slabs, then meets the stream again at a waterfall. Go up the waterfall and continue west to a narrow, boulder-filled canyon just before the height of land. The Main Face is just above you to the right.
Directions: From the Main Face, walk left along the base of the cliff to a beautiful amphitheater capped by a dramatic, 25'-tall roof.
The Fountainhead 5.11d G 60' ★★★★★
This begs-to-be-climbed line breaks the 20'-deep horizontal roof on its left side. May help to be short. This is the biggest horizontal roof with a free route in the Adirondack Park.
Start: Below the left side of the enormous roof, at a bulging face.
P1 5.11d G: Go up the bulging face to a white boulder jammed under the roof (despite appearances, this boulder is solid). Up this to an amazing roof-crack in an offset corner. Undercling left out over the void with increasing difficulty to the lip of the roof. Break the roof and climb another 6' to a fixed anchor. 60'
Gear: Single set of cams from yellow Alien to #2 Camalot. Once you clip the anchor, place a directional to keep the rope out of the crack.
Judgement Day 5.12c G 80' ★★★★
This thuggy, gymnastic, technical line breaks through the roof on its right side. Hand tape and a right knee pad help.
Start: On the right side of the enormous roof, just left of a deep, dirty, V-corner.
● P1 5.12c G: Stick clip, then boulder onto the orange face and climb shallow, left-leaning cracks up the overhanging wall to the roof. Rail right 6' to the right side of a chockstone, then make powerful moves up to a layback flake (crux). Layback desperately up the flake to a great jug at its top, then make hard moves left to good holds. Move up to the left side of an overlap, then climb up and right (easier, runout) to a fixed anchor. 80'
Ain't No Thang 5.12a G 70' ★★★★
An incredible, sustained journey up a black, overhanging wall with a little bit of everything: jugs, heel hooks, jamming, and big moves between crimps. Hand tape (up to your elbows) and a right knee pad help. To avoid rope drag, unclip the 4th quickdraw after clipping the 5th, and have the belayer unclip the first draw.
Start: Begin on the right side of the amphitheater, just left of where the terrain rises steeply to the right, at a left-rising flake on an overhanging wall.
● P1 5.12a G: Follow the rail up and left to where it meets a right-leaning offwidth crack. Go up the offwidth using jammed chockstones to an alcove, then jam straight left using a horizontal handcrack (#1 Camalot). At its end, layback up to a huge jug (crux), then go straight up the overhanging wall to a fixed anchor. 70'
Second-Hand Lichen 5.8 G 60' ★★
Noteworthy in that it is (by far) the easiest route at the cliff.
Start: 50' from the left end of the most overhanging section of the wall at a left-facing, right-leaning ramp with good cracks in the corner.
P1 5.8 G: Go up the crack in the corner of the ramp to a roof. Step left over the roof and climb another crack to the top of the ramp. (A well-placed piece helps keep the rope out of the crack here.) Continue straight up to the top. Wall left to descend a gully. 60'
Off the Couch 5.13b G 50' ★★★★★
This masterpiece climbs an unlikely sheer wall that overhangs 35 degrees. Three distinct cruxes.
Start: Locate Crown Crack, the left-leaning crack that begins on the terrace that divides the right end of the cliff. Begin 15' left of the crack just left of two flat boulders and below a shallow overlap 7' up.
● P1 5.13b G: Stick clip. Undercling up into the overlap, then use sidepulls to gain a good ledge. Move up to the next horizontal and rail left to a good hand jam. Go straight up to a rail, then up to a flake. Go up the crack (shared with Crown Crack) to a ledge. There's a fixed anchor just above. 50'
Crown Crack A2 0'
[route #1, volume 1, page 150]
The Warmup 5.13c A0 45' ★★★★★
Closed project. Another pump-fest up the most overhanging section of The Crown. This one lacks any rests.
Start: 6' right of Crown Crack at an obvious left-leaning layback flake in black rock.
● P1 5.13c A0: Stick clip, then go up the layback flake to its top. Shift right and climb a black streak to a rail. Go up and right along the rail, then straight up to a fixed anchor over the top. 45'
Over The Edge 5.6 G 60'
Start: On the right end of the terrace.
P1 5.6 G: Scramble up boulders to the arête that forms the right end of the wall. Climb the face just right of the arête to the beautiful, open summit area. 60'
This small, 75'-wide canyon is in the same drainage as The Crown, but much further east 605172,4880656. The main cliff is narrow, overhanging, and about 70' tall. Across the canyon is another cliff, mostly dirty, with a single, cleaned swath of excellent stone; the route Jennafactor is here.
Directions: From the waterfall, follow the cliffline left into a gully. Walk up to the head of the gully, over some boulders, and into a tiny canyon. The main cliff is on the right, facing southwest.
Jennafactor 5.7 G 70' ★★
Great holds on this one.
Start: Directly across the canyon from Poster Boy at the base of a cleaned slab.
● P1 5.7 G: Go directly up the slab to a fixed anchor. 70'
Poster Boy 5.10b G 70' ★★★
The first route here, and a good warmup for other routes at The Crown.
Start: In the center of the face below the left end of a left-facing, right-leaning corner that begins 12' up. This leaning corner defines the left edge of the overhanging wall of Stone Cold.
● P1 5.10b G: Make some insecure palm-slapping friction moves to gain the ramp. Go up the ramp to near its top, then step left and climb an overhanging wall to its top. Mantel onto a slab (crux) and up to a fixed anchor at the very top of the wall. 70'
Stone Cold 5.12c G 55' ★★★
A direct route up the smooth, overhanging main wall. Requires powerful pulling on good edges.
Start: 15' right of Poster Boy below the main, overhanging wall, and just left of a dirty depression.
● P1 5.12c G: Mantel up into a scoop below the overhanging wall. Shuffle right, then back left on two rails. From the rails, go straight up to the top of the face, and onto a ledge at the top. Continue up the slab to a fixed anchor shared with The Bionic Woman. 55'
The Bionic Woman 5.10a G 60' ★★
A one-move wonder, but oh, what a move.
Start: On the right side of a blunt, crack-riddled arête, just right of a large tree pasted against the rock 2' above the ground.
P1 5.10a G: Go up and left behind the tree to the arête, and climb this to a wide ramp. Go up the ramp a few feet to a horizontal on the left wall. Traverse wildly left and mantel up (bolt, crux) onto a ledge. Continue up the face to a fixed anchor (shared with Stone Cold). 60'
Gear: To 2".
Location: Near the Northway (I-87) Exit 30.
Aspect: Southwest
Height: 80'
Quality: ★★
Approach: 1 hr 10 min, difficult
Summary: Two high-quality climbs in a quiet, remote setting.
As the name suggests, The Beyond is farther than everything else...farther than King Philips Spring Wall, the Highway Blues Slab, Steve Austin, and The Crown. It's located in a quiet, remote valley southwest of The Crown and has beautiful views of the rocky east-facing flanks of Spotted Mountain and East Dix (now Grace Peak).
The cliff is broken up and wide. The routes are located on the highest section of rock, below and left of a left-rising, stepped overhang that breaks the cliff a third of the way up. The rock here is excellent with that High Peaks coarseness (reminiscent of Wright Peak), and many excellent hidden horizontals for gear. There is limited potential for additional routes.
Directions: From the Amphitheater at the left end of The Crown, walk west 200' out of the canyon 604799,4881041. Bushwhack southwest on a bearing of 245°. Visibility is limited, and, once out of the canyon, the terrain is gently rising, but the hardwood forest is relatively open. After 20 min arrive at a remarkable 40'-tall, egg-shaped boulder perched on a slab near the summit 604328,4880796. Just beyond the boulder, and below you is the cliff. Walk downhill staying skiers left of the cliff until you can break right under the main face 604117,4880716, about 25 min from The Crown.
Land of Snake Believe 5.9 G 80' ★★★
Excellent climbing, great gear, impeccable rock. Named for the snakeskins found in just about every horizontal crack on the cliff.
Start: On the left side of the face, just where the terrain rises steeply uphill, is a hidden left-leaning crack that runs nearly the full height of the cliff. Begin 10' right at a smaller left-leaning crack–flake that leads to a 10'-high, right-facing corner that leans 45° to the right.
P1 5.9 G: Go up the left-leaning crack past some blocks to the base of the 45° leaning corner. Step left onto the face and climb straight up a series of left-facing flakes and horizontal cracks to a bulging overlap. Layback up the right side of the bulge (crux) to excellent horizontals. Continue up an easy slab to a comfy bench-seat ledge. There's good gear here, or you can scramble up further to anchor on trees. 80'
Above and Beyond 5.11a G 80' ★★★
Another excellent and unlikely line. Harder if you're under 6' 4".
Start: 15' right of Land of Snake Believe below a slab, just right a white pine tree growing next to the cliff.
P1 5.11a G: Make a couple slab moves to gain a good stance on a shelf (small TCUs here). Continue up through a couple overlaps to a shallow left-facing corner. Up this, then reach right to a smaller left-facing corner and mantel up onto the slopers at its top. Make a few face moves up and right to some sidepulls, then go back left and make a hard barn-door move up to jugs (bolt, crux) and good horizontals. Follow a low-angle left-facing corner to the top. 80'
❏The route Leap of Faith [route #3, volume 1, page 151] has been regraded 5.13a.
Bozeman Bound 5.11a PG 100' ★★★
Great crack climbing with some height-dependent moves. Good hands, sparse feet. P1 provides an easy way to access the P1 anchor of Tombstone, in case the normal first pitch is wet.
Start: At a right-facing, left-leaning corner 8' left of Tombstone [route #8, volume 1, page 157].
P1 5.4 PG: Climb the left-leaning, right-facing corner past a tree, then step out right, go up a face, then scramble up blocky terrain to the fixed anchor shared with Tombstone P1. 45'
◉ P2 5.11a G: Step left from the belay and follow a left-rising horizontal seam for 12' to where it meets a vertical tips-crack. Make a hard move to get established in the tips-crack and follow this to where it widens, then more easily up to a fixed anchor in an alcove. 55'
Gear: P1 accepts a few smaller cams. P2 takes an optional #0.75 Camalot.
Sausalito 5.10d PG 100'
[Between routes #8 and #10, volume 1, page 157]
Climbs the face and small crack between Warpath and Bandito. A little contrived in that you have to purposefully avoid Warpath for gear and holds.
Start: Same as Bandito.
P1 5.10d PG: Climb Bandito past its bolt, then move left and follow a faint crack and face holds to a roof. Over this (crux), then up a crack with a couple horizontals to the fixed anchor of Warpath. 100'
Once Upon a Climb in the Northeast 5.10c G 50' ★
Chossy, and some placements are in questionable rock. The rusty piton is critical.
Start: 20' right of Sundance [route #19, volume 1, page 160] at a slab below a left-facing corner.
P1 5.10c G: Climb a slab to reach a finger slot in the bottom of the left-facing corner. Go up the left-facing corner (piton), then move right onto the face and up to a jug. Make a hard move up a decomposing crack to [unstable] jugs that lead to a fixed anchor. 50'
Gear: Standard rack to #0.75 Camalot; doubles through #0.5 Camalot.
Sioux City Sarsaparilla 5.10a PG 100' ★★
Great movement and exposed positions, but some questionable rock (this middle section of Deadwater is chossy). Watch out for poison ivy in the talus around the base, and the extensive poison ivy on the tempting rest-ledge half-way up (it is easily avoided by the climber, but maybe not when pulling the rope).
Start: On a small rock pedestal in a shallow, right-facing corner 35' right of Once Upon a Climb in the Northeast.
P1 5.10a PG: Up the face to a jug (bolt), then into a large right-facing corner. Up the corner, and several more corners a slab, then (V1) up and slightly left through exposed roofs to a fixed anchor. 100'
V1 5.10c/d TR: At an alcove in the roof, move right of a tight seam on a beautiful shield of rock. Some tough moves to gain the anchor ledge.
Gear: Doubles to 1".
It's On Ya! 5.9 G 70' ★★★
Good climbing.
Start: In a right-facing corner 8' left of Welcome to Deadwater.
P1 5.9 G: Follow the right-facing corner (crux at the bottom) straight up to a slab below a large, square roof. Up the slab to the roof; break through this on the right to a fixed anchor just above. 70'
Welcome to Deadwater 5.10c G 50' ★★★
Start: At a left-facing corner 5' left of Widow's Blood.
P1 5.10c G: Follow the left-facing corner (crux) through an overlap, then drift right to a fixed anchor. 50'
Bambi 5.5 G 70' ★★
Start: 3' left of Buffalo Bob.
P1 5.5 G: (V1) Climb up a fingercrack, then step left and climb a wide crack to the top of a mini-tower on the arête. Continue up the arête and face to a fixed anchor. 70'
V1 Widow's Blood 5.6 G: Begin at the base of the arête with a 4'-high shelf. Climb up the arête using cracks on either side to the top of the mini-tower.
Buffalo Bobby 5.9 G 70' ★
This is a variation to Buffalo Bob [route #21, volume 1, page 162].
Start: Same as Buffalo Bob.
P1 5.9 G: Go up the Buffalo Bob corner to its top. Instead of heading right to the shared anchor with Reach for the Sky, stay in the corner up to a thin roof. Go left under the roof to a fixed anchor above Bambi. 70'
Fistful of Dynamite 5.8 G 70' ★★
This route borrows somewhat from Reach for the Sky, but has plenty of independent climbing at a more moderate grade. Can be used to set a toprope on Reach for the Sky.
Start: Same as Reach for the Sky [route #22, volume 1, page 162].
P1 5.8 G: Start up Reach for the Sky to where that route breaks right. Continue straight up to a 3'-tall handcrack. Go up this, then into a stem box capped by a roof. Pull the route on the right side to a ledge. Continue up a crack to the fixed anchor shared with Reach for the Sky. 70'
Gear: To #3 Camalot.
❏Variation to Do You Feel Lucky [route #1, volume 1, page 163]:
V1 Gentle and Soft 5.9+ R: Begin 15' right and climb the striking fingercrack using pods for 15', then mantel a sloping ledge. Traverse left 15' (crux, unprotected) to join the normal route to the top.
Blind Stoke 5.11b G 100' ★★★
[Between routes #5 and #6, volume 1, page 163]
A good route with a brief, well-protected, crux on excellent rock. The easier climbing has some subpar rock.
Start: 40' right of the large roofs at a left-leaning crack system in a steep wall.
P1 5.11b G: Climb up to an alcove 10' up. Move left to another crack and up into a smaller, higher alcove. Follow left-leaning seams (crux) to where the angle eases. Go up an easy slab to join Josey Wales [route #5, volume 1, page 163] to the top. Fixed anchor on a tree. 100'
Gear: To 2".
❏Although still names "Sharp Bridge Campground", the signs on the road read "Sharp Bridge Campsite".
❏There is a fixed anchor at the top of Rumble Strips.
Directions: (2021: This has been updated to reflect changes in the campground configuration.) Before the campground gate, bear right past a gate and downhill into a picnic area. Follow the dirt road parallel to a stream to a fork. The left fork leads to a camp site; you bear right and proceed to a trail register. Continue on the trail to a wood bridge; 50' beyond the bridge, angle off left and follow a well-worn path (on a bearing of 105°) for 10 min to the base of the cliff 606491,4877272, arriving at the left end.
Last But Not Least 5.7 G 40' ★
Start: 10' left of Short Sharp Shocked [route #1, volume 1, page 164] and 3' left of a large A-shaped alcove, at a smaller, round waist high alcove.
P1 5.7 G: Go straight up using the crack on the left. Finish in the short wide crack at the top. 40'
[route #1, volume 1, page 164]
[route #2, volume 1, page 164]
Perception 5.8 G 60' ★★
Start: Same as for Guide's Gift.
P1 5.8 G: Instead of moving left as for Guide's Gift, go straight up the face (2 bolts), then up a fragile, shallow, right-facing corner. Some blocks lead to the top. Tree anchor. 60'
[route #3, volume 1, page 164]
[route #4, volume 1, page 164]
[route #5, volume 1, page 164]
Clippin' Chippies and Dustin' Beavers 5.9+ G 70' ★★
Start: Directly between Sharp Bridge and Gifts of Promiscuity at a right-facing corner that begins at ground level.
P1 5.9+ G: Climb the corner to its top at a triangle-shaped roof. Step left and make a difficult move to gain a crack above. Continue up the crack system on the face (crux) to a fixed anchor shared with Gifts of Promiscuity. 70'
Gifts of Promiscuity 5.10b G 70' ★★★
Perhaps the best route on the wall; sustained.
Start: 4' left of Monkey at some small ledges below a shallow, right-facing corner. The first ceiling of Day Tripper 12' up.
P1 5.10b G: Mantle onto the small ledges and clip a bolt. Work your way up to the crack (shared with Day Tripper), then continue to the ledge beneath the second roof with a small tree. Step left onto the gently overhanging face and work your way up the two parallel cracks (crux). Make a couple of difficult moves straight up to the large ledge and fixed anchor. 70'
[route #6, volume 1, page 164]
[route #7, volume 1, page 165]
V1 5.6 G: New variation. At the top of the corner, traverse right a couple steps around a small arête, then scramble to the top. This alternate finish reduces the overall grade of the route to 5.6, although is less aesthetic.
Monkey in the Middle 5.10- TR 80' ★
Begin 10' right of Monkey [route #7, volume 1, page 165], at a chimney crack that narrows to a seam higher up. Go up the chimney and enter the seam (crux, easier if tall), then follow the seam past ledges to the top. Would be R on lead.
[route #8, volume 1, page 165]
Second Shift 5.10c G 80' ★★★
Two short, quality pitches. The upper pitch has great position.
Start: At a right-facing, right-leaning corner with a crack, below the right side of the terrace-ledge (mentioned in the crag description). This is below a large prow that defines the right side of the wall above the ledge, and there's a good ledge at the base of the right-leaning corner.
P1 5.8 G: Go up the crack to its top. Step left and go straight up to a short, right-facing block. Go over this (crux), then rail left and mantel onto the large terrace-ledge. There is a fixed anchor on the ledge. 40'
P2 5.10c G: Layback and face climb up a seam past two bolts to a fixed anchor at the top of the wall. 40'
Gear: Small cams and nuts.
❏The route Mushu [route #6, volume 1, page 171] has been regraded 5.13c.
❏The route Juicy Fruit is ● and more like 5.11c.
❏The route Boyz in the Hood is ●, and has a lower fixed anchor that avoids the dirty finish.
❏The route Awesome Sauce [route #5, volume 1, page 171] is ●.
Mushu Lite (linkup) 5.13a G 0' ★★★★★
Can the linkup be better than the original? You decide. Climb Mushu's excellent, burly, knee-bar cave to the ledge rest, then step left and finish on the steep, dynamic face of Awesome Sauce. Avoids the V10 dyno of Mushu's original finish.
Roy Batty 5.10a G 50' ★★★
Start: 20' left of a dirty gully in a left-facing corner.
P1 5.10a G: Use jugs on the left side of corner to attain the single bolt. Traverse left onto the face and follow vertical cracks to the top. End at a fixed anchor (shared with Toes Where They Don't Belong). 50'
Toes Where They Don't Belong 5.9 G 50' ★★★
A clean, excellent route that will test your balance and has a great finish. The moves are tricky but well-protected; somewhat height dependent.
Start: Immediately left of a dirty gully, which is 15' left of Frosted Fern [route #1, volume 1, page 165].
● P1 5.9 G: Climb face to a stance and a rest 40' up. Traverse left around a corner and end on a comfortable ledge with a fixed anchor. 50'
Toads Where They Don't Belong 5.7 G 50' ★★
Start: At the right end of the cliff, 5' right of an arête, and 15' right of Frosted Fern [route #1, volume 1, page 165].
◉ P1 5.7 G: Make some boulder moves to start, then fun jug climbing up the steep face. Fixed anchor shared with Alter of Love. 50'
Gear: 1 ea #0.75 Camalot.
Altar of Love 5.8 G 50' ★★
Start: Right of Toads Where They Don't Belong.
● P1 5.8 G: Go up the featured face on positive holds to a fixed anchor. 50'
Shreddy Roosevelt 5.8 G 50' ★
The name says it all—if you toprope, take care for your rope on the sharp rock.
Start: Same as Altar of Love.
P1 5.8 G: Trend right towards a horizontal (#1 Camalot), then go up to a bolt. Climb past a good horizontal (#0.5 Camalot) to the large ledge. Continue up a right-facing corner (red micro cam or small stoppers) to a fixed anchor. 50'
Location: Near the Northway (I-87) Exit 29.
Aspect: West
Height: 30'-140'
Quality: ★★★
Approach: 6 min, easy
Summary: A newly explored cliff with many project and a few completed, moderate routes.
A varied group of crags, with one large cliff (The Main Cliff) and a nearby area with several smaller formations (The Towers), both with short approaches. Much of the rock is steep and there is potential for additional hard routes.
Access: The approaches and cliff are on Town of North Hudson land, which has previously featured hiking and mountain biking trails in the same general area.
Frontiertown Crags
The Main Cliff
The Main Cliff is 110' high on the tallest routes, and about 500' wide. Walking off is challenging, so plan to rappel.
Directions: From the Northway (I-87) Exit 29, go east on Blue Ridge Road 0.4 mile to the intersection with NY 9. Turn right (south) on NY 9 and drive 0.6 mile. Park in the dirt lot next to FrontierTown Road 601830,4866593. From the parking, cross NY 9 and enter the woods on the east side of the road directly behind a phone pole with three yellow-shrouded guy wires. Walk up through some tiny trees, then follow a forest road northeast for 1 min past an abandoned shed. Turn left (north) on a much larger forest road and follow it for 4 min. At a cairn on a stump on the right side of the forest road, turn right and walk past a large boulder and up to the base of the cliff, arriving at the attractive offwidth crack of Looney Toons 602108,4866834.
Final Corner (project)
From Green Face, walk left under broken outcrops and then uphill. 200' left of Green Face is a place where you can walk up to the top of the cliff. Final Corner is right-facing corner directly above this walk up. It's steep and insecure early on.
Green Face 5.8+ TR 80' ★
Begin 50' left of the Spooky Chimney, around yet another arête, at a right-facing corner with a very good short crack that leads to a steep face. Climb the crack, and then the face above to the top. The rock looks brittle, and gear would be questionable.
Witness the Sickness 5.13a G 70' ★★★★★
Savage, and excellent. This route stays left of the arête, whereas Kung-Fu Kegels stays to the right.
Start: 10' uphill and left of Kung-Fu Kegels, at a short right-facing corner that leads to a right-leaning, thin seam in an overhanging wall.
● P1 5.13a G: Stick clip. Climb the right-leaning seam to its end (crux). Move right to the arête and dyno to a good horizontal. Finish up the arête to a fixed anchor on the left side of the arête. 70'
Kung-Fu Kegels 5.12d G 70' ★★★★★
Start: At a 4'-tall narrow rib at the toe of the arête just left of Better Off at the Brewery. Walking left from Dark Side of the Loon, this is the most obvious and attractive cliff feature, and has a relatively open base area.
● P1 5.12d G: Stick clip. Climb the rip to a pair of good holds on the arête. Go straight up the arête until you can make a desperate reach right to a horizontal crack. Climb a vertical crack to its top, then move back left to the arête and climb to the top. Fixed anchor on the right side of the arête. 70'
Better Off at the Brewery 5.9 TR 80'
On the wall 10' left of Spooky Chimney. Climb of detached but stable jug-blocks for 15', then follow a thin handcrack to its end. Move right on big holds to a good stance beneath twin cracks. Up the twin cracks to a jug out right, then up a left-leaning crack to long reaches between horizontal shelves. Worthwhile should somebody clean it.
Spooky Chimney 5.8 G 75' ★★★
Really good climbing all the way up.
Start: 10' left of Scary Chimney.
P1 5.8 G: Climb the dramatic left-hand chimney. 75'
Scary Chimney (project)
Open Project. Begin 30' left of a right-facing corner, around an arête, at the right-hand of two scary-looking chimneys.
Cobweb Corner 5.7 G 70'
A bit dirty and loose.
Start: At the left end of a dirty wall at a right-facing corner.
P1 5.7 G: Climb the corner and the face above to the top. 70'
Arête (project)
Open project. Begin 80' left of Looney Toons and around a blunt arête, the cliff base path goes roughly uphill. 20' up this rough section, step up right to the right face of another arête. Climb the face and arête to the top.
Living in a Young Man's World 5.12b G 40' ★★★★★
Excellent and devious climbing on an impeccably cleaned, gently overhanging wall. Not as sustained as Dark Side of the Loon, but with a single, nails-hard move. Stays dry in light rain.
Start: 10' left of Looney Toons below a 12"-wide slot 12' up.
● P1 5.12b G: Stick clip. Make hard moves off the ground to the slot, then technical laybacks lead to a square chunklet welded in a seam. Work up to a right-rising crack, then up a final sharp fingercrack with a middle-finger mono to the top. Fixed anchor. 40'
Looney Toons 5.12a G 80' ★★★★★
The offwidth part, once known as Arm Crack, has been led, extended, and renamed. The first section can be led to a midpoint anchor, making an excellent 5.10a warmup.
Start: At the plumb-line handcrack that widens to offwidth, where the approach path meets the cliff.
P1 5.12a G: Climb the crack, which widens from hands to body size, to a ledge. There is a fixed anchor here (5.10a trad to this point). Continue up the arête (bolts) to a fixed anchor shared with Dark Side of the Loon. 80'
Gear: Camalots 2 ea #3 and #4.
Dark Side of the Loon 5.12c G 80' ★★★★
A lesson in pump management with multiple 5.12 cruxes stacked on one another and no rests (although you can shuffle left to the jug on Looney Toons at one point). Clean falls with good clipping stances.
Start: 5' right of Looney Toons below a very black face with orange lichen, on a block just left of the corner/chimney of Left Chimney.
● P1 5.12c G: Go up the black face to a horizontal (optional #0.4 Camalot). Continue straight up through a V5 boulder problem (crux) with cracks and face holds, then up easier cracks to a fixed anchor. 80'
Gear: Optional #0.4 Camalot.
Dark Toons (linkup) 5.12b G 80' ★★★★
● This linkup provides a slightly easier sport pitch to the top of the wall, avoiding the offwidth. Climb Dark Side of the Loon to a horizontal, then up to where your feet are in this horizontal, level with the intermediate anchor of Looney Toons. Move left to the jug rest, then up the arête of Looney Toons to the fixed anchor. 80'
Left Chimney (project)
Open project. This climbs the left side of a left-facing wall. Begin right of Dark Side of the Loon and climb up ledges into the corner. Follow the chimney to a short slab up and left to a small tree.
Right Chimney 5.8 G 85' ★★
Start: 10' right off Left Chimney.
P1 5.8 G: Climb a corner past a variety of challenges to finish at an attractive ledge. 85'
Descent: Rappel via V Crack.
Unmasked 5.11b G 50' ★★★★
A good warmup with nice moves and a challenging crux at the overlap.
Start: 6' right of Right Chimney, below a red-colored, blunt arête.
● P1 5.11b G: Up holds on the arête to a left-facing edge. Go up this to its top, then move right to a restful flake-jug (hollow, but secure). Traverse left 6' to a position below an overlap, then over this with a long reach to better holds. Continue up to a ledge with a high fixed anchor. 50'
Fruit of the Loon 5.7+ G 60' ★★★
Good jams and stances to place gear.
Start: 30' right of Right Chimney and around the bulging arête at a short left-facing corner that leads to a V-shaped crack. The face to the left has a couple of triangular-shaped holds.
P1 5.7+ G: Climb the corner and the crack to a large roof. Step left to a tree anchor. 60'
Corner Chimney (project)
Open project. Begin 10' right of V Crack at a corner that leads to a chimney.
Directions: From the Northway (I-87) Exit 29, go east on Blue Ridge Road 0.4 miles to the intersection with NY State Route 9. Park at a large pullout on the southwest corner of the intersection 602034,4867379. Walk south on NY 9 for 600'. Enter the woods on the east side of the highway at a cairn. Follow a path east past a small rocky clearing and a vernal pool and cross a small stream using some large square boulders. Continue uphill a few feet to reach the cliff. The approach brings you to the first small alcove in the cliff line 602255,4867225, directly in front of Welcome to Frontier Town.
Welcome to Frontier Town 5.6 G 35' ★
Start: The approach path brings you directly to this route—a jagged left-rising crack line in the first alcove.
P1 5.6 G: Climb the jagged, steppy crack to a short slab finish. 35'
Wild West 5.4 G 30' ★
Start: At the base of a chimney/offwidth around the corner in the second alcove, 15' right of Welcome to Frontier Town.
P1 5.4 G: Climb the offwidth crack to the same top as Welcome to Frontier Town. 30'
Death Pancake (project)
20' right of Wild West below a huge, tilted-out flake, with some exotic rock projections above. (The "pancake" flake appears to be solidly attached to the cliff, despite the name.)
Splitter 5.7 G 35' ★★
Start: Around the corner and uphill in the third alcove, 120' right of Death Pancake, at a fingercrack that leads through two small overhangs in the left wall of the alcove.
P1 5.7 G: Climb the crack. 35'
The Land Down Under 5.5 G 40'
Start: From Splitter, walk right under the nice steep wall of the third alcove, which has potential for some hard routes. Continue right along the cliff-base path which steps uphill, traverses under some broken outcrops, and reaches The Brown Tower 200' right of Splitter. The Brown Tower is a large, left-leaning, overhanging projection of brown rock. The left side of the Brown Tower is extremely overhanging. Begin after a short downhill on the path, at a small cairn below some large blocks under an overhang.
P1 5.5 G: Climb up onto the blocks, and then up and left under the overhang to an exit at the top left. 40'
Brown Tower 5.5 PG 140' ★★
Start: 30' right of The Land Down Under, at the base of the brown rock, where the terrain starts to go uphill.
P1 5.5 PG: Climb up onto a tall, low-angled ramp and continue up to a platform with large boulders. From the boulders, climb 3rd class ledges up and left to the top of the cliff line. (The top is a pleasant, open forest with a nice view of Frontier Town.) 140'
Old Smoothie 5.9 TR 60' ★
Above the start of Brown Tower scramble up a gully 20' to a small alcove at the base of another ramp. Climb the ramp, easily at first, then via the namesake smooth friction section to finish on easier rock at another platform.
Gray Tower Crack 5.7+ G 45' ★★
Start: 20' right of Brown Tower, at a vertical crack in gray rock with a tiny tree at 30' up.
P1 5.7+ G: Climb the crack to the tree, finish up and right to the top of the Gray Tower. 45'
Gray Tower Arête 5.7 G 40' ★
Start: 15' right of Gray Tower Crack, at the base of an arête that forms the right end of the Gray Tower.
P1 5.7 G: Climb the arête to the top of the Gray Tower. 40'
Upper Wall (project)
Open project. Between the tops of the Brown Tower and the Gray Tower there is an upper wall. The base of this wall requires a technical (though easy) approach. You can walk over from the top of Gray Tower, or rap in from the top of the cliff line, or scramble up dirty 4th class from the base of Old Smoothie. The route starts at the base of a group of left-leaning cracks in the upper wall, and follows left-leaning cracks to a broken area, then back right and up to the top.
❏The route Pacifier [route #1, volume 1, page 169] is (sport).
LOLS 5.8 G 30' ★★
Could use a good brushing, but still climbable. Stands for "Lots of Little Shit".
Start: 15' left of Pacifier.
● P1 5.8 G: Go straight up the black face. At the top, angle right, then step back left to a fixed anchor (going straight here is an option, and increases the grade to 5.9+). 30'
Mullet 5.10a G 35' ★★★
Could use a good brushing, but still climbable.
Start: 20' right of Pacifier below a left-facing, staircased corner 10' up.
● P1 5.10a G: Go up the face to the corner, then mantel onto a narrow ledge on top of the corner. Thought-provoking face moves straight up lead to a fixed anchor. 35'
Northway Express Wall
The Greenhouse
Rocket Votes for Bernie 5.7+ G 70' ★★
Start: 15' left of the heavily vegetated left-leaning open book, mentioned as being 4' left of the start of Greenhouse Defect [route #1, volume 1, page 173].
P1 5.7+ G: Climb the right-rising finger crack into a dirty open book. Climb up into a small left-facing corner to gain a right-rising crack. Follow the crack to a small overhang, then head left onto the face. Climb the face to the top. 70'
Gear: Micro-cams recommended.
Location: Near Northway (I-87) Exit 30, off Tracy Road
Summary: A collection of three cliffs on the slopes of Feeder Mountain.
This group of three small cliffs is located on Feeder Mountain, about 0.5 mile west of the Mineville Pillar ice climbing area. There is a lower cliff, an upper cliff, and a right-hand cliff. The cliffs share a common approach path.
Aspect: South
Height: 90'
Quality:
Approach: 15 min; moderate
The lower Stump Pond Cliff is visible from Tracy Road, where it overlooks Stump Pond. The cliff features steep, right leaning cracks and dihedrals. The cliff is about 170' wide.
To reach the top of the cliff, walk around the left end where the rock ends at a steep wooded gully; this is also the start of the approach to the upper cliff.
The left end of the cliff begins with low-angled brushy rock. Right of this is a series of right-leaning cracks. 70' right of the left end is a large, 8'-tall broken block. Right of the block is a long section of overhanging rock interrupted by a narrow vegetated gulley. There are two trees spiraled around one another that provide a landmark.
Directions: From Northway Exit 30 (0.0 mile), drive south on US 9. At 0.1 mile, turn left onto Tracy Road (CR 6). At 1.3 miles park at a large, partially-paved pullout on the right 609015,4881091. From the west end of the pullout, cross the road and walk back 75' until the sandy bank ends. A cairn in the woods marks the start of the climber's approach. Follow this path across a small inlet (or a few feet upstream in high water), circle around a large pond and wet area, and then traverse uphill and right to the base of a narrow talus field. Follow the talus to the base of the cliff 609063,4881382. The approach reaches the cliff near its right end.
Stump Jumper 5.7 G 75' ★★
Start: 100' right of the spiral trees and 20' right of the approach path, at a left-facing corner with a rampart of rock to its right at the base of the cliff.
P1 5.7 G: Climb the corner on excellent holds past a small overhang. 75'
Aspect: West
Height: 70'
Approach: 35 min; moderate
Quality:
The Upper Stump Pond Cliff is a small panel of rock about 75' wide. It is set in attractive woods, and the top has a commanding view of Northway Exit 30. The routes have not been developed.
Directions: Follow the approach to the lower cliff, go to the left end, and up the steep wooded gully. Continue generally north and across a flat area. At the end of the flat area, traverse uphill to the left to reach the upper cliff 609078,4881648.
Aspect: South
Height: 100'
Approach: 50 min; moderate
Quality:
The Righthand Cliff is about 100 feet wide and has potential for some difficult routes.
The left end of the cliff features low-angled mossy rock at the base of a slab, and a loose corner. Right of this there is a spectacular looking arête. The arête is about 100' tall and makes a good landmark. Right of the arête is a huge, right-facing corner which overhangs at its top. 5' right of the corner is a short overhanging face. Around the next arête and 15' uphill to the right there is a zig-zag offwidth.
Directions: From the top of the lower cliff, traverse east across the top of the hillside with occasional cairns. Once you reach a place where you can sense openness of a cliff is below you, traverse down a steep, improbable deer path to the base of the cliff 609452,4881534.
Location: Off Ensign Pond Road near Moriah
Aspect: Southeast
Height: 40'
Quality:
Approach: 2 min, easy
Summary: Small cliff that parallels the road
This small cliff parallels the Ensign Pond Road. The worthwhile section is about 100' wide.
Directions: From the Northway (I-87) Exit 30, drive south on NY 9 for 6.8 miles to Caza Turn road on the left. Turn left, then left again onto Ensign Pond Road. Follow Ensign Pond Road for 6.2 miles to a small dirt pullout on the left with room for 4 cars 610846,4875872. Follow a trail behind the memorial, and turn left at 2 min (at a cairn) to reach the cliff 610917,4875950.
A Good Man 5.8- G 30' ★
Start: Where the approach path meets the cliff, just a few feet right of a large tree at the top. There are two parallel finger cracks, with a pointed block at the base just right of the cracks; this route is the left-hand crack.
P1 5.8- G: Climb teh crack to the top. 30'
Riding with the Boys 5.7 G 30' ★
Start: This is the right-hand crack 4' right of A Good Man.
P1 5.7 G: Start by climbing to the top of the pointed rock at the base of the cliff, then step into the crack. Follow the crack to the top. 30'
In Memoriam 5.6 G 40' ★
Start: 30' right of the pointed block of Riding with the Boys, at an obvious and dramatic handcrack.
P1 5.6 G: Climb the crack to a mossy ledge, and then finish up a few more feet of lower angled rock. 40'
Pay Your Respects 5.8 G 30' ★★
Start: 50' right of In Memoriam at a thin face below a crack that starts halfway up the cliff. This is 8' right of the three-trunked maple tree.
P1 5.8 G: Climb the thin face to gain the crack. Continue to the top. 30'
Close the Circle 5.7+ G 30'
Start: 8' right of Pay Your Respects at a left-facing corner that leads to a roof.
P1 5.7+ G: Climb the corner, then traverse left under the roof to join Pay Your Respects. 30'
Location: Off Ensign Pond Road near Moriah
Aspect: Southeast
Height: 45'
Quality: ★
Approach: 5 min, easy
Summary: A small band of cliffs that parallels the road, separated from the road by a narrow swamp.
Directions: Park as for Jim's Cliff. Follow the approach to Jim's Cliff. At the cairn that marks the turn for Jim's Cliff, continue on the trail for 3 min. The trail crosses a small stream (usually dry), comes out into an open area, and then swings left (cairn) and runs along the bottom of the cliff line (between the cliffs and the swamp). Because the cliff is intermittent, each route is marked by a cairn on the trail for reference 611074,4876041.
This cliff line is long ridge of rock that parallels Ensign Pond Road, separated from the road by a narrow strip of swamp. Much of the ridge is low, but in some spots it rises to worthwhile height for climbing. The tops of these routes offer views of the rugged slope of Harris Hill across the road. In season, the bugs here are hell on earth. Go only in early spring, or wait until fall.
The Day of the Deer Fly 5.4 G 45'
Start: At the base of a low-angle slab.
P1 5.4 G: Climb the slab. 45'
Flying Mouthparts 5.4 G 45' ★
Start: 100' right of The Day of the Deer Fly is a slab with a small tree at mid height. Begin at a right-rising double crack.
P1 5.4 G: Climb the crack, move up left of the small tree, and then up to the top. 45'
Jaws 5.3 G 40' ★
Start: 120' right of Flying Mouthparts is an alcove just right of a right-rising rib of low-angled rock. Begin at the high point of the alcove.
P1 5.3 G: Climb the corner, then finish the broken face to the top. 40'
Deer Fly Apocalypse 5.6+ PG 45' ★★
Start: 45' right of Jaws is a teller face with a gunsight-like notch at the top. Begin at the base of the face, a few feet above the trail.
P1 5.6+ PG: Zig-zag up the face and through the notch at the top. 45'
Adirondack National Bird 5.6+ PG 45' ★★
Surprisingly good climbing for a short, slabby route.
Start: 10' right of Deer Fly Apocalypse at the base of a small, flatiron-like slab with a broken roof above.
P1 5.6+ PG: Climb the slab, and go through the roof to the top. 45'
Location: Off Ensign Pond Road near Moriah
Aspect: South
Height: 70'
Quality: ★★
Approach: 10 min, easy
Summary: Small, quiet cliff with a few routes and an open project.
The cliff is about 70' high, and the worthwhile section is about 150' wide.
Directions: From the Northway (I-87) Exit 30, drive south on NY 9 for 6.8 miles to Caza Turn road on the left. Turn left, then left again onto Ensign Pond Road. Follow Ensign Pond Road for 7.0 miles to a dirt pullout on the left with room for 6 cars 611813,4876679. There is a green sign on a tree for "Parch Pond Tract", a private preserve that allows limited public recreation. From the parking, walk west into the woods to a junction with a well-developed trail heading north (this is a CATS trail under construction) and a smaller path going west. Take the smaller trail heading west, following a semi-open ridge that separates the road from a narrow valley. At 4 min, drop down right into the narrow valley and follow a good logging road west. At 10 min there is a cairn on the right marking the approach path to The Dome. Follow this 250' to an intersection just before (and within sight of) The Dome. Take the left fork The Dome 611181,4876930, reaching the cliff in the center.
Access: The approach and cliff are on the "Parch Pond Tract" owned by the Eddy Foundation, a private preserve that allows limited public recreation. Hiking and [limited] climbing are allowed as long as climbers observe the conservation principles of the organization.
Fickle Finger 5.6 TR 45' ★
Begin at a large, free-standing pillar-flake at the left end of the cliff. Layback the fragile-looking flake to its top, then follow a crack and easier face to the top.
Unnamed (project)
Open project. Begin 8' right of Fickle Finger at underclings with an attractive crack above. The initial moves are quite difficult.
Really? 5.6 G 55' ★★
Start: On top of a prominent boulder 30' right of where the approach path meets the cliff.
P1 5.6 G: From the top of the boulder, step across to the cliff, move up, then step left past a small tree. Friction up to an intimidating-looking steep crack, which is easier than it looks with huge holds. 55'
Butt Cheek 5.7 G 50' ★★
Named for the easiest way to do the crux opening move.
Start: 8' right of Really? at a sloping boulder that leans up into the base of a small corner.
P1 5.7 G: From the top of the boulder, go up the corner (perhaps using the namesake body part). Friction up to the base of [another] intimidating-looking steep crack, which [again] turns out to be easier than it looks with huge holds (a #4 or #5 Camalot help protect this wide crack). 50'
Location: Off Ensign Pond Road near Moriah
Aspect: Southwest
Height: 90'
Quality: ★★
Approach: 20 min, moderate
Summary: Small, remote cliff with several steep routes.
The cliff is somewhat complex and forms the southwest corner of a hill. The lower portion of the cliff has three tower-like formations (Left Tower, Right Tower, and Center Tower). Left Tower has crumbly rock and an unusual, small, square, cave-like opening in its face. Center Tower is solid. Right Tower is also solid, but shorter. Above and right of these towers is the Main Wall, which is 90' tall and sheer. Right of this, the upper wall separates into blocky tiers. Further right still, the cliff wraps around to face south, and is about 60' tall.
To approach the top, walk left in front of the main wall, up a slope, then switchback into the open slopes above.
Directions: Park as for The Dome 611813,4876679, and follow the hiking directions to the fork in front of that cliff. Take the right fork and switchback up the gully right of The Dome to its top. Continue west along the path to arrive at The Fortress at 20 min 611068,4877259, in front of Época and Sands of Time.
Access: The approach is on the "Parch Pond Tract" owned by the Eddy Foundation, a private preserve that allows limited public recreation. The cliff is on state land.
Dead End 5.7 G 70'
Start: At a left-facing corner.
P1 5.7 G: Go up the corner until the crack disappears. Traverse right onto the face, up a few feet, then back left on gravelly suspect holds to the top. 70'
Tropical 5.8 TR 45' ★
Named for the "tropical-looking" (?) rock. Begin at the base of the Right Tower, just right of a tree, at a right facing scoop 5' up. Climb the strenuous face on big holds.
Sands of Time (project)
Closed project. Begin at the left end of a terrace, near a large birch tree, below a delicate, pasted-on, hourglass-shaped flake. Delicately climb the hourglass, then move up and right through some horizontals to finish in a vertical crack.
Época 5.12b G 70' ★★★
The name is Spanish for a period in time. Excellent climbing with a dramatic, dynamic finish. There are two ways to do the crux; both are high quality. The original way requires a 6'+ wingspan, and the variation is easier if you're short.
Start: 30' right of Sands of Time, just left of a sunken, table-sized boulder below a left-leaning crack that begins 10' up.
● P1 5.12b G: Boulder up to the crack, then follow it to a horizontal break. Good face holds lead to second horizontal, then a long move to a third horizontal. Go up to a left-facing sidepull, (V1) then up right to a crimp rail in the center of the face. Make a long dyno up and left to a good finish jug (crux), then mantel onto a ledge with a fixed anchor. 70'
● V1 5.12a G: From the sidepull, move up to higher, orange, left-facing sidepull, then make a dyno (crux) to the finish jug.
Secret Entrance (project)
Open project. Begin 30' right of Época where the terrain goes uphill to the right. Face climb up and left (crux), then back right to a large ledge. Continue up a crack to the top.
The Bishop 5.5 G 70'
Start: 180' right of Época, over (or around) and intervening promontory, at a left-leaning ramp. There is another, lower-angled ramp a few feet to the right; The Bishop is the steeper, left-hand ramp.
P1 5.5 G: Climb the ramp, then straight up to the top. 70'
The Rook 5.9- G 45' ★★
Start: Begin 20' right of The Bishop at a steep, blunt arête.
P1 5.9- G: Climb the arête to the top. 45'
Newt 5.6 R 60' ★
Start: 45' right and uphill from The Rook, at a spruce at the base of the cliff, with a smaller fir 6' up.
P1 5.6 R: Go straight up past the birch near the top. 60'
Red Eft 5.4 G 60'
Start: 6' right of Newt at a left-facing corner with a tiny birch 10' up.
P1 5.4 G: Up the corner and face to the top. 60'
❏The 2'-high pedestal that marks the start of Monkey Pump [route #3, volume 1, page 146] is gone.
Location: On Deer Mountain, accessed from US 9, just north of Split Rock Falls (accessed from the Northway Exit 30).
Aspect: West
Height: 40'
Quality: ★★
Approach: 50 min, moderate
Summary: A wide, short cliff in a lovely location above the New Russia valley.
The Outpost is located on a shoulder of Deer Mountain, a trailless subsummit of Rocky Peak Ridge in the Giant Mountain Wilderness. The top of the cliff is flat, open bedrock with filtered views of the New Russia and Split Rock valley, as well as the cirque on Rocky Peak Ridge. The base area is friendly and open. The sector with the existing routes faces west; moving (climber's) right, the cliff wraps around the ridge to face southeast.
While modest in height, the cliff packs a punch in climbing difficulty with few rests. The rock is fair quality, and the routes have been nicely cleaned and equipped.
With ease, you can reach the top of the cliff by walking (climber's) left, then up a short slope.
Directions: Park on US 9 at the bottom of the hill just north of Split Rock Falls, where Coughlin Brook crosses under the road 607808,4886948. Follow Coughlin Brook northwest for about 45 min, near the 400m elevation contour. When convenient, bushwhack out of drainage and contour east to meet a well-maintained forest road. (This forest road leads back to US 9 at the Euba Mills Outlaws—a private hunting cabin 608245,4887210. Approaching on this road reduces the approach to about 30 min.) Continue contouring east to the cliff 607492,4887760, about 5 min from the forest road. There is a line of cairns that lead from the forest road to the cliff.
From New Russia With Love 5.11a G 35' ★★
Much harder than it appears from below.
Start: On the right wall of a large open book corner. This is the first bottom-to-top crack on the left side of the cliff.
P1 5.11a G: Follow the crack straight up to a fixed anchor. The bulge at mid-height is the crux. 35'
Gear: To #2 Camalot.
Stack Overflow 5.12b G 35' ★★
Technical and pumpy.
Start: At the base of the arête 6' right of From New Russia With Love.
● P1 5.12b G: Climb straight up the arête to a fixed anchor at the top. 35'
JUICE! 5.12d G 40' ★★★★
A short, crimpy route with three distinct cruxes. Excellent.
Start: 50' right of Stack Overflow on a flat-topped boulder with an 8"-tall horn, below a good right-facing flake 6' up.
● P1 5.12d G: Go up to a shallow, right-facing corner and climb this to its top. Follow crimps up and right to a left-facing wedge (first crux), then up and right to a grotto of square-cut holds (second crux). Reach left to a lone pocket, then make a big move straight up to a rail (third crux). A final long move gains the top and fixed anchor. 40'
Dances with Bees 5.11b G 40' ★★
Great moves on interesting black rock. Named for the FAers interaction with a nearby ground bee nest. You can reach (with care) the anchor from the top without rappel.
Start: 100' right of Stack Overflow, in the center of a black face, below a seam that breaks a bulge 15' up.
● P1 5.11b G: Layback up the seam to a dike below the bulge. Break through the bulge on laybacks and face holds, then up to a fixed anchor. 40'
Location: Between New Russia and Elizabethtown, accessed from US 9 (which is accessed from the Northway Exits 30 or 31).
Aspect: Southeast
Height: 40' to 300'
Quality: ★
Approach: 1 hr, moderate
Summary: Two cliffs—one is a wide, short, steep cliff and the other a multi-pitch slab—in a lovely location above the New Russia valley.
Iron Mountain, aka "Elizabethtown No 2", is located west of US 9 between Elizabethtown and New Russia, and uses the same parking as the ice climbing area known as Little Moscow. This cliff is clearly visible from the road when driving from New Russia towards Elizabethtown on US 9.
There are two cliffs explored for climbing here, both located on a rocky promontory southeast of the main summit. The first cliff, the Iron Slab, is a 300'-tall, south-facing slab, with a few tree islands and mostly clean rock that tops out on a bald subsummit with three eyebolts (these were used to tie down Verplanck Colvin's survey tripod when he surveyed the Adirondacks in the late 1800s). The second, the Iron Wall, is a short, steep cliff located further to the east. Between the two cliffs is a slab capped by a large, eyebrow-shaped roof with two enticing roof cracks.
The approach is steep, but fairly easy to navigate. The "bushwhack" portion is in an open hardwood forest with good distance visibility.
Directions: Park at a large pullout on the west side of US 9 610539,4893458, 2.1 miles south of Elizabethtown (the intersection of US 9 and NY 9N), and 7.7 miles north of Malfunction Junction (the intersection of US 9 and NY 73). Within this section of road, this is one of the only places where the state land touches the road. From the south side of the pullout, follow an obvious logging road uphill, southwest at first, then west. At 3 min you will pass a wet, black cliff on your left; this is Little Moscow, the ice climbing area. Continue up the logging road. At the first fork stay left, then right at the next fork. At 13 min cross the new hiking trail marked with blue ribbon (as of 2020). At 19 min, go left at a fork, and at 28 min stay left at another fork just after a long, level section. At the next fork, stay left, which goes straight uphill. This should bring you to a col 609605,4893624; the aforementioned hiking trail goes through this col. Locate this, cross it, go uphill 100', then contour straight south around a hillside. After you clear the hillside, continue uphill and south to another col 609567,4893232. From here follow the pleasant, open ridge west. This should lead you directly to the Iron Wall 609353,4893195. To reach the Iron Slab, continue to the left and downhill, hugging the rock to the base of the slab 609088,4893064. As of June 2020, there is survey ribbon everywhere—orange, blue, and red. For this approach, each intersection has pink ribbon showing the proper forks, and the final bushwhack is also flagged.
This beautiful little cliff is steep with few holds, split by a couple horizontal cracks. The right side has a left-facing, right-leaning corner. The forest is open, and the terrain is flat and pleasant. In front of the cliff is an open, bald promontory with good views. You can access the top by walking (climber's) right to a break in the cliff, then back left to the open slabs above; you'll have to rappel from oak trees to reach any anchors.
Iron Man 5.12b G 40' ★★★★
Athletic and short. It has two dynamic moves and an unusual heel-toe cam that makes the crux work.
Start: On the left side of the wall below a steep, grainy, shallow, left-facing open book corner 10' up.
● P1 5.12b G: Stick clip. Make powerful moves up the overhanging wall to a great left-hand jug, then up the flared, shallow corner to a pasted-on, ear-shaped jug. Another dynamic move gains better edges. Continue up to an overlap with lichen-covered rock above and a fixed anchor. 40'
Gunslinger 5.13b G 40' ★★★★
Closed project. Overhanging and plain hard. It is recommended to back-clean the first three quickdraws to increase responsiveness of the belay for the horrendous jump.
Start: On a ledge 40' right of Iron Man.
● P1 5.13b G: Climb a chocolate-colored, overhanging wall on crimps to a ledge. Squirm onto the ledge, then step left 5' to a position below a left-facing edge 8' up. Make a horrendous jump and campus to get situated in a horizontal crack, then go up the left-facing edge to a good rail at the top. Use gymnastic trickery to reach a shallow, right-facing edge above, then throw up and left to a good fingerlock in a flake. Fixed anchor just above. 40'
No routes here yet, but what a beautiful slab and topout!
❏There are new parking restrictions along the NY 73 corridor through Chapel Pond. The most affected section is between Chapel Pond and Roaring Brook Falls, with more restrictions planned for the near future. On a good-weather weekend, arrive early and expect to hunt around for parking. Affected areas include the Spider's Web, Beer Walls, Case Wall, Chapel Pond Slab, Upper Washbowl, Creature Wall, and all the smaller areas around Chapel Pond. Be especially mindful of the new no-parking signs or you may end up with a whopper parking ticket. For example, in the description of the AMR trailhead [volume 1, page 426], the statement "If the lots are full, you can park alongside NY 73" is no longer true.
Location: Near the intersection of US 9 and NY 73 (Malfunction Junction), accessed from Exit 30.
Aspect: Southeast
Height: 40'
Quality:
Approach: 10 min, easy
Summary: Four tiny walls, very close to the road, with several exploratory routes.
The Boquet Ridge Cliffs are four small cliffs facing away from US 9 on a small ridge. They are short, steep, and offer a few lead routes and some toproping.
Directions: Park on the wide shoulder of US 9, 1.0 mile north of Malfunction Junction, near the utility pole 3316A 606161,4885358 (0 hr 0 min). Walk 40' south of the pole and enter the woods at an opening cleared by surveyors. Walk steeply uphill for a few feet, then follow a gently open valley southeast to the height of land. At 4 min, turn to the right (southwest). At 8 min reach the first, rightmost cliff cleverly named Cliff #1 606117,4885114. Walk left along the base to Cliff #2, Cliff #3, and finally Cliff #4.
This cliff is just left of Cliff #3 and is about 40' tall. On the right end is a series of right-facing corners and a large roof. 20' left of this are a pair of overhanging cracks separated by a mattress-sized block. 20' further left is a steep, left-leaning crack.
Twin Cracks (project)
Open project. Begin 18' left of On Bee on the left side of a low overhang formed by a mattress-sized block. Go up a crack on the left side of the mattress to the top of the block, then up into a stem box that leads to the top. 30'
On Bee 5.8+ G 35' ★
Start: Near the right end of the cliff, under the left end of the large roof, below a pod 5' up.
P1 5.8+ G: Get onto the pod, then up right-facing flakes to a platform. Step left and climb a crack to the top. 35'
Gear: A large cam (4" or 5") is helpful about 10' up.
This diamond-shaped cliff is 40' tall and separated from Cliff #2 by a tight, steep, wooded gully. At the highest point on the cliff is a system of short, curved cracks which look like "somebody stuck a butter knife into the cliff while it was soft."
Butter Knife (project)
Open project. Begin 36' left of Journey below a system of right-leaning cracks and slots, and below a shallow, wide crack just below the top of the cliff. Go up the slots and cracks to the wide crack. Go past the wide crack on its left side to the top.
Journey 5.8 G 50'
Start: 10' left of the right end of the cliff (and left of the steep wooded gully that separates Cliff #3 and Cliff #4), below a 5'-tall right-facing corner 5' up.
P1 5.8 G: Climb up into the corner, then go left along a long left-rising traverse. Run it out up easier rock to the top. 50'
This cliff is wider and taller than Cliff #1. There is a large right-facing corner on its right end, and a broken up right of that. 20' left of the right-facing corner are some large, right-facing flakes.
Grunt 5.10 TR 40'
Begin 20' left of Loose below a large right-facing flake that goes half-way up the cliff. Go up the flakes via strenuous laybacks and sidepulls and finish up the steep face above.
Loose 5.5 G 35'
Go up 10', then more up and right to scary left-facing, broken flakes.
Start: Near the right end, at a large right-facing corner, the base of which is formed by a 12'-tall tower with a triangular top.
P1 5.5 G: Go up 10', then move up and right to scary, left-facing, broken flakes. Follow these to the top. 35'
This is the smallest of the four cliffs, and the first one you reach on the approach. It's 35' tall and very steep. There is a right-facing corner and large roof on its right end.
Directions: With increased hiker traffic, the trail system alongside the Boquet River is much better established and obvious. An improvement to the guidebook description [volume 1, page 183] is as follows: Follow the trail on the left side of the river for 10 min to where it intersects the river. Cross here and continue on the trail, now on the right side of the river. Cross a tributary and continue past the Boxcar swim hole and flume (which you can see and hear down to your left) to where the river meanders through meadows. Keep an eye on your right for a low ridge of rocks and boulders, about 30' off the trail. Just past these (no cairn), turn right off the trail on a bearing of 330° and bushwhack uphill to the cliff. Total time 20 min.
❏Heat Wave [route #3, volume 1, page 183] now has a fixed anchor shared with Hot Flash.
Hot Flash 5.12b G 70' ★★★★
Excellent, sustained, off-vertical face climbing, and much more difficult than it looks. There are many sidepulls and big reaches between good horizontal cracks. The crux is a devious blank section at the third bolt, of which there are at least three (!), equally-difficult methods.
Start: 15' downhill and left of Heat Wave [route #3, volume 1, page 183] below a left-rising overlap 12' up.
● P1 5.12b G: Face climb up to the overlap. Go over this, then straight up the face using sidepulls and occasional horizontal cracks to a vertical crack. Follow this to a fixed anchor shared with Heat Wave. 70'
Hang Ten 5.9+ G 65' ★★★
Start: 10' left of Surfs Up below good ledges.
P1 5.9+ G: Go up and right on ledges, then step left and go up steep rock to a left-leaning crack. Follow the left-leaning crack over a bulge (crux), then up a steep face past several horizontals to the top. 65'
Gear: Nuts and cams up to 3".
Surfs Up 5.10d PG 65' ★★★
Start: 10' left of Life's a Beach below a jug 7' up, and a ledge 10' up.
P1 5.10d PG: Gain the ledge, then go straight up on narrow ledges to a bulge split by a left-leaning crack. Go over the bulge at the crack, then go straight up the face (bolt) to another left-leaning crack, move right onto the face past another bolt (crux) to a ledge with a fixed anchor shared with Hang Ten and Life's a Beach. 65'
Gear: Small cams to #1 Camalot.
Life's a Beach 5.9 PG 60'
[route #1, volume 1, page 198] More of a face climb with a seam than a fingercrack.
❏Variation to Führer [route #1, volume 1, page 211] that provides an alternate, lower start.
V3 Führer Direct 5.9+ R: Begin at the base of the cliff, on the left side of "Jungle Groove" (not on the "First Tree Island"). Go up a left-leaning diagonal to a ledge with a tree and belay (80'). Step up to the open slab and go up to meet the normal route at the end of the traverse on P1.
This area is located at the bottom of Chapel Pond Slab, near the mouth of the South Descent Gulley [volume 1, page 216]. The routes are easily accessible for toproping and leading.
Directions: From the forest in front of Chapel Pond Slab, walk south parallel to the road past the Chapel Pond Boulders (a small bouldering area). 60' past the boulders turn right and walk up the steep wooded slope to the base of the slab 600580,4887655. If you're facing uphill, Little Empress is just right of the mouth of the South Descent Gully for Chapel Pond Slab.
Tsarina 5.6 G 80' ★★
You can access the top of this route by scrambling up the descent gully, then right onto the cedar ledge.
Start: On the arête where the slab and descent gully intersect.
P1 5.6 G: Go a few feet up the arête, then follow widely spaced—but excellent—holds that lead diagonally right, then back left to the arête. Friction (crux) to a large, left-facing corner, and go up this until jugs lead over it to a final face and cedar ledge. 80'
Anastasia 5.3 R 60' ★★★
One of the best easy routes in the park. Fun, secure, and unique. A lone sapling midway offers psychological protection for leading. The top is reached from the cedar ledge of Tsarina using a fixed rope.
Start: 30' right of Tsarina at a vein of large, dark crystals.
P1 5.3 R: Follow the sinuous line of square-cuts to fixed anchor on cedar. 60'
Marie Antoinette 5.4 PG 90' ★★
A good introductory lead with varied climbing.
Start: At an obvious, leaning handcrack 20' right of Anastasia.
P1 5.4 PG: Climb the handcrack with a 5.4 move to a ledge. Traverse right past shallow, right-facing corners to the left end of the hollow "guillotine" flake. Keep your head and resist the urge to undercling out right. Instead, choose the short finger-tip crack that leads to a mellow arch and fixed anchor on cedar. 90'
Xena 5.9+ G 40' ★
This route can be toproped by walking through the woods from the right.
Start: At a point where the tree ledge of the prior climb meets the ground, below the right edge of the hollow flake.
P1 5.9+ G: Friction straight to the cedar. 40'
This small, hidden wall is located uphill from the Little Empress Slab and left of the South Descent Gully [volume 1, page 216]. Named on the 50th anniversary of the Beatles album release.
Directions: Scramble up the South Descent Gully a short distance to a tree with old rappel slings. Exit left onto broad tree ledge. Climbs are described right to left.
A Day in the Life 5.8 PG 40' ★★
Start: At a fingercrack just right of a giant ceiling and left-facing corner.
P1 5.8 PG: Go up the fingercrack with excellent locks, then traverse right on the face, then continue up to the top. 40'
Lovely Rita 5.6 TR 40'
Begin a few feet left of the arête where a minor ledge merges with the face. Follow good holds up to join the arête near its top.
Lucy in the Sky With Diamonds (aka: The LSD Arête) 5.9 TR 40' ★★
This is the obvious rounded arête on the right edge of the face. It is directly across the gully from the top of Tsarina. Climb the prow to the tree ledge.
Directions: Approach as for the Lonely Hearts Club Cliff Band, but continue past the large ceiling and up to nice ledges below a 150'-tall slab.
Keep Calm and Carry On 5.6 PG 120' ★★
This is a reasonably well-protected route on good rock that gives access to all the Emperor Slab climbs.
Start: Below the 150'-tall slab.
P1 5.6 PG: Climb clean and easy friction into a wide groove, heading for the first little cedar on the left margin of the face. Go right from tree to hidden flake (small cams). Move right again, then up on good edges (crux) to left end of foot traverse. Traverse right 30' to a spacious ledge. Belay here (and descend through trees to base) or continue up a pocketed crack to the Emperor Slab routes. 120'
❏V1 of Metacomet [volume 1, page 149] should be ★★★★.
Boquet River Crags ● Whitewater Walls
Wall #1
❏V1 of Route Number 1 [volume 1, page 184] should be ★.
Aspect: West
Height: 110'
Quality: ★★★★★
Approach: 40 min, moderate
Summary: Tall, sheer wall with difficult routes on excellent rock.
The Future Wall is mentioned [Volume 1, page 252] as having the greatest potential for new routes at Washbowl Pond. Indeed.
The west-facing wall is 130' tall, but the routes stop at a natural breaking point below the dirty, loose upper section. The base of the cliff is open and pleasant, a great place to be.
To set a toprope, walk right and up a broad gully separating the Future Wall from the Banana Belt. Once up the initial section of the gully, walk left to a short wall and follow this steeply downhill, then (skier's) right on ledges above the lower wall. You'll need to make a short rappel to safely reach the anchors.
It's About Time 5.11b G 75' ★★★
A straight-up face climb with great moves and a unique three-finger hole.
Start: 15' left of License to Drill, below a horizontal crack 6' up, and 6' right of a firepit.
● P1 5.11b G: Go up past the horizontal crack to a left-rising seam. Follow this to another horizontal break. Step left and climb straight up to a hole in orange rock. Go up and left to a ledge, then step back right. Continue straight up the wall to a ledge and fixed anchor. 75'
License to Drill 5.13a G 65' ★★★★★
Supreme, intricate, technical face climbing. Recent ascents have bumped this to 13a.
Start: Just left of the base of the right-rising ramp of Not Too Steep for my Lichen below a head-high horizontal crack.
● P1 5.13a G: Climb past several horizontal cracks, then up a left-facing edge. Continue straight up the face (crux) to a left-rising horizontal crack, then straight up to the top at a fixed anchor. 65'
Not Too Steep for my Lichen 5.12c G 65' ★★★★★
A gorgeous and aesthetic line. It has bigger holds than its neighbor, but is steeper.
Start: On the right side of the wall at a 2'-deep right-rising ramp.
● P1 5.12c G: Walk up right along the ramp (optional #0.5 Camalot), then layback and undercling up left-arching flakes to their top. Make a crazy-hard move (crux) to a coarse baseball-shaped hold, then reach right to some jugs. Layback to the top of the face and a fixed anchor. 65'
Aspect: West
Height: 80'
Approach: 45 min, moderate
Quality: ★★★★★
Summary: Overhanging wall with high-end routes that follow cracks and water grooves.
The Body Shop is an excellent cliff situated high above Roaring Brook Falls and below the Nubble (a small rocky knob above Washbowl Pond). It is, in fact, the left-most wall on the hillside above the trail that connects Washbowl Pond with Roaring Brook Falls. (The next cliff to the right—by some distance—is the Wall of Sorrows [volume 1, page 251]).
The base of the cliff has two obelisk-like boulders that protrude straight up from the flat terrain. The left one is 8' tall, and the right one is 5' tall. These boulders provide useful landmarks for locating the routes.
The base of the wall overhangs by 20°, and above the angle varies from overhanging to slab. The dominate features are intermittent cracks that range from seam to water groove to chimney. The climbs are all severe and excellent, and the views of the Ausable Club and Great Range are exceptional.
To reach the top, go up the steep slope right of I Gotta Guy.
Directions: [map on page 251, volume 1] From the three-way trail intersection at the south end of Washbowl Pond, follow the trail marked with red disks toward the Roaring Brook Falls Trail for 0.4 miles to the height of land. (Just before the height of land you will see the Wall of Sorrows on the right.) After the height of land, continue steeply downhill for 3 min to a large pointed boulder 20' down and right of the trail 600154,4888955. Leave the trail here and walk past this boulder. Contour the slope to the north with some cairns to a final chest-high step up to reach the base of the wall 600154,4889097.
Washbowl Pond ● The Body Shop
Main Wall
This is the tallest section of cliff, with the two obelisk-like boulders at the base.
Hourglass 5.12c G 80' ★★★★★
Named for an hourglass-shaped hold 30' up. The starting boulder seems secure, but make sure to belay to the side just in case. Since the FA, a foot chip has broken, so it's possible this is slightly more difficult than.
Start: 18' left of the large obelisk, at an overhanging crack with a cantilevered, 6'-tall, wedge-shaped boulder stuffed in 5' up.
● P1 5.12c G: Stick clip! Jam up the wedge-shaped boulder to a rest on its top. Make a long reach to a horizontal, then up to the hourglass hold (first crux). Gain the crack just above and climb this to a no-hands rest. Take a breath, then layback and pinch your way up the overhanging seams and water pockets (second crux, super techy) to a fixed anchor at the top of the cliff. 80'
Unnamed (project)
On the face in front of the large obelisk is this closed project.
Buzz Kill 5.13a G 50' ★★★★★
A masterpiece of opposition holds.
Start: 18' right of the large obelisk and 5' right of the small obelisk, at an overhanging crack-seam.
● P1 5.13a G: Up the crack to its top, then launch right to a good hold. Move back left up to a jug and good rest. Step back right and climb the overhanging water groove to where it changes angle and becomes an offwidth. Fixed anchor on the left. 50'
I Gotta Guy 5.12d G 50' ★★★★★
An amazing boulder problem start leads to an exciting jamming finish.
Start: 25' right of the small obelisk and 20' right of Buzz Kill, at the base of a ramp with a short, left-facing corner.
● P1 5.12d G: Go up the ramp to gain a vertical crack in a 15° overhanging wall. Climb the shallow, left edges to reach a horizontal crack. At a decent stance, contemplate the finger- and hand-jam finish. Break through the bulge to where the angle changes and the water groove becomes an offwidth. Go up this to a final slab move and a fixed anchor. 50'
Washbowl Pond ● The Body Shop
Right End
The Right End is about 100' right of the Main Wall. On the approach, just before the chest-high step, go up and right to the base of this short, wide wall.
Modern Collision 5.11a G 40' ★★★
This deceiving route ascends a 10° overhanging wall.
Start: At the highest point of the cliff is a vertical seam that travels the entire length. Begin 5' left in a shallow, left-rising, right-facing corner.
● P1 5.11a G: Gain the first horizontal crack and step right to reach the vertical seam. Using face holds, climb through a shallow overlap to gain the parallel crack system above. Follow this to the fixed anchor at the top of the cliff. 40'
❏P1 of Elusive Dream [volume 1, page 207] should be ★★.
❏V2 (All the King's Men) of Kingdom Come [volume 1, page 209] should be ★★★★.
❏There is a new fixed anchor at the top of P4 of Kingdom Come [route #20, volume 1, page 209].
❏The fixed protection has been removed from Working Wives [route #8, volume 1, page 203].
❏Variation to Kingdom Come [route #20, volume 1, page 209]:
V3 5.10 G: This 90' variation (an alternative to P4) avoids the harder finish to Kingdom Come. Begin on right end of the King's Couch (at the top of P3 of Kingdom Come). Traverse up and right 20' to a deep horizontal, then go straight up (crux) to a large flake on the right. Stand on this to reach a fixed anchor. Exposed! Gear: A few cams to 2". Rappel (single rope) back to the King's Couch.
1916 5.10a G 70' ★★
Start: Just left of Sentry [route #5, volume 1, page 202].
P1 5.10a G: Mixed gear and bolts lead up the face to a ledge with a fixed anchor. 70'
Yersina 5.11a G 50'
Start: Up and left of the Peasant Wall at a geometroc wall of 3' by 4' sections of horizontal and vertical cracks.
P1 5.11a G: Climb the geometric wall to a cedar on the right. 50'
Gear: Single set of cams to #1 Camalot.
The Redeemer 5.10c G 80' ★★
Start: 20' left of Soul Fire below the left end of a ceiling 15' up.
● P1 5.10c G: Go up to the left end of the ceiling, then up past some right-facing, pointed flakes. Continue up the face to a left-facing corner, then up to a fixed anchor. 80'
Soul Fire 5.10c G 80' ★★★
Great face climbing; harder if you're tall.
Start: At a waist-high boulder 25' left of Medieval Times [route #11, volume 1, page 206] below a left-rising crack that turns into a left-rising ceiling.
● P1 5.10c G: Follow crimpy holds up and left, then delicately up to a rail (#0.4 or #0.5 Camalot helpful, but not mandatory). Move left to a crux mantel, then straight up to a fixed anchor. 80'
Twenty Thousand Leagues of Passion 5.10d G 50' ★
Start: On top of a waist-high shelf, 50' right of Elusive Dream, 6' right of a large, pointed boulder that sits 10' back from the cliff.
● P1 5.10d G: Climb up to a break with parallel horizontal cracks. Move left to a gravelly open book and follow this up and left to a right-rising seam. Follow this seam (and slab below) rightwards to meet a left-rising crack system. Follow this up and left to a large shelf-ledge with a fixed anchor just above. This anchor sits 10' below the right side of a triangular roof. 50'
Between Seasons 5.11d G 215' ★★★★
Start: 20' left of The Keep [route #14, volume 1, page 206].
● P1 5.11d G: Follow a line of bolts left of The Keep through various crux sections and slanted shelves. 215'
Royal Pain 5.12a G 50' ★★★
This route is the completion of the V1 of Kingdom Come [route #20, volume 1, page 209]. It stays totally dry in rain, just like P1 of Kingdom Come. Sharp.
Start: On the right side of the starting boulder of Kingdom Come.
● P1 5.12a G: Climb straight up to a left-facing edge. Up this to its top, then angle up and right on sharp crimps to a fixed anchor shared with Four Guns Blazing. 50'
❏P1 of Führer [volume 1, page 211] should be ★★★.
❏V1 of Führer [volume 1, page 211] should be ★★★★.
❏V2 of Führer [volume 1, page 211] should be ★★★.
❏V1 (Palm Sunday (aka New Rubber)) of Thanksgiving [volume 1, page 218] should be ★★★★.
❏V1 of Regular Route [volume 1, page 219] should be ★.
❏V2 of Regular Route [volume 1, page 219] should be ★★★.
❏V3 of Regular Route [volume 1, page 219] should be ★★★.
❏P1 of Roaring Brook Falls [volume 1, page 316] should be ★★★★.
Edgewater 5.6 PG (5.3 R) 170' ★★
[Right of route #2, volume 1, page 317]
Extremely slippery when wet, which is most of the time; the rating reflects mostly dry rock conditions. After P2, you can join the normal route, or cross the stream and walk off right.
Start: On rocks just left of where the lowest waterfall terminates. Belay at the edge of the water 20' right of After Irene.
P1 5.3 R: Climb just left of the final small waterfall to a broken slab, then diagonal up and left to a ledge below and left of an usually wet, vegetated slab. There is an old fixed piton at the belay. 60'
P2 5.6 PG: Step up and left to the base of a right-facing corner. Climb the corner to the slab above then traverse right to a crack close to the water (often wet). Follow the crack straight up and over a small headwall to belay on a large ledge at the dead cedar, just left of the water. This is the same belay as commonly used after P1 of the ice route. 110'
❏V1 (Radioactive Direct) of Radioactive [volume 1, page 294] should be ★★★★.
❏V2 (Isotope) of Radioactive [volume 1, page 294] should be ★★.
❏V1 (Tequila Mockingbird Direct) of Tequila Mockingbird [volume 1, page 295] should be ★★★.
❏The hardware on Center Stage has been upgraded.
❏There is an alternative (and previously-unreported) approach to the Lower Beer Wall that begins at the alternative parking area 599451,4888877 [volume 1, page 286]. From the end of the parking area (the end nearest Chapel Pond), cross the road, and follow a good path directly to the cliff. The trail arrives at the top of Afternoon Delight [route #37, volume 1, page 302]. This is a faster approach if you intend on climbing at the left end of the Lower Beer Wall.
❏V1 (Death Trap Lite) of Death Trap [volume 1, page 304] should be ★★.
❏V1 (Lichenbräu Dark) of Lichenbräu [volume 1, page 309] should be ★★.
❏P1 of Backs against the Wall [volume 1, page 310] should be ★★.
❏V1 (Cruisin' with Joey) of Clutch and Cruise [volume 1, page 310] should be ★★.
❏V2 (Clutchin' the Bräu) of Clutch and Cruise [volume 1, page 310] should be ★★.
❏The trail to Spanky's Area crags was rerouted during a trail day organized by the Adirondack Climber's Coalition. It begins at the same parking [volume 1, page 188], but leaves from the right side of the parking lot rather than the left side.
Opportunistic Omnivores 5.9 PG 115' ★★
Start: 30' left of No Regrets Coyote [route #5, volume 1, page 189] on top of a boulder and below a black right-facing corner. This is the same start as Sheik of the Burning Sands (winter route).
P1 5.9 PG: Climb right-facing corners to a left-rising ramp. Up the ramp 10' (blue Camalot) and break an overlap on good holds. Wander up the face following holds and protection, then eventually head left aiming for a ledge below a white roof. From the ledge follow a rising crack to a pine tree rappel. 115'
❏The route Chocoholic is ●. The optional #4 Camalot doesn't really get you that much.
P1 5.12b G: Stick clip, then make a couple hard moves to get established at the overlap 10' up. From here, a tips-ripping slab-crimp gives way to a better hold at the second bolt. Continue straight up the face (5.9 PG) to the top, then step left to a fixed anchor shared with Lentil Beans. 75'
Thunder and Lichen 5.11c G (5.9 R) 85' ★★★★
[route #22, volume 1, page 192] This project has been meticulously cleaned, and led as a single pitch. The route is well-protected once above the horizontal crack 12' up; if you're worried, you can pre-place a #4 Camalot in the horizontal and stick clip it. An excellent, sustained pitch.
Start: 30' left of Rope Burn at a black wall that leads to a left-leaning seam that begins above a wide horizontal crack 12' up. The face on the right of the seam is sparsely dotted with orange lichen.
P1 5.11c G (5.9 R): Climb the black face up to a wide horizontal crack (#4 Camalot), then go up the left-leaning seam (crux) to its top. Mantel onto a sloping stance. Follow a crack over the next bulge to the top of the wall and a fixed anchor. 85'
Gear: Standard rack to 2", plus 1 ea #4 Camalot.
Sleeping Bats Fly 5.6- G 90' ★★★
Start: 20' right of Let Sleeping Bats Lie [route #28, volume 1, page 193].
P1 5.6- G: Make a hard move off the ground, then up the right side of a clean face to a ledge (shared with Let Sleeping Bats Lie) with a fixed anchor. 90'
Gear: Small gear from Camalots 0.1 to 0.4
Boquet River Crags
Shark Fin Cliff
Shark Fin Cliff sits 600' upstream from the Boquet Canyon and on the same side of the river 600444,4885628. The cliff can be seen from the pool below Welcome to the Jungle [route #1, volume 1, page183]. The south side of the cliff is an easy slab and the west side has possibilities for more technical lines, its dominant feature being a roof that resembles a huge shark fin.
Directions: There is an alternative approach to the Boquet River Crags that is reportedly quicker. Park at Round Pond Trailhead [volume 1, page 426] (1.0 mile from the Chapel Pond Pullout, when driving towards Malfunction Junction). Follow the Dix Mountain trail (blue markers) to Round Pond and continue along its northern shore. Follow the trail over the height of land to a stream crossing at a log bridge. Leave the trail and bushwhack left (roughly south) along the stream for about 0.1 mile to where it meets the North Fork Boquet River. Follow this downstream for another 0.3 mile to reach the north end of Shark Fin Cliff.
Talus About the Crack 5.6 PG 70' ★★
Start: 150' from the south side of the cliff directly below the shark fin shaped roof. This is directly above a large dipping pool.
P1 5.6 PG: Climb up a slightly overhanging wall with left-leaning cracks to a stem-box below a narrow ceiling. Break right through a slot in the ceiling to a small ledge. Continue past a large freestanding flake on the left to the top of the chute. Exit right onto terrace. Belay and rappel from trees. 70'
Gear: To 2".
Mama's Boquet 5.7 PG 40' ★★
Start: 300' upstream from Talus About the Crack at the corner of a smaller cliff immediately after a sandy gully 600389,4885702.
P1 5.7 PG: Go up and left of a triangular ceiling at head height on clean rock. Follow a right-rising crack to a nearly vertical crack ending at a ledge. Follow a left-rising rail to the top (critical blue & black alien in crack left of rail). Walk off to right down gully. 40'
Gear: To 2".
❏V1 (Left-Hand Direct) of Left-Hand Route [volume 1, page 227] should be ★.
❏P1 of Right-Hand Route [volume 1, page 228] should be ★★★.
❏P3 of For Once a Great Notion [volume 1, page 228] should be ★★★.
❏V1 of Tilman's Arête [volume 1, page 234] should be ★★★★.
❏V2 of Tilman's Arête [volume 1, page 234] should be ★★.
❏Due to beaver activity and a new thigh-deep pond, the DEC has kindly rerouted the approach to the Creature Wall. For the new approach, park at the trailhead for Giant Mountain, 0.2 mile from the Chapel Pond pullout (when you're driving toward Malfunction Junction). Follow the main hiking trail about 100 yards past the sign-in register to where the trail swings to the right. Leave the trail on the left (cairn) and follow flagging on a level bench to where it meets the old approach trail just below the cliff. This new approach is always dry. Click here for a revised map.
Named for the winter route located here, you pass this wall on the approach to the Upper Washbowl. It's about 50' tall and gently overhanging. There is a flat base area, and on the far right side is a 10-high, fin-like boulder set back 1' from the cliff face.
Directions: Follow the approach for the Upper Washbowl [volume 1, page 240]. "...go up and left along the base of the [Creature Wall] and through large talus blocks, veering right to the base of another steep wall." This steep wall is the Flexible Flier Wall 600522,4888371.
The Whole Enchilada 5.11a PG 50' ★★
Good gear, but very specific and difficult to place.
Start: Just right of the flat area at a crack that begins in the dirt and leans right 45°.
P1 5.11a PG: Follow the crack to two horizontals 10' up. Above are two vertical seams in black rock. Face climb left of these (crux, #00 TCU and #2 Wild Country Rock), then move into the left-hand seam, which is now a finger crack. Follow this up and left to some chunky rock (there is a fixed hex hidden in a gravely alcove) to a left-facing, left-leaning corner. Up this (fixed piton on the right) to its top, then up jugs to a final short handcrack. Fixed anchor on a tree. 50'
Gear: Nuts and cams to 1.5".
❏The approach has been changed; see above notes about the Creature Wall.
❏V2 (Butterflies Are Free) of Mastercharge [volume 1, page 244] should be ★★★
❏P1 of Prelude [volume 1, page 248] should be ★★★.
❏P2 of Buffalo Soldier [volume 1, page 249] should be ★★.
❏The bolts and fixed anchor on Weekend Warrior have been updated (2018).
Herbie's Tomato Garden 5.10b G 110' ★★
Start: Same as BBC [route #1, volume 1, page 244].
P1 5.7 PG: Climb the first pitch of BBC route and make a belay at a cedar on a big ledge. 30'
P2 5.10b G: Traverse right past a corner and follow a handrail out ledges of black rock. At the end of the handrail, go up a blocky corner to a stance below a gnarled cedar being careful of rope drag. Step left out onto the face and work up a series of stepped ledges with a steep face above. Up the face (crux) to a fixed anchor. 80'
Oscar's Pillow Toss 5.11b G 120' ★★★
Start: Same as Cul-de-Sac [route #2, volume 1, page 244]: at the base of a 25'-tall left-facing dihedral.
P1 5.7+ G: Climb the beautiful hand crack to the top of the block. Walk right using a hand rail to a fixed anchor on the right side of the ledge below a right-facing, stepped corner. 40'
P2 5.11b G: Gain the corner to a stance and a handrail leading right. Follow the handrail to a fingercrack and good gear. Up the crack (or bypass this crux on the right by climbing flakes) and face above, then mantel onto a ledge (crux). Follow the stepped ledge left to a short face; cross this to reach a broken fingercrack. Up the crack to a fixed anchor. 80'
Gear: Single rack to #0.75 Camalot; a few small cams; 2 ea #2 Camalot for P1.
Unnamed (project)
Closed project. At the fingercrack on P2 of Oscar's Pillow Toss, continue right trending upwards following flakes and ledges for 40' to a left-facing, blocky corner. Follow a broken crack system to the top.
Unnamed (project)
Closed project. From the P1 belay of Oscar's Pillow Toss, climb the large arching corner until you are forced to break a ceiling at some right-facing overlaps. Go up the face above to a good stance, then follow the same finish as Oscar's Pillow Toss.
Forever Who I Am 5.11a TR 100'
Begin 15' right of Weekend Warrior and climb directly up the face to a fixed anchor. Access the fixed anchor from Hesitation.
Upper Washbowl
Routes that start on the Slanting Ledge
Munchkin Country 5.11a G 100' ★★
The old piton has been replaced with a bolt.
Start: Same as Flight into Emerald City.
P1 5.11a G: Start as for Flight into Emerald City. When the crack forks, climb the left fork to the top of the cliff. 100'
Gear: To 2.5".
Upper Washbowl
Left Descent Wall
On the (climber's) left walk off from the top of the Upper Washbowl you walk in front of this wall, which sits directly above BBC [route #1, volume 1, page 244]. It's a great diversion after topping out on the main cliff.
Breaking Trad 5.11b G 40' ★★★
Excellent face climbing.
Start: 45' from the right end of the wall, below the second black streak from the right.
● P1 5.11b G: Go straight up the wall making long reaches between good holds. Fixed anchor in the back of an alcove. 40'
DP 5.12c G 45' ★★★★
Super techy, off-vertical face climbing.
Start: 10' right of Breaking Trad.
● P1 5.12c G: Go straight up, then up and right to gain a left-rising seam. Follow this (poor feet) to a jug fingercrack, then deadpoint to a slopey slot. Up a short fingercrack and face to a fixed anchor. 45'
❏V2 (Deviant Finish) of The Key [volume 1, page 269] should be ★.
Arachne (aka Five Hundred Rednecks with Guns) 5.12a X 45' ★★★
This previous toprope [route #4, volume 1, page 260] has been led and renamed. The quality rating is for the toprope. It's a serious lead, climbing in and out of ground fall. The old bolt at the start (which was useless) has been removed.
Start: 4' left of Dacker Cracker below a series of left-rising, right-facing edges.
P1 5.12a X: Boulder up to the start of the left-rising edges to better holds and the first gear 25' up. Continue up and left in the shallow, right-facing corner. Exit through a V-notch to the top. Belay from trees. 45'
Gear: Green Alien, blue Alien, #5 BD nut, #7 BD nut, red Alien (#0.5 Camalot doesn't fit), #1 DMM RP.
On the Edge of Oblivion 5.12c X 80' ★★★★★
This route, previously known as Jungle Fever [route #11, volume 1, page 262], was never led, and the bolts were removed rendering it...impossible? I guess not; it has now been led headpoint style, in and out of ledge fall. The climbing is high quality, and is highly recommended as a toprope (after leading, say, Esthesia or Slim Pickins).
Start: Same as for Slim Pickins. Best to belay on the sloping ledge below the main Slim Pickins corner.
P1 5.12c X: Start in the main Slim Pickins corner. Traverse left to the arête and climb it and the black face to a good hold. Trend up and right and join Slim Pickins for 8'. Head back left to the arête and climb to an overlap (crux). Surmount this and continue to a larger overlap. Continue up through a final overlap, then up the face to a fixed anchor shared with Esthesia and Slim Pickins. 80'
Gear: Finger-sized cams, RPs, and a #2 Camalot. A black Alien and blue Totem are also useful.
Je Me Souviens 5.12+ TR 0'
This newly "discovered" left-leaning crack lies between Slim Pickins and Zabba, and is reportedly protectable in the PG/PG13 range with an emphasis on offset cams. It remains an open project.
Location: East side of NY 73 in Keene Valley
Aspect: Southwest
Height: 80'
Quality: ★
Approach: 27 min, moderate.
Summary: Small isolated cliff very close to Keene Valley with potential for more routes.
This isolated, 250'-wide cliff is located on a hillside south of the Mossy Cascade hiking trail to Hopkins Mountain. It cannot be seen from the road or trail, but most of the approach is via the trail. The cliff has potential for more routes.
The cliff has a higher left-hand section, and a lower but steeper right-hand section. You can reach the top by hiking around either end.
Directions: Park at the Mossy Cascade trailhead, a pullout on the east side of NY 73, 1.9 miles south of the Noonmark Diner in Keene Valley 597727,4890688.
From the trailhead (0 min), follow the marked Mossy Cascade Trail along the east branch of the Ausable River. The trail crosses a private road near some residences, then follows the Mossy Cascade Brook. On the left side of the brook is some rock on private land. The trail climbs past Mossy Cascade Falls (not visible from the trail). At 22 min, the trail begins a switch back to the right at a set of shallow wooden steps. 100' further, on the right end of this switchback, locate a 4'-tall boulder 30' right of the trail. Turn right (south) of the trail to the boulder, then contour the hillside. At 24 min you will cross a private driveway, just uphill of a tan-colored 4'-tall boulder alongside the driveway. Continue contouring the hillside to reach the cliff at 27 min 598435,4890884.
Lower Mossy Cascade Cliff
Left Section
This section has a rolling, wooded ledge along the base. The routes start from this ledge, which is easy to access from either end. Right of Full Value are several shorter, wide cracks which start at the base ledge.
Full Value 5.8+ G 80' ★
Start: 30' right of the left end of the cliff, at a handcrack that begins on top of blocks at the left end of the base ledge.
P1 5.8+ G: Climb the crack. 80'
Lower Mossy Cascade Cliff
Right Section
From the Left Section, walk right past the end of the base ledge. The right-hand section begins where the base ledge tapers to the ground.
Rites of Spring 5.8+ G 70' ★★★
Start: 20' right of the end of the base ledge and 8' right of a spruce tree, at a vertical crack that begins 8' up.
P1 5.8+ G: Make a boulder move (5.7 PG) to gain the crack. At mid-height, shift right 4' to another crack (crux) and follow it to the top. 70'
Location: East side of NY 73 in Keene Valley
Aspect: South
Height: 90'
Quality: ★★
Approach: 45 min, moderate
Summary: A small crag on a long cliff line east of NY 73 in Keene Valley; good potential for more routes.
There is a long, intermittent cliff that runs across the base of Hopkins Mountain, from near the Ranney Trail (on the north) to near the Mossy Cascade Trail (on the south). This line of cliffs is visible from NY 73 in the winter. This particular crag is the southern section of this cliff, on a hill north of the Mossy Cascade Trail that goes up Hopkins Mountain.
This end of the line cannot be seen from the road or trail, but most of the approach is via the trail.
The crag is wide and circles the hilltop from the south side around to the west side. To reach the top either (a) scramble up 3rd class rock on the right end, right of the route Baby Snake, or (b) scramble up steep woods in a break in the cliff band 100' left of Ramshackle Corner.
Directions: Park at the Mossy Cascade trailhead, a pullout on the east side of NY 73, 1.9 miles south of the Noonmark Diner in Keene Valley 597727,4890688. From the trailhead (0 min), follow the marked Mossy Cascade Trail along the east branch of the Ausable River. The trail crosses a private road near some residences, then follows the Mossy Cascade Brook. On the left side of the brook is some rock on private land. The trail climbs past Mossy Cascade Falls (not visible from the trail), and then crosses the brook at 25 min. At 35 min, on a slight downhill, reach an obvious yellow-blazed property boundary. This is an old property line; as of the early 2000s both sides of this line are State Land.
Turn left (north) off the trail and follow the yellow-blazed property line through generally level open woods. This is the route of the long-abandoned "Keene Valley" hiking trail, so there is occasional evidence of a maintained footpath. At 42 min, reach an area with large blocks in the woods. From the last yellow-blazed tree, follow cairns right, and then left up through a short talus field to the base of the cliff at 45 min 598500,4891999.
The trail reaches the cliff at a 15'-tall tower of red rock (aka the "Red Tower"), which is a good landmark for locating routes.
Ramshackle Corner 5.6 PG 70' ★★
Start: 75' left of the Red Tower, at a large right-facing corner left of a black slab.
P1 5.6 PG: Go up the slab a few steps and then left into the corner. Climb straight up past some small scrappy trees and an unprotected section to the top. 70'
Gray Tower 5.6+ G 75' ★★
Start: 5' right of the Red Tower, at a toe of gray rock, where a 3"-diameter birch tree appears to be growing directly out of the rock.
P1 5.6+ G: Climb easily up and left, then up through an overhanging channel on huge holds to an anchor on a small tree. A #5 cam is helpful just below the steep channel. 75'
Cedar Circle 5.10- G 80' ★★
Start: 15' right of the Red Tower, at a vertical crack that rises from a small circle of large cedars at the base of the cliff.
P1 5.10- G: Make a hard boulder problem to gain the crack, then follow it to the top. The wide section at the top is safer if you bring a #5 cam. 80'
Cedar Right 5.9 G 80' ★★
Start: 5' right of Cedar Circle at a right-rising crack that leads through a bulge.
P1 5.9 G: Climb the crack through the bulge (using a couple holds on Cedar Circle). On easier ground, move right around some blocks and then up into the obvious and very steep stem box. Up this (crux) to the top; fixed anchor on a tree. 80'
Orange Zombie 5.7 R 80'
Interesting, loose and scary!
Start: 75' right of the Red Tower, at a 6'-high "zombie-sized" orange block standing in a corner.
P1 5.7 R: Climb the block, and then step up left onto a platform. Continue straight up through a slot, past a small tree and up to a sloping ledge with a large block on the right. Step right up onto the block, then scramble right to a tree in a gully. It's best to belay the second back on top of the block. 80'
Baby Snake 5.6 G 90' ★
Start: 10' right of Orange Zombie at a ramp of low-angled rock.
P1 5.6 G: Climb the ramp with vertical rock to your left past a short friction crux that is often wet. Finish in a short vertical corner. 90'
Location: Keene
Aspect: West
Height: 90'
Quality: ★★
Approach: 28 min, moderate.
Summary: A long line of mostly-unexplored cliff above NY 73 in Keene Valley.
There is a long, intermittent line of cliffs that runs across the base of Hopkins Mountain from near the Ranney Trail on the north end to near the Mossy Cascade Trail on the south end. This line of cliffs, visible from NY 73 in the winter, was private land, but New York State acquired it around 2005, and now the whole line is public land.
The area has potential for more routes. This particular set of cliffs is on the side nearest the Ranney Trail. Because the beginning portion of the Ranney Trail is an easement on private land, the approach walks uphill until the trail reaches state land, then travels back downhill to reach the cliffs.
Watch for poison ivy along the base of the cliffs, mostly near the open talus.
Directions: Park at the Rooster Comb Trailhead 596982,4893207, on the east side of NY 73, 0.4 mile south of Keene Valley (from the intersection of NY 73 and Adirondack Street). From the trailhead (0 hr 0 min), walk south (towards Chapel Pond) on NY 73. At 1.5 min, turn left onto Ranney Way and follow it on the level valley floor for a while, and then uphill to where it becomes the marked Ranney Trail, paralleling Hopkins Brook. Follow the trail; at 21 min, enter state land marked by a sign. Leave the trail on the right and cross Hopkins Brook. Follow the obvious yellow-blazed state land boundary downhill, almost parallel to the brook. At a cairn, veer left from the blazed line and follow a path to reach an old forest road at 24 min. Follow the old forest road downhill, and at 25 min reach a cairn on the left that marks the start of the short path to the cliff. (If you reach a yellow-blazed survey line and a "state land" sign facing downhill, you have gone about 80' too far on the old road.) Follow cairns across the hillside to reach the left end of the cliff at 28 min.
The approach reaches the left end of the cliff line 597741,4892663. Walk to the right to the first rock, which is low and wet. Continue right along the base of the rock; after 3 min, you will reach larger walls. The first wall features angular rock with some route potential. The next wall is higher and features brown rock, with a long overhang and some shattered talus at the bottom; this cliff also has potential for difficult routes. Near the right end of this cliff, a broken right-facing corner and crack rises from a tiny flat area with grass; this is the start of Raven Chase.
Raven Chase 5.9 G (5.6 R) 90' ★★
Start: At the broken, right-facing corner and crack above a tiny flat area with grass.
P1 5.9 G (5.6 R): Go up the crack through some broken rock to a small birch tree. Follow a ramp up and left, then step down to an alcove. Friction up left (5.6 R) to a crux finish in a boxed-in corner. 90'
Ranney Cliffs
Quarantine Buttress
Work from Home (aka Red Dihedral) 5.8+ G 70' ★★
Start: Right of Raven Chase is a section of black rock. (The Black Bowl ice route is located here.) This route is located 50' right of Black Bowl at broken, red rock hidden in thick evergreens. It is most easily located by first finding the Masks, Methanol, and Moonshine, which is 10' right and more obvious.
P1 5.8+ G: Scramble up to a handcrack. Climb the handcrack until it is possible to step right and climb cracks to a ledge. From the ledge find a hidden overhanging dihedral and climb this for 20' until it is possible to move left (crux) to a hanging block on the arête. Finish up the arête to a fixed anchor. 70'
Gear: Standard rack to 3".
Socially Distant 5.11b G 75' ★★★
Good climbing with coarse rock. Can be toproped after leading Masks, Methanol, and Moonshine. The first bold is very high.
Start: At the left side of a detached flake-tower 8' left of Masks, Methanol, and Moonshine.
● P1 5.11b G: Gain the top of the flake-tower. Move up on small ledges then reach a perch on the arête to the left. Continue up the arête to a small roof; clear this on its right side and move up to a fixed anchor (shared with Masks, Methanol, and Moonshine). 75'
Masks, Methanol, and Moonshine (aka Gray Dihedral) 5.10a G 75' ★★
A nice, sustained handcrack, somewhat marred by loose blocks down low, and hollow rock in the corner.
Start: At a handcrack in a very obvious, left-facing, gray dihedral.
P1 5.10a G: Go up the corner to a ledge 20' up. Climb the beautiful overhanging handcrack above to a fixed anchor (shared with Socially Distant). 75'
Gear: Standard rack to #3 Camalot, with an extra #1 and #2 Camalots.
Homeschooled 5.11d PG 75' ★★★
Start: On the off-vertical wall 10' right of (uphill and around the corner from) Masks, Methanol, and Moonshine below a flared, pinched-off crack.
P1 5.11d PG: (V1) Up the crack to its top (crux), then up a thin crack (small nuts and microcams) to better holds. Continue more easily to a fixed anchor under a large, flat, perched flake. 75'
V1 5.11a G: Climb the initial corner of Corona Corner to the ledge, then step right and join the normal route at the first bolt.
Gear: Micro-cams, small wires.
Chimney Arête 5.6 G (5.4 R) 75' ★
You can avoid the chossy finish by stepping left to the fixed anchor of Homeschooled.
Start: 20' right of Gray Dihedral at a left-leaning chimney high on the cliff.
P1 5.6 G (5.4 R): Climb the chimney past two low chock stones (crux) onto a large ledge. Continue up the blunt, low-angled arête that forms the left margin of the chimney (5.4 R). 75'
Narsil 5.8 PG 50' ★★
Start: From Chimney Arête, walk right past dramatic blocky walls with roofs for 7 min to this obvious arête.
P1 5.8 G: Climb arête using the crack 3' right. The thin crux near the top. 50'
Location: Between Noonmark and Round Mountain, accessed from the Giant Mountain Trailhead in St. Huberts
Aspect: West
Height: 60'
Quality: ★
Approach: 28 min, moderate.
Summary: Generally short routes on two west-facing cliffbands above Icy Brook.
Round Mountain is well-known to climbers, as it is on this mountain you find Chapel Pond Slab, the Beer Walls, and the King Wall. This line of cliffs is on the other side of the mountain above Icy Brook, a stream that runs between Round Mountain and Noonmark Mountain.
There is extensive ice climbing on the Lower Cliff.
Directions: Park at the Roaring Brook Falls Trailhead / Adirondack Mountain Reserve (AMR) Trailhead: These parking areas are located on opposite sides of NY 73 in St. Huberts, 3.2 miles from Keene Valley (from the intersection with Johns Brook Road, when you're traveling toward Chapel Pond), and 5.4 miles from Malfunction Junction (when you're traveling toward Keene Valley). From the parking lot on the west side of the road, walk up the dirt road to the golf course and trailhead for Noonmark (aka the Stimson Trail) on the left, marked with yellow discs. Follow a private road to the beginning of the trail, then up the trail to a junction at 20 min. Bear left toward Dix Mountain. At 23 min the ground is fairly level and the brook is nearby. Leave the trail here on the left and walk straight east. Cross Icy Brook, then walk a little ways uphill to reach the left end of the lower cliff at 28 min 598689,4888204. In times of high water, Icy Brook can be difficult to cross. In this case, use the S. Burns Weston Trail that ascends Round Mountain, and bushwhack from there; it takes twice as long.
The Lower Cliff is 400' wide and severely overhanging, but only about 50' tall at its highest. There is great potential here for short, hard mixed lines.
Weenie Way (project)
This open project was cleaned in 2016, but never climbed. It reportedly goes at about 5.9, and is 50' tall. Begin near the center and highest point of the lower cliff, at a left-leaning overhanging crack. Go up the crack on large holds to the top.
The Upper Cliff is about 100' wide and 60' high, and is generally overhanging. The roof right of Blueberry Jam is large with some futuristic routes possible.
Directions: From the Lower Cliff, walk left and follow the outcrop to its left end. Continue 60' past where the cliff is no longer "climbable height" to a point where it is easy to scramble up to the top. From there hike back right across the top of the cliff for 300' to a point where you can see the Upper Cliff through the trees, about 75' uphill 598694,4888292.
Blueberry Jam 5.9 G (5.6 R) 60' ★★
Start: At a right-facing corner toward the left side of the cliff, below a roof. Right of this the roof becomes very large.
P1 5.9 G (5.6 R): Go up the right-facing corner past the roof where it changes to a left-facing corner with excellent jams. Follow this to the top. 60'
The Wave 5.8 G 60' ★
Start: Right of Blueberry Jam is a large roof. 20' right of this, the cliff bends around a corner and becomes less steep. Begin in a left-facing corner toward the right side of the cliff.
P1 5.8 G: Go up and left along cracks and flakes to the top. 60'
Watch Bezel 5.8 G 50' ★
Start: Same as The Wave.
P1 5.8 G: Go straight up the face with the horizontal cracks. 50'
Whips and Chains Excite Me 5.12a G 70' ★★★
This route breaks a roof on the left end of the cliff, nearest the hiking trail. Some say 5.11d; you decide.
Start: 100' left of Edge of the Valley and 30' from the stream at a slab below a large roof 30' up, just left of a left-facing corner.
● P1 5.12a G: Go easily up the slab and leftwards to a left-facing offset in the roof. Pull the roof and work up and right to a stance. Move up and left across a steep face, around an arête then up onto a ledge. Continue straight up to top out; fixed anchors on the right. 70'
Fresh Outta Jitters 5.11c PG 70' ★★
Take care to keep the rope out of the crack at the lip of the roof; a black Alien clipped to the thumb loop just left of the main crack works well.
Start: 100' left of Edge of Insanity, same as Whips and Chains Excite Me.
P1 5.11c PG: Climb up the broken left-facing corner to the roof. Follow the crack out the roof and make a strenuous move to get established above. Climb straight up a crack (micro cams, small nuts/brass) to a bulge. Traverse left (more small cams) then up to an undercling, pull the bulge into the open book above. Continue straight up to a fixed anchor. 70'
Gear: Standard rack plus small nuts/brass, micro-cams.
The Other Side of Insanity 5.10a G 60' ★★★★
Climbs the steeper side of this amazing blade of rock; much better than its neighbor.
Start: Locate Edge of Insanity. On the left side of the fin is a deep V-chimney. Begin left of the toe of the buttress below the fin, below a small ledge 10' up.
● P1 5.10a G: Stick clip. Go up to the ledge, then work up and out right to the arête. Follow the arête through a bulge (crux) to a ledge and fixed anchor shared with Edge of Insanity. 60'
Edge of Insanity 5.10d G 60' ★★★
The route Edge of the Valley (aka The Shark's Fin) [route #3, volume 1, page 256] has been cleaned, equipped, led, and renamed (again). Climbs an amazing blade of rock.
Start: First, find the obvious fin of rock, about 100' right of Stagger and Swerve. On the left side of the fin is a deep V-chimney with a towering block that leans across the gap and touches the fin, and to the right is a giant dead birch. Begin at the toe of the buttress below the fin.
P1 5.10d G: Climb broken, chossy rock to gain the fin, then follow it to the top. 60'
Gear: Single rack from blue TCU to #0.75 Camalot.
O Canada 5.8 G 60' ★
Start: 15' right of Edge of Insanity below a crack/chimney line.
PG 5.8 G: Go directly up and through a left-facing dihedral into a small overhang. Follow a juggy crack system to the top. Step up to a birch tree or left to the fixed anchor of Edge of Insanity. 60'
Gear: To 5".
New Plumbing 5.6+ G 40'
Start: 10' left of Plumber's Crack [route #5, volume 1, page 222].
Climb face past several great horizontal cracks to a bolt. Make a big reach (crux) to better holds, then move right to join Plumber's Crack to the top. Fixed anchor on tree shared with Plumber's Crack. 40'
Location: Near the intersection of US 9 and NY 73 (Malfunction Junction), accessed from Exit 30.
Aspect: Southeast
Height: 100'
Approach: 45 min, moderate
Quality: ★
Summary: A sheer, off-vertical face with high-quality, black rock.
Camalot Cliff is a 200'-wide, 100'-tall off-vertical face located on Noble Mountain, a minor summit due south of Rocky Peak Ridge. This cliff is the largest in a cluster of tiny cliffs located just east of spot elevation 502, located due north of Malfunction Junction. You can glimpse several of the cliffs (but not Camalot Cliff) from US 9, just north of Malfunction Junction near a wood bridge 605616,4884937 over the Boquet River. (This bridge is the marker for a hidden ice pillar—Rickety Bridge Pillar—on the east side of the road.)
The rock is similar in texture to King Philip's Spring Wall [volume 1, page 147], and the cliff geometry is similar to the Highway Blues Slab [volume 1, page 149], but with a much improved ambiance (i.e., no highway noise). The terrain is lowest on the left side, and rises as you move right. The face is surprisingly devoice of features, although there are several left-rising cracks and dikes. Of particular note is a left-rising overhang that begins near the ground right of center.
You can reach the top of the cliff by hiking around the right side.
There are presently many closed projects here.
Directions: Park on the west side of US 9, 0.1 mile north of Malfunction Junction, next to the entrance to an excellent primitive campsite 605222,4884376.
Cross the river, go up a short slope, then head northwest through level woods to another rise. Go up this gaining about 70' of elevation and keep a steep drainage in sight to the left until you reach a bench with open slabs to the right. Swing around this ridge, stay at the same level until you are on its north side, then descend to a level, wooded hollow (if you drop down earlier you'll be in a swamp). Walk northeast for 8 min, past several small 30'-tall cliffs, then cut northwest up a drainage system and skirt another open slab, to reach another wooded hollow behind it. Follow it northeast until the terrain drops. Hold the elevation and walk along the top edge of a talus pile to reach the left end of the cliff 605398,4885497.
It is possible to approach more directly from US 9, but this crosses private property near the river.
Your Mother is a Hamster 5.10a G 65' ★★★
Start: At the very left edge of climbable rock.
P1 5.10a G: Go up a shallow pedestal to a steep face. Up this to a crack, trending right to another right-leaning crack; up this to the top. 65'
Unnamed (project)
Closed project. Begin midway between the previous project and Black Knight's Fight. Go up a whisper-thin seam to the top.
Black Knight's Fight 5.9- PG 75' ★★★
Devious route finding, which is typical of this cliff. Has some spicy runouts.
Start: Below an 8'-tall left-facing corner that begins 10' up. There is a fresh rock scar that forms a good, 1'-wide foothold just above ground.
P1 5.9- PG: Go up to the corner, make a difficult move to its top, then mantle onto the holds. Work up through a steep section via right-rising cracks and seams, then move left along a horizontal a few feet to holds. Up these, then slant rightward toward a left-facing corner on the horizon at the top of the cliff. Pull up onto a good stance at this point. Go 25' up a trivial, dirty slab to a fixed anchor on a white pine tree. 75'
Unnamed (project)
Closed project. Begin immediately right of Black Knight's Fight and climb right-leaning vertical seams.
Noble Prize 5.9 G 85' ★★
Start: Two-thirds up the ramp at the base of the cliff is a mound of dirt that forms a moat between itself and the cliff. Begin at a ground-level, rounded, right-facing flake on the left side of this moat. 20' above is a left-facing, fin-like flake.
P1 5.9 G: Climb a left-facing corner to the fin flake. Traverse left 6' to a small, left-rising flake that breaks an overhang. Weave up the face on small holds, then traverse right into a body-sized alcove beneath a left-rising diagonal dike. Rail left along the dike to a point where the dike diminishes, then climb pockets and good holds to a fixed anchor. 85'
Noble Truths 5.10b/c PG 85' ★★★★
The best route here so far. Technical, pumpy, and cerebral with several cruxes.
Start: Same as Noble Prize.
P1 5.10b/c PG: Climb a left-facing corner to the fin flake. Make a difficult step up and left through an overhang. Climb up and slightly left, then back right, then make a difficult mantel onto a ramp. Climb through overhang, then up a bulging face to a fixed anchor. 85'
Gear: Single rack from microcams to #1 Camalot; 2 ea #0.4 and #0.5.
Unnamed 5.11b TR 85'
Begin just right of Noble Truths and go up the initial face to a thin face to a small bulge with a left-rising crack. Go up the face staying right of Noble Truths, then trend left to finish at that route's anchor.
Castle of Aaargh (project)
Closed project. Begin at white rock below the slanting roof, just left of the next project. Go directly up to the roof, then over this to reach an overhang with a left-rising dike. Follow dike left to the end of the overhang, then climb straight up face to anchor. In the 11d/12a range.
Unnamed (project)
Open project. Go up a left-facing corner to an overhang, then traverse along its base 20'. Break through and go up a slightly overhanging face with mere hints of vertical seams running up it.
Unnamed (project)
Closed Project. Begin as for Noble Intentions. Follow Noble Intentions to where it steps right. From there, go up the face with left-slanting seams to the top of the cliff.
Noble Intentions 5.10b G 55' ★★
More route finding to decipher on this one. The move, once ascertained, is not that difficult, but hanging on long enough to find it certainly is.
Start: At a 7'-tall face below an overlap 11' up, 10' right of a left-facing corner, and 20' left of a broken area with the left-slanting crack of Ham and Jam and Camalots.
P1 5.10b G: Climb up to overlap and step right to a left-rising seam (micro-cams). Make a committing move onto the steep face above the overlap, go up a step, then step right across the seam onto the steep face immediately right of it. Move up to a horizontal crack and stand up at the bulging face above it via underclings, gastons, side-pulls, and a 1-finger sloper. Step right for holds then move up to a small niche. Step out left and go up, cross a thin, left-rising diagonal dike to lower-angled rock. Head up to a twofxied anchor. 55'
Gear: Micro-cams to 2".
Unnamed (project)
Closed Project. Begins as for Ham and Jam and Camalots, but continue up the left-slanting crack line to the dike. Take that feature across the face to the top left of the center of the wall.
Ham and Jam and Camalots 5.8+ G 45' ★★
Start: In an overhanging, left-leaning open book 30' left of the left end of the cliff.
P1 5.8+ G: Climb up into an overhanging open book and make a hard move to a stance left of its top. Traverse right 4' and go up a left-leaning vertical crack for 10'. Climb straight up the face to the right via good cracks and horizontals to a fixed anchor. 45'
Unnamed (project)
Closed Project. Climbs the vertical crack immediately right of Ham and Jam and Camalots.
❏As of May 2021, the parking area for the Case Wall has been closed and barricaded. You now have to park at the Beer Walls (which is already tight) and walk down the road to the [now closed] parking and follow the normal approach, which is still the fastest way.
Beer Walls ● Case Wall
Lives of the Hunted Area
Briefcase 5.12d G 35' ★★
Severely overhanging with really good moves and some knee bars. Good value for a short route, and always in the shade.
Start: Uphill and left of Climb Free or Die Trying [route #96, volume 1, page 314] is a severely overhanging wall in the steep gully. Begin on the right side (when facing uphill) of the deep cleft, at a seam–crack that breaks the overhanging wall.
● P1 5.12d G: Stick clip. Step up into a right-facing corner, then reach left into the overhanging crack. Pumpy moves up the crack lead to a V-groove and a fixed anchor on the right. 35'
Beer Walls ● Case Wall
Shotgun Face
❏The routes on the Shotgun Face topo [volume 1, page 315] are incorrectly numbered. Add 1 to each of the numbers.
Instant Makeout 5.11a G 130' ★★★★
Interesting and varied climbing in a stunning location. The open rock area at the top has excellent views.
Start: A few feet left of Gunpowder Corner [route #97, volume 1, page 315], same as On The Case.
● P1 5.11a G: Climb straight up to a shelf, then traverse left over the drop past a bulge with a 4"-wide horizontal slot (scrunchy, first crux) to a no-hands stance. Go straight up the steep wall (second crux) to a final move left to an arête. Follow the exposed arête (5.8) to the top. Belay from trees. 130'
On The Case 5.11c G 140' ★★★★
Ascends the most obvious feature on the overhanging wall above Gunpowder Corner—the prominent left-facing, right-leaning corner-ramp that splits the center of the overhanging wall. It's long, exposed, and has a dramatic crux finish. The route makes a rising traverse left, then a long rising traverse right; to reduce rope drag, after you clip the 5th piece, reach back and unclip the 4th (or used an extra long runner on the 4th piece).
Start: A few feet left of Gunpowder Corner [route #97, volume 1, page 315], same as Instant Makeout.
● P1 5.11c G: Follow Instant Makeout to the no-hands stance. From there, traverse right (first crux) to the base of the left-facing, right-leaning corner-ramp. Climb the corner-ramp (5.8) to its top where it merges into the overhanging face. Step right, then straight up (second crux) to the top. Fixed anchor. 140'
Descent: You can lower with a single 70m rope. You can also top out onto the open rock ledge and belay from trees. The route is difficult to clean on lower; it's better to clean on toprope.
Unnamed (project)
This closed project begins as for On The Case and Instant Makeout. When those routes traverse left, continue straight up, then up a right on the overhanging wall.
Open and Shut 5.9 PG 130' ★★
A quality face climb in a dramatic location next to an overhanging wall.
Start: A few feet right of the Gunpowder Corner chimney, directly below the left end of a right-rising dike 10' up; same as Last Swim or Dive [route #99, volume 1, page 315].
● P1 5.9 PG: Same as Last Swim or Dive: mantel onto a large hold several feet right of the chimney, then up and slightly left to a small flake. From here, Last Swim or Dive goes right to the arête; you continue straight up to ledges, then left to a left-arching crescent. Go up this, then up to a ceiling with a good jug-flake. Over this, then up a left-facing edge (crux) to a final short crack and fixed anchor. 130'
Descent: You can lower with a 70m rope.
Last Swim or Dive 5.7 G 140' ★★★
This climb has been resurrected [route #99, volume 1, page 315] and is now a safe, fun adventure. Due to recent rockfall, the V1 variation is no longer viable (and was dangerous anyway).
Start: A few feet right of the Gunpowder Corner chimney, directly below the left end of a right-rising dike 10' up.
P1 5.7 G: Go up good holds to the right-rising dike. Latch onto a narrow shelf above and traverse delicately right 30' to a ledge on the arête (this is the arête of Amateur's Edge and The Very Edge). Follow the arête to the top. 140'
The Very Edge 5.9 G 140' ★★
This route follows the very edge of a long arête that begins at the ground and soars 140' to the very top of the cliff. Spectacular; would get five stars if the climbing was more consistent.
Start: Downhill and right at the toe of this section of cliff is an arête that runs the full height of the cliff. Begin 15' uphill on the right side of the arête, where a ceiling goes into the dirt.
P1 5.9 G: (V1) Step carefully leftward onto a sloped ledge above the ceiling. Climb straight up the arête (crux) for 20'. From here, the difficulty eases to 5.5. Climb the spectacular, clean arête with many rests and adequate protection to the top. Last Swim or Dive joins the arête about halfway up. Fixed anchor shared with Open and Shut. 140'
V1 The Very Edge Direct 5.10a G ★★: The directissima of the arête. Begin at the low point on the arête and climb up broken rock a few feet to a good left-facing edge. Move right (crux) to the sloped ledge of the regular route and follow the arête to the top.
Descent: You can rappel down the line of Open and Shut with a single 70m rope. You cannot, however, lower from this route (or its variation) with a 70m rope.
Chapel Pond Gully Cliff
Foot Patrol Face
Foot Patrol 5.9 G 50' ★★★
This is a lead-version of Foot Patrol [route #1, volume 1, page 224]. It makes a quality final pitch to routes that top out on the Gully Cliff. A recommended linkup is to begin on the Tanager Face and climb Lifelong Affliction to Beam Me Up to Foot Patrol.
Start: On a left-rising ramp on the right side of the cliff.
P1 5.9 G: Go up 10', then foot traverse left along horizontal cracks to below the obvious vertical crack that breaks the upper third of the face. Follow the crack—fingers to hands— to the top. 50'
Descent: Walk off down a gully (climber's) left.
Gear: Single rack of Camalots from #0.4 to #3; extra #1 and #2.
❏V2 (Another Crack) of Great Chimney [volume 1, page 356] should be ★★.
❏There is now a fixed anchor at the top of P1 of Running of the Bulls.
❏P1 of PSOC [volume 1, page 326] should be ★.
❏P1 of Xenolith [volume 1, page 327] should be ★.
❏P2 of Xenolith [volume 1, page 327] should be ★★.
❏V1 (Tommy) of Look, Roll, and Fire [volume 1, page 328] should be ★★.
❏P2 of Hooligans [volume 1, page 328] should be ★★.
❏P3 of Hooligans [volume 1, page 328] should be ★★★.
❏P1 of Old Route [volume 1, page 329] should be ★★★.
❏The route Ward Cleaver [route #26, volume 1, page 331] is ● and now has a fixed anchor.
❏The route Master of the Flying Guillotine [route #28, volume 1, page 332] is ●.
❏P1 of Mr. Clean [volume 1, page 345] should be ★★★★.
❏Joshua Climb [route #6, volume 1, page 342] is hard for the grade. The start is 5.7.
❏The hardware on Eat Yourself a Pie [route #22, volume 1, page 345] has been upgraded.
❏On the Leash [route #21, volume 1, page 345] now has a proper fixed anchor.
Rule of the Bone 5.10c G (5.4 R) 150' ★★★★
Incredible climbing with a little bit of everything—thin face, fingercrack, a juggy ceiling, and some spicy traversing.
Start: Same as Mr. Dirty.
P1 5.10c G (5.4 R): Climb up Mr. Dirty for 30', then step across the left-facing off width and traverse right (5.8), following a crack under a ceiling to a tiny left-facing corner in the ceiling. Bust through the ceiling with long reaches between buckets (crux), then step right on a good ledge to a mail slot (2" cam helpful). Climb up to a bolt, then 6' left and up to a thin seam. Move left once again to a good flake and a fixed anchor (shared with P1 of My Dogs are Barking). 90'
P2 5.10b G: Climb up and right (bolt). Traverse right to a crack in the giant orange left-facing corner. Make a reach to a jug on the right face of the corner. Another strenuous move gains a stance with a good rest. Follow the juggy crack (two pitons) as it arches left into an undercling that ends at a fixed anchor (shared with P2 of My Dogs are Barking). 60'
Gear: Small TCUs, double set of cams to 0.5" and a single 2" cam.
Descent: Two rappels with a single rope.
My Dogs are Barking 5.11a G 140' ★★★★
Quality climbing, but some friable rock.
Start: 15' uphill of Mr. Dirty and right of the left-facing, left-arching off width, above a large boulder-slab that pinches against the face.
P1 5.10c G: Climb up to a bolt, then up a left-leaning crack. Traverse left (hard) to another seam, which is followed up to a ceiling below a tiny left-facing corner in the ceiling. Join Rule of the Bone to the shared fixed anchor: bust through the ceiling with long reaches between buckets (crux), then step right on a good ledge to a mail slot (2" cam helpful). Climb up to a bolt, then 6' left and up to a thin seam. Move left once again to a good flake and a fixed anchor. 90'
● P2 5.11a G: Go up and left until you are under a large flake. Make a powerful layback move up this flake to a jug at its top. Make a big reach to a crimp (crux) followed by a reach to a ledge. Go up a pocketed slab, then step right over a smaller, left-facing corner to the fixed anchor (shared with P2 of Rule of the Bone). 50'
Gear: For P1, optional TCU down low, #2 Camalot above the roof.
Descent: Two rappels with a single rope.
Between the Lakes
Cascade Cliff
❏V1 (Direct Finish) of Lichen Delight [volume 1, page 376] should be ★★★.
Atmospheric Pressure 5.12b G 85' ★★★★
After 32 years, this toprope has finally been freed. It ascends the amazing fingercrack on the overhanging left wall of the huge right-facing corner that splits the left side of the cliff. The initial section is bolt protected.
Start: At the fixed anchor at the top of P1 of Lichen Delight.
P1 5.12b G: Step off the ledge and climb to a good undercling (crux #1). Continue up the crack to a second crux and large jug where the crack splits. (V1) Finish the lefthand crack and step right to a ledge with a fixed anchor. 85'
V1 Cosmic Pressure 5.12+ G: Climb the sustained, righthand fingercrack to its top, and step left to the ledge with the fixed anchor. On par with the best of the Spider's Web cracks.
Gear: Six bolts and singles from #0.5 to #4. For V1, six bolts and singles from #0.3 to #1.
Fermi's Paradox 5.11b PG 70' ★★★
Start: Same as Drake Equation.
P1 5.11b PG: Begin as per Drake Equation to a good stance at a horizontal 25' up. Move up the two thin cracks using fingerlocks and sidepulls to a good rest where the cracks almost meet the blocky corner of Cosmic Thing. Step up and right following a shallow, arching roof to a stance (small nuts/RPs helpful). A short hard sequence rewards you with a perch on the arête and a fixed anchor. 70'
Gear: Cams to red Camalot; a couple extra micro cams and small nuts/RPs.
Drake Equation 5.10c PG 80' ★★★
Start: 6' right of Cosmic Thing [route #17, volume 1, page 379] at a block step with a tiny vertical seam that leads to a long horizontal ending at the corner of a roof.
P1 5.10c PG: Walk out the block and make a couple balance moves to gear at the corner of the roof. Step up then right to gain a crack system and work to a triangle incut hold next to a good horizontal. Place gear and take a breath, traverse right with a gymnastic move (crux) to gain a stance on the corner at the base of a small open book. Easier climbing leads up the open book past a small cedar to gain a fingercrack; follow this to the top. Step right to the same top out and rap anchor as My Favorite Martian. 80'
Gear: Standard rack to 2" with and an extra #0.75 Camalot.
Location: North side of NY 9N between Keene and Elizabethtown, along the trail to Hurricane Mountain
Aspect: South
Height: 80'
Approach: 15 min, easy
Quality: ★★★
Summary: Very accessible cliff with several moderate routes below a beautiful viewpoint.
This cliff is the left end of the series of walls that includes the Banzai Wall [volume 1, page 335]. The newly re-routed hiking trail up Hurricane Mountain leads to a lookout at the top of this cliff.
The cliff is 150' wide. The first landmarks on the left end are two trees at the base of the cliff—a large double-trunked maple, and a large spruce 20' right of the double-trunked maple. 5' right of the spruce, you can walk onto a large right-rising ledge. Not That We're Normal is accessed from this ledge, Devour the Sun climbs through this ledge, and Two Girls goes up just past the right end of this ledge.
The rock is good on the left side of the cliff, and becomes chossier as you move right.
Directions: Park at the trailhead for Hurricane Mountain on Route 9N 602014,4896154, 3.5 miles east of the intersection with NY 73 near Keene and 6.5 miles west of the intersection with US 9 in Elizabethtown. Follow the hiking trail to an expansive lookout on the right, reached at 12 min. This is the top of the cliff 602402,4896372. There are steep gullies on both sides of the cliff; the cleanest way to reach the bottom of the cliff is to use the gully on the west (skier's right) end of the cliff. Return along the hiking trail for about 150' to an earlier, smaller rock lookout area, then descend over this and then walk left just below an 8'-diameter boulder to the bottom of the cliff.
Diversity 5.7+ G 60' ★★
Start: Near the left side of the cliff, 15' left of the double-trunked maple, at a rib of rock with a 3'-tall spruce at its base.
P1 5.7+ G: Up easy jugs, then a thin face to reach a long ledge near the top of the cliff. Continue straight up following a thin right-facing flake to the top. 60'
Adrenaline 5.8 R 75' ★★★
Nice, varied climbing on this one with a couple challenges near the top.
Start: At the large spruce tree, directly below an overhanging block 40' up.
P1 5.8 R: Climb up and slightly left past two small "octopus cedars". Make a runout up and right to the overhanging block. Go up the left side of the block to reach the long ledge near the top of the cliff. Continue straight up to the top, left of a small tree, where there is a black scoop 10' up. 75'
Not That We're Normal 5.9 PG 70' ★
Start: 30' right of Adrenaline at an overhanging wall with a very thin, left-leaning crack. (To reach this, walk rightward up onto the large ledge at the base of the cliff for 25'.)
P1 5.9 PG: Climb the overhanging wall for a couple moves (crux, harder if you're short) to a ledge. Continue in the crack (now 5.8 G) past a couple trees to reach the long ledge near the top. Finish behind a cedar tree on easy (3rd class) blocky steps. 70'
Devour the Sun 5.8+ TR 80' ★
A good route; someone should one lead it. This route is on the border with chossier rock to the right. Begin at the base of the cliff, at a crack in a short left-facing corner, 45' right of the start of the right-rising ledge from which Not That We're Normal begins. Climb the short corner-crack to reach the large ledge. Continue in the same crack line up and left to the base of a large cedar. Scramble straight up easier rock past a couple ledges to the top.
That Crack was Hard 5.9 TR 75' ★
Begin 20' right of Devour the Sun at a blocky, right-facing corner with a left-leaning crack above. Climb the crack (crux) until level with the right end of the large ledge. Step right and face climb a couple steep moves onto low-angled rock above and right of the ledge, then climb the easy stepped face to the top.
Penumbra 5.8+ TR 80' ★
Begin as for Deathtooth. Go up the left side of the alcove. Continue up and slightly left, then straight up past diagonal cracks. Scramble straight up easier rock past a couple ledges to the top.
Deathtooth 5.6 G 75'
Loose and dirty ("ghastly" was the word used by the first ascent team); not recommended.
Start: At an overhanging alcove with a large hanging block 10' up, 15' right of TomsProj.
P1 5.6 G: Go up the left side of the alcove, then move right onto the hanging block (the "deathtooth"). Climb straight up a gully past a series of ledges to the top. 75'
Peregrine Pillar Area
Banzai Wall Left
This south-facing, 80'-tall wall is on the left end of the Banzai Wall. The line of cliffs that includes this wall begins at the Hurricane Mountain hiking trail at the Hurricane Lookout Crag. Moving right the cliff diminishes, then picks back up again at Banzai Wall Left; right of this is the main Banzai Wall [volume 1, page 335], and further right is Peregrine Pillar [volume 1, page 333].
The cliff is about 200' wide, and the base is a pleasant forest of young beech trees. A good landmark for locating the routes is a 5'-tall, pointed boulder 3' in front of the cliff, and 30' from the left end of the cliff.
Directions: From Hurricane Lookout Crag, continue on the trail to where it turns north through level forest. Within 100', at a white rock in the trail, turn right into the forest. A faint path in open forest leads 3 min to the top of Banzai Wall Left 602529,4896372. The best approach is to rappel in from the top. This new approach, made possible by the rerouted Hurricane Mountain hiking trail, is faster than the approach described in the book for the main Banzai Wall.
Broken Sword 5.9- G 75' ★★★
Start: 30' left of the pointed boulder, on a low ledge at the base of left end of the cliff.
P1 5.9- G: Climb black rock up and left past ledges into an overhanging corner. Pull up through the corner to easier climbing into an alcove, then hike right and finish up through blocks. 75'
Wasting My Fear 5.8 G 80' ★★★
Start: At the pointed boulder.
P1 5.8 G: Climb easily to a flat ledge 12' up. Undercling up and right under a long diagonal roof (reminiscent of Quadrophenia). Break through the roof at the end and follow a stepped crack to the top. 80'
Sensei DuBois 5.9 G 80' ★★★
Start: At a left-facing corner, 30' right of the pointed boulder.
P1 5.9 G: Follow a steep corner up and left to a small tree, then continue up and right on easier rock to the top. 80'
Gear: Small cams needed.
As You Believe 5.9 TR 80' ★★★
Begin 80' right of the pointed boulder and a few steps uphill, at a low-angle, right-rising, black ramp, just left of an open area. Follow the ramp up into steeper rock (5.7 R), then work back and forth (crux) to an alcove at the base of a left- and right-rising V-shaped formation. Climb either the left ramp (5.6 G) or right ramp (5.6 R) to the top. If climbing the left ramp, escape right at the top to avoid a juniper jungle.
Peregrine Pillar Area
Lower Banzai
This 80'-tall, 250'-wide, south-facing cliff sits on a knoll downhill of the (climber's) left end of the Banzai Wall. It is most easily reached from the base of the Hurricane Lookout Crag. The cliff has some quality sections, but also some unpleasantly loose sections.
Directions: From the base of the Hurricane Lookout Crag, walk downhill, then (skier's) left, then uphill to reach the base 602630,4896345. It takes about 7 min from the Hurricane Lookout Crag. The approach reaches the cliff at the base of a chimney with a blocky roof 20' up.
The Blade (project)
Open project. Begin below the small roof 20' up. Climb a crack, then step right around the roof. Continue to the top past the scary-looking—but secure—blade of rock.
Squat Tower 5.6+ G 80' ★★
Start: 50' right of The Blade, at the height of land, there is a large, square, 10'-wide chimney with a squat, 15'-tall tower leaning into its base. Begin at the base of this tower.
P1 5.6+ G: Climb the tower, then move into the left corner of the chimney and follow this to the top. Exit out the back of the chimney. 80'
Tower Crack 5.9 TR 70'
30' right of Squat Tower is a square alcove with a very thin, razor-cut crack in the back, and a short fistcrack behind a birch tree on the right side. Begin in the alcove and face climb up and right, up the fistcrack (5.7). At the top of the fistcrack, move left to the razor cut crack—now finger-sized—and follow this to the top of a tower. The rock is fragile and gear would be suspect.
Three Tall Pines 5.8 TR 70'
Begin 8' right of Tower Crack at a flat-topped 6'-tall tower. Climb the steep face past some loose blocks, then continue to the top on a lower-angled face and left-facing corner. The rock is fragile and gear would be suspect.
❏Since 2017, there have been access issues with Owls Head Mountain. As of Fall 2021, it has been announced that the trail and parking for Owls Head Mountain [volume 1, page 349] will be permanently closed. No alternative approach has been established.
Location: South side of NY 73 in Cascade Pass
Aspect: Southeast
Height: 170'
Approach: 40 min, moderate
Quality: ★
Summary: A remote, summit-like cliff located above a hidden valley in Cascade Pass.
There are several cliffs on and around the ridge that overlooks Lower Cascade Lake, including The Nursery [volume 1, page 371] and Fern Cubby [volume 1, page 370]. Bear Cubby 591497,4898598 is also located on this ridge, which has several ice and mixed routes, but no reported summer routes. Don't Call Me Cubby is the largest of these cliffs and is located at the high point of the ridge above a flat valley.
The cliff is about 300' wide. Much of it is brushy, and broken by ledges. The existing routes are located on the highest, center area of the cliff. The center of the cliff features a blunt, right-facing arête; about 50' right of this is a low-angle face about 140' high.
Directions: Follow the directions to The Nursery. From there, continue a few minutes uphill to a col 591060,4898227, then go contour northwest to the base of the cliff 591237,4898443.
It is also possible to approach up the ridge from Bear Cubby. This is reported to have more open woods.
Descent: Rappel with one or two ropes. There are rappel anchors for a single-rope rappel just to climbers right of Don't Fall.
Don't Pull on That! 5.6 PG 170' ★★
Start: At the small twin maple tree at the base of the blunt, right-facing arête.
P1 5.6 PG: Climb the right side of the arête to reach a terrifying, pasted-on flake. Gently traverse to the left side of the flake and continue up cracks and other features to reach a brushy sloping ledge. 100'
P2 5.5 G: Continue up the arête on a series of short walls and ledges to the top. 70'
Don't Fall 5.6 PG 130' ★★
Start: On the black rock at the base of the low-angle face 50' right of Don't Pull on That.
P1 5.6 PG: Climb the black rock (crux) to the first gear 15' up, then follow a long crack in much easier rock (5.4 G) to the top. 130'
Don't Call Us 5.6 G 140' ★
Start: At a crack in a left-facing corner, 10' right of Don't Fall.
P1 5.6 G: Climb the crack to reach an anchor on a tree at a ledge above a fin of rock. 90'
P2 5.5 G: Go up and then follow a right-rising ramp to the top. 50'
❏There is a new DEC hiking trail up Little Crow that has confused some climbers. Just past the "30'-tall black slab with three parallel vertical cracks" [volume 1, page 338], the trail forks: a new blue-marked trail goes left, and the old red-marked trail goes right. Stay on the red-marked trail and follow the directions as normal.
❏There is a fixed anchor at the top of Orange Crush [route #1, volume 1, page 338].
❏The route Pebbles and Bamm Bamm [volume 1, page 339] is missing hangers.
❏The route Hollyrock [volume 1, page 339] is ●.
❏Santa Crux [route #3, volume 1, page 419] is not ●, as it requires a single piece of protection.
Left of the main routes (Old Guy Shootin' Powder to Beavers Taste Like Wood) the cliff is split by a horizontal terrace. Above this terrace is the Upper Tier, while the cliff below this ledge, really an extension of the main face, is known as The Pump Factory.
Directions: Walk left from Old Guy Shootin' Powder following the cliff for 4 min to find this collection of routes. Alternatively, to approach more directly from the road, continue 600' past the first cairn and over two wooden bridges. On your right directly after the second bridge is a large boulder with a cairn on top. Turn right here and trend uphill following cairns to directly to the cliff.
Horny for Fall 5.8 G 90' ★★★
Possibly the juggiest 5.8 in the park, and another way to reach the Upper Tier.
Start: At the left end of the area composed of gently overhanging light gray rock. Left of the blunt arete and right of a large left-facing corner on a series of huge jugs and small ledges.
● P1 5.8 G ★★★: Climb up the ladder of jugs to a ledge and make your way right to the corner. Follow the corner to its top and make a move right and up to the anchor shared with Ceremonial Grade. Lower here unless heading to the second tier. 60'
● P2 Dirty Beaver 4th class: This pitch only has one bolt, but is very easy and quite mossy. It's clean enough to get you to the second tier, which is the only reason that it's worth doing. Both pitches can be linked. Climb straight up to the obvious opening in the trees and the finish anchor, which you'll use later to descend from the Upper Tier. 30'
Descent: Single rappel from the 2nd pitch anchor with 60m rope.
Footloose 5.10c G 60' ★★
Shares an anchor with Horny For Fall and Ceremonial Grade.
Start: On a blunt arete with some small ledges, 3' right of the Horny For Fall corner
● P1 5.10c G: Climb some jugs trending slightly right until the third bolt. Move straight up the arete until the good holds run out. Move up and right (crux) and then back to the big jug on the arete. Use the remaining two bolts on Horny For Fall to finish up the arete and onto the ledge with the fixed anchor. 60'
Ceremonial Grade 5.12a G 70' ★★★★★
The "ceremonial grade" is always of the utmost quality. This thing is that good.
Start: At the left end of a large flat open area at the base of the gently overhanging light gray wall. This is the last route before the uphill rise begins, below a head high ledge.
● P1 5.12a G: Stick clip. Climb up to the first bolt and then head right, following the big holds until they run out. Go straight up to a stance (physical crux). Traverse left with small feet (technical crux), then straight up with sidepulls and crimps. Fight the pump on your way into a finger crack (redpoint crux). Follow the crack (optional finger sized gear here) to topout and find the anchor shared with Horny For Fall and Footloose. 70'
Sinister 5.10d G 60' ★★★
Start: At a discontinuous right-arching crack system left of the obvious crack line Driven or Dragged.
● P1 5.10d G: A bouldery start leads to a tight hand jam at the third bolt. A couple more hard moves lead to a welcome stem rest. Fight the pump while loosely following the crack system to the fixed anchor shared with Driven or Dragged. 60'
Driven Or Dragged 5.10d G 60' ★★★
Steep, pumpy crack climbing.
Start: Two crack lines lead up to and meet at a small roof with a fixed anchor that can be seen from the ground. This is the route on the right.
P1 5.10d G: Boulder up to where the crack begins. Find some gear and bear hug the scary flake (but don't put gear behind it). Clip the bolt and make a couple of hard face moves (crux) to get to a good stance below a bulge. A red alien above your head is very handy as you make your way through the bulge (think laterally!) to a nice stance and the anchor. 60'
All Moves Are Final 5.11d G 50' ★★★
Start: Same as Driven Or Dragged.
● P1 5.11d G: Climb the prow and small crack to a ledge. Go up and right to an overlap, over this to a second overlap. Move left around this, then up to a fixed anchor shared with Driven Or Dragged. 50'
Bloodlust 5.12a G 60' ★★★★★
Not especially sharp, but still made the FAer bleed.
Start: Just to the right of a discontinuous crack that splits the right end of the overhanging gray wall.
● P1 5.12a G: Boulder up to the first bolt and step right to find good holds invisible from below. Work your way up and back left to the crack system with jugs. Work up the winding crack to some big sidepulls (crux #1). Clip here and work out crux #2 to the ceiling. Pull the ceiling on its right side then traverse left to a fixed anchor. 60'
Macguffin 5.10d G 40' ★★
Start: On the right end of the light gray wall is a roof with a wide black streak above. Begin below the black roof.
● P1 5.10d G: Make your way up and left on the light gray rock with multicolored streaks to the roof. Make a hard move to get established above the roof (crux) then continue up the black streak until you can step right to a ledge and the anchor. 40'
Liquid Exits 5.10a G 40' ★★★
Start: At a prominent black streak in a flat, open area.
● P1 5.10a G: Climb a steep, technical face to a ledge. Continue up an overhanging face on positive holds to a fixed anchor. 40'
This is the section of rock above the terrace that sits above The Pump Factory.
Directions: From the left end routes (Horny For Fall et al) continue all the way to the left end of the cliff, then up and right to access the terrace that splits the cliff. Follow the terrace back right to locate these routes. You can also climb Horny For Fall to reach the terrace, then walk right to these routes.
Imodium 5.10a G 50' ★★
Some out-of-character (for the Adirondacks anyway) pockets on this route.
Start: Left and uphill from the lowest point of land on the second tier on a black streak.
● P1 5.10a G: Use a couple of cool pockets right off the ground and make your way up crisp edges on grippy rock. The crux comes near the top right before the fixed anchor. 50'
Pepto Bismol 5.10a G 60' ★★★
Start: At the lowest point of land on the second tier, below a left-rising ramp and left-rising roof above in a black streak.
● P1 5.10a G: Climb up onto the ramp and pull the roof above. Make your way up the black streak and find the crux in the bulge. Some welcome jugs lead to the anchors. 60'
Orange Crush 5.12a TR 40' ★★
At the left side of the cliff is a large, orange, right-facing corner, which is about 90' left of Grand Ole Osprey [route #2, volume 1, page 414]. Begin at the second water runnel left of the corner in front of a large block. Climb a left-facing groove straight up, crux at the top. A knee pad is helpful.
Sunset Boulevard 5.11b TR 45' ★★★
Begin on the arête of the large, orange, right-facing corner at the left side of the cliff. Climb straight up the face to the right of the arête. There is a deadpoint crux about halfway up.
Speaking of Whip Its 5.10d G 45' ★★★
Start: Locate the large, orange, right-facing corner where the approach trail meets the cliff. Begin on good face holds to the right of the arete of Sunset Boulevard.
● P1 5.10d G: Work your way straight up a techy, crimpy, and sustained face. 45'
Great Day for Up 5.7+ G 85' ★★
Coarse rock with great stances. Generally pleasant climbing with a short crux at the top.
Start: 10' right of the large, orange, right-facing corner, at a smaller right-facing corner below a series of steps that lead to a triangular chock stone at the top of the cliff.
P1 5.7+ G: Climb the arête of the corner past several blocky ledges to a refrigerator-sized block. Go left or right (easier) around this, then up to the chockstone. Jam or bear hug the chockstone to a stance and follow a crack to a fixed anchor. 85'
Gear: Standard rack to 3"
What About Mister? 5.10c/d G 85' ★★★★
Fantastic route that gets harder as you go, characterized by overlaps with good holds to pocketed moon rock similar to that on Potter Mountain at Silver Lake.
Start: At the right end of a rectangular boulder 20' right of the large, orange, right-facing corner (and 10' right of Great Day for Up.
◉ P1 5.10c/d G: Find a series of left-leaning ramps, and climb these to their top. Go through a several overlaps aiming for a flake with a left-facing corner and a hollow flake attached and above on the left. Move up the flake and rightwards to a stance on top of a right-facing flake. Make a series of cryptic moves to solve to crux. 85'
Gear: Optional finger-size gear between bolts 2/3 and 4/5.
Interstate Love Climb 5.10a/b G 130' ★★★
Start: 50' right of Frippery [route #4, volume 1, page 414] at a 50'-tall right-facing corner.
P1 5.8 G: Climb a hand- and finger-crack in the corner, then a slab to a large ledge below another 10'-high ledge. Move 10' left and locate a vertical crack. 50'
P2 5.10a/b G: Up the vertical crack (#4 cam useful) to a ledge. From the left end of this ledge, head up and right to a roof. Make fun moves up a short corner (crux) above the roof to a ledge. Step right and gain a ramp/slab/corner system; follow this up and left to the top of the cliff. 80'
Gear: To #4 Camalot.
Descent: Walk off (climber's) left or rappel D.W.A.
A Climb Called Quest 5.10d/5.11a G 120' ★★★★
The route delivers great movement and varied climbing; P2 is stupendous.
P1 5.6 PG: Start up the same slab as D.W.A. and set up your belay on the left side of the spacious ledge. 50'
P2 5.10d/5.11a G: Locate some cracked flakes on the left. Head straight up to a triangular roof with a ledge on the right. Up onto the ledge and then onto a left-rising ramp. Head up past a flake and step out right. Power your way through a Gunks-like roof. Easy climbing leads you to the base of a vertical wall with three bolts and a series of horizontals. After the last bolt, diagonal up and left through the last few horizontals to a ledge. Climb up right onto another ledge. Belay from here on gear or continue to the top and belay off trees. 70'
Descent: Rappel D.W.A.
Gear: #00 TCU to #1 Camalot; double up on TCUs and finger-sized gear.
D.W.A. (aka Dihedrals With Attitude) 5.10b/c G (5.6 R) 110' ★★★★
A stunning route that has attitude—it never seems to totally ease off until the top. Great exposed positions with repeated roof-to-dihedral sections and good rests. Climb in one long pitch or two pitches. Start: Same as Pink Lynch [route #5, volume 1, page 415].
P1 5.10b/c G (5.6 R): Romp up the slab 50' to a comfy ledge and set up to belay or continue onto the next ledge under the obvious roof and right-facing corners. Can climb if slightly wet. Gain the roof with some hidden gear and then move out right. Place some small wires or a #00 TCU around the corner and move into the next roof enjoying the exposure. Step to the right edge of the roof (exposed) and begin your journey up the next series of dihedral/roof combos. At the last roof break out right on to a slab and then up a juggy face to the top. Belay from trees (the large tree has a fixed anchor). 110'
Gear: To 3".
Descent: Two rappels with a single 60m rope, or a single rappel with a 70m rope.
The Next Wave 5.11a G 90' ★★★★
One of the largest roofs in the park. Beware of rope drag; maybe best to belay the follower from the top.
Start: Locate the huge roof above a right-facing corner that is located at the right end of the cliff. Scramble up to the base of the cliff proper using a fixed line 10' left of the start of C.C.R.
P1 5.11a G: Climb up a series of small ledges in an open book to the base of an arête. Step right and climb a large right-facing corner to the massive roof. Traverse out the handcrack and pull the roof directly (crux). Follow the crack to its top and a fixed anchor (shared with C.C.R.). 90'
Gear: Single rack from green Alien to #2 Camalot and nuts.
C.C.R. (Cloudspin Cliff Revival) 5.10a PG 90' ★★★★
An incredible climb that has a bit of everything: a bouldery start, a hand- and finger-crack, a slab, and an exposed roof finish.
Start: Walk up the right-rising ramp that takes you to the right end of the cliff. Locate the third major roof at the height of the cliff and look for a trail on your left. Walk up into a pleasant staging area with the starting arête.
P1 5.10a PG: Climb the arête (can pre-place the first piece) and left face to a series of pinches to a ledge. Up a wide crack and then step left to a slabby face with a thin crack (5.8 R); you can avoid this by going right. Move left, crossing the route Demolition [route #6,volume 1, page 415], to a 10'-high right-facing corner under the roof. Up the cracks to a Gunks-style roof. Bear hug the side pulls (or escape right, easier). Up a short dike to fixed anchor. 90'
Gear: To 3"; doubles in C3s to #0.5 Camalot; many slings.
Sundays Are for Friends 5.8- G 60' ★★
A fun route that falls into the if-only-it-were-longer category.
Start: Follow the trail below C.C.R. toward the far-right end of the cliff. Walk 40' uphill, then look back left for an obvious trail to a ledge to the left of a large chimney.
P1 5.8- G: Locate the obvious crack above. Follow some flakes and slab to the base of the crack. Up the crack and then follow it out right. (V1) Step up on the ledge and move back left to a short slab finish. Fixed anchor. 60'
Gear: Camalots from #0.3 to #2.
V1 5.9+ TR: At the top of the crack go straight up on small holds to gain a sloping ledge.
Said and Done 5.10a PG 100' ★★
Start: Just right of the large chimney on the far-right end of the cliff. (Sundays Are for Friends begins left of this same chimney.)
P1 5.10a PG: Follow a handcrack to a roof, then over this using a flake to a second roof. Follow a right-facing, right-leaning corner with an offwidth crack to its end (crux), then traverse right using a knob to a blunt arête; pull around the arête, then up a face to the top. 100'
Quarantine 5.10d G 80' ★★
There are several ways to do the crux, which is at the very bottom. The easiest uses flakes on the right side of the open book.
Start: 10' left of Covid Corner at a shallow open book.
P1 5.9+ G: Stick clip. Up the shallow open book (crux) to a good jug in a right-rising, narrow shelf. Continue up past two bolts to where the angle changes, then run up an easy slab to a fixed anchor. 80'
Covid Corner 5.6 G 40'
Quality, easy climbing, but needs cleaning.
Start: In a vegetated open book with a good crack, 65' left of Muscinae.
P1 5.6 G: Go up the crack in the open book to a cluster of trees. Move right to a fixed anchor shared with Stimulus Check. 40'
Stimulus Check 5.8 PG 40' ★★
Start: 55' left of Muscinae, on the left side of a featured slab, and 10' right of a vegetated open book of Covid Corner.
P1 5.8 PG: Go up the featured slab past a small flake (gear) to a right-rising crack below an overlap with a bolt just above. Move right, then back left over the overlap, then work up a slab with finger-sized cams to a fixed anchor. 40'
Muscinae 5.10c G 40' ★★★
[route #1, volume 1, page 385] A good warmup for the other routes. Note: This route was incorrectly identified in the book; this location and description should completely replace that.
Start: 48' left of Connection below a vertical seam that doglegs left 15' up.
● P1 5.10c G: Go up the seam (crux) to some face holds, then move left 4' and continue up the seam to a fixed anchor. 40'
Start: 5' right of Muscinae.
3 bolts with fixed anchor. Maybe takes gear too.
Reciprocity 5.12d TR 60'
[route #2, volume 1, page 385] The face to the left of Connection.
Connection 5.13a G 60' ★★★★
After attempts by strong climbers, this route [route #2, volume 1, page 385] was finally led, and the grade bumped to 5.13a. The fixed anchor can be reached from the top via a short rappel.
Start: In the center of the sheer wall, at a flat stone below a zigzag crack that begins 12' up.
● P1 5.13a G: Start 3' left of a seam and climb up right-facing flakes to the first bolt. Step right to the base of the seam, then make a hard move (crux, V7) to get established in the crack. Up the flared pods and good crimps (sustained 5.12) to a fixed anchor at the top. 60'
30' right of Connection, has two bolts, fixed anchor. Looks like it takes gear too.
The Big Reveal 5.13a G 35' ★★★
Maybe the shortest hard route in the park? Bouldery and sustained with impeccable rock.
Start: Below a seam –crack on the right side of the cliff.
● P1 5.13a G: Stick clip. Climb the seam, then bulging face to a ledge with a fixed anchor. 35'
Unknown 5.13a G 35' ★★★★
Viscous crimping on this one. After the hueco things calm down.
Start: 10' right of The Big Reveal.
● P1 5.13a G: Work up and left (crux) to a good hold in a left-facing edge (which is 3' right of The Big Reveal). Continue up and slightly right to a hueco, then straight to the top with a fixed anchor. 35'
Start: 40' right of The Big Reveal at a slabby arete that defines the right side of the wall section.
2 bolts with fixed anchor. Sport.
Unknown 5.11c PROTECTION 50' ★★★
Start: 60' right of The Big Reveal on the right side of a face, 4' left of a mossy groove with an s-bend-trunk birch tree 10' up.
● P1 5.11c G: Go up the slab and over a bulge (crux) to the top; fixed anchor. 50'
Location: East side of NY 86, on the Lake Placid side of Wilmington Notch
Aspect: North
Height: 50'
Quality: ★★
Approach: 2 min, easy
Summary: Small cliff very close to the road with a single, quality route.
This small cliff is located very close to the road near the Ausable River. It has unique hueco-like features, but these are unfortunately on a shorter section of cliff unsuitable for routes. There is presently a single route that ascends a dramatic, overhanging prow. Beyond this single route, there are few possibilities for further development.
Directions: From the intersection of NY 86 and NY 73 in Lake Placid, drive northeast on NY 86 towards Wilmington 4.6 miles and park on the shoulder on the right 586540,4907431; there is room for one car here, and is on the section of road alongside the Ausable River next to the "Road Hole", a known fishing spot. There is a larger parking area on the left 150 yards further down the road. (When traveling from Wilmington, the pullout is on the left, 4.3 miles from Whiteface Ski Center.) From the parking, bushwhack into the woods for 50', then uphill to the cliff 586621,4907465, about 2 min from the car.
Pusties, Brah! 5.11b G 50' ★★
Start: The right end of the cliff (nearest the road) has huecos and is covered in green lichen and moss. Follow the cliff line to the left and steeply uphill to the base of an obvious, overhanging prow.
● P1 5.11b G: Boulder up the prow to a left-leaning crack. Up this to a shelf on the right and below an especially overhanging section of the prow. A hard move leads over this (crux) to better holds and a ledge. Continue up good incuts to a fixed anchor. 50'
❏V2 (Nestlings) of Touch of Class [volume 1, page 399] should be ★★★★.
Creation Direct 5.11b G 185' ★★★★★
This single-pitch direct start to Creation of the World [route 15, volume 1, page 403] adds 90' of face, corner, and fingercrack linking directly into the P2 offwidth. The overall effort required is much more significant than the grade would suggest.
Start: 20' uphill and right of Mistah Luthah [route #14, volume 1, page 403] below a bolt 10' up in a faint black streak.
P1 5.11b G: Climb a bouldery face past two bolts and move left to a stance at the base of a shallow, left-facing corner. Up the corner to a small overlap and then gain a large, left-facing, boot-shaped flake. Climb the flake and mantle to a stance at the base of a fingercrack. Climb the fingercrack to a point where it joins the established route its handcrack. Continue up into the offwidth past the cedar and to the cave belay. 185'
Descent: There is no fixed anchor in the cave. Climb P3 of Creation of the World, then rappel Fear of Flying.
Gear: Two sets of 1/2" to 1.5" cams; wires including RPs; singles #2 to #5 Camalots; double #6 Camalot.
❏Variation to Touch of Class [route #10, volume 1, page 399]:
V4 5.10a G: Follow Nestlings to where the thin cracks fade. Instead of traversing right, grab the arête on the left and follow it to where it rejoins Touch of Class. This is a superior line to the normal Nestlings variation, with good gear (wires).
This cliff [volume 1, page 407] has seen recent attention. There is now an approach path and several high-quality routes.
Directions: Follow the normal approach to Moss Cliff [volume 1, page 393]. About two thirds of the way to Moss Cliff, look for a path going right, presently marked with blue flags. Follow this across a large talus field to the base of the buttress.
Moments in Peace 5.12a G 185' ★★★
The third pitch is high quality, but you have to navigate some scary rock on the first two pitches.
Start: From where the approach trail meets the cliff, walk uphill and left to a clearing 100' below the base of a large gully. Locate a bolt 8' up to the left of a shallow, left-facing corner.
P1 5.9 PG: Step up and clip a bolt, then move right into a slot. Stem up the slot, then exit right to a fixed anchor. 50'
P2 5.10a G: Good protection, but due to poor rock quality, treat this pitch as PG/R. Undercling a flake leftwards to a stance. Go up a loose, left-facing corner, then move further left to better rock. Go straight up to a stance (optional fixed anchor). Move right (bolt), then up to a nice belay ledge with a fixed anchor. 70'
P3 5.12a G ★★★★: The money pitch. Traverse left, then work up to a stance below a crack. Jam tips and layback to a good hold at mid-height. Continue up the sustained crack to a fixed anchor. 65'
Gear: To 2.5" with an emphasis on tips- and finger-sized cams.
Descent: You can lower off the top pitch back to the P2 belay, then rappel with a single 70m rope.
Extreme Tips 5.12b G 40' ★★★★
An amazing crack in a spectacular location; difficult and sustained.
Start: Go 20' downhill and right of Moments in Peace. Traverse out on a ledge with a cedar tree to a 4th class gully with a fixed line. Scramble up this gully to a ledge. Ascend another fixed line to another ledge (or climb a short, 10' pitch). Traverse left to a fixed anchor below a crack.
P1 5.12b G: Climb the crack with multiple crux sections to a fixed anchor. 40'
BLM 5.11c G 170' ★★★
The description of this route (i.e., the stack corners) is similar to Don't Give Guns to Children [route #28, volume 1, page 407], but is in fact down and right of that route at a different set of right-facing stack corners. Use many long runners to avoid rope drag, and maybe unclip some draws after moving past them.
Start: From where the approach trail meets the cliff, hug the wall and follow it downhill and (climber's) right. There is a fixed rope/handrail on a large cedar; descend this to a position below two right-facing, right-leaning, open book corners, one stacked above the other.
● P1 5.11c G: Begin up an easy face to the first right-leaning open book corner and climb to its top, then up and left across broken rock to the base of the second right-leaning open book corner. Up this corner (first crux) to its top. Hand traverse 20' right on good jugs to a shallow right-facing corner. Make a hard move up (second crux), then traverse right (third crux) to stand in a large scoop. Continue straight up more easily to a fixed anchor. 130'
● P2 5.11c G: Climb a black face with seams, diagonally up and right to a ledge. Walk left to a fixed anchor. Continuous! 40'
Descent: A short rappel to P1 anchor, then a single 70m rope will get you down.
Healthy Hobbits 5.7+ PG 80' ★
Start: Below the blank slab between As She Is and And She Was [routes #13 and #14, volume 1, page 391].
P1 5.7+ PG: Go up the blank slab for 20' (crux) to a horizontal crack. Continue up the slab avoiding the crack systems to the left and right, past a couple more horizontal cracks, to a large belay ledge shared with Roast n' Boast. 80'
Follow the Fire Hydrants 5.12 A0 150' ★★★
Climbs the dramatic arête right of Route of Oppressive Power [route #1, volume 1, page 411]. Freeing the aid section is an open project. Stays in the shade until 3:00 PM.
Start: Approach as for Route of Oppressive Power. Begin on third-class terrain beneath a bolt.
● P1 5.12 A0: Scramble up the 3rd class terrain and stick-clip the bolt. Batman up to the bolt, then climb jugs to a giant cedar. Chimney behind the cedar to its top and clip the first bolt; this is the start of the actual climbing. Incredible movement begins on the left side of the arete, then switch to the right side and a good rest. Pull a small roof, then either climb a bolt ladder on the left side of the arête (A0) or the face on the right side of the arête (open project) to a slabby ledge. From here, it's 5.9 to the top. Fixed anchor. 150'
Descent: A 70m rope makes it to a flat ledge about 10' up where you can scramble down.
Olympic Acres
Polar Soldier Wall
Piecework Afternoon 5.9- G 85' ★★
The upper half of the route has nice 5.8 climbing on featured brown rock.
Start: 125' left of Vestibular Apparatus at a steep wall, 5' left of a short vertical crack.
P1 5.9- G: (V1) Make a hard undercling move (crux) to lower-angle terrain. Go up and left to a short, low-angle arête. Climb the arête or slab to the right to a stance at the base of the brown wall. Nice continuous 5.8 moves lead to a fixed anchor. 85'
Descent: Rappel with a single 60 m rope.
V1 5.7 TR: Start on the crack 5' right of the regular start. Go left at the top of the crack to join the route.
Gear: Cams from blue TCU to red Camalot.
Vestibular Apparatus 5.10d G 80' ★★
Start: Below the black arête that defines the left end of the steep wall, 22' left of Out for the Boyz [route #1, volume 1, page 415].
P1 5.10d G: Climb a handcrack in black rock just left of the arête to its top. Move right to gain a thin crack on the arête (1st crux). Up the arête to a ledge (this is the same ledge as P1 of Out for the Boyz). On the steep wall above the ledge, make several face moves (2nd crux) to gain a right-slanting crack in a shallow right-facing corner. Follow this to its top (fingers), then reach up and left to another right-slanting crack (3rd crux). Follow this to its top at a fixed anchor. 80'
Gear: To 3".
Fire on the Mountain 5.9+ G 50' ★★★
Very Potter Mountain-like climbing on a just-under-vertical face.
Start: Top of the first pitch of Out for The Boyz.
◉ P1 5.9+ G: Head right on the large ledge for 6', then go up aiming for a shallow water groove. Follow this groove until it ends, then trend right to another shallow water groove. Follow this (0.75 Camalot) to the top. 50'
Gear: 1 ea #0.75 Camalot.
Ethical Dilemma 5.12 R 60' ★★★★
A testpiece of fiddly gear placements. It is recommended to rehearse the very-specific gear prior to leading, especially considering that the first ascent relied on a skyhook for protection.
Start: 20' left of The Eye of Sauron below a wall with three discontinuous cracks.
P1 5.12 R: Crimp hard up a steep wall to gain the first vertical crack. Make some balancey moves to a good hold out right which puts you beneath the second vertical crack. Up to its top, then make a hard move out of the crack into the right-facing flake. After this, enjoy a good rest, place a sky hook, then make a couple hand moves out left to a wild mantle to find yourself at the technical upper crux above the sky hook. Pull into the final vertical crack and enjoy some excellent (and better-protected) moves up the crack to a slabby top out. Fixed anchor. 60'
Gear: #1 (blue) CAMP Ball Nut; blue Totem; purple Totem; #1 (green) DMM Dragonfly; medium-sized hook; yellow Totem (equivalent to #0.4 Camalot); #2 (yellow) Metolius TCU. Consider crashpads to protect a low fall which could land you on the ground.
The Eye of Sauron 5.13a G 50' ★★★★
Pumpy, crimpy start, and a hard slab finish. Good rock.
Start: 30' right of Out for the Boyz at a rust-colored, eye-shaped hole 1' above the ground. This is 20' left of Crime, Fools, and Treasure.
● P1 5.13a G: Stick clip, then make a boulder move (crux, V7) to good holds. Go past a band of angular, light-colored rock to a right-leaning seam in a steep slab. Up the seam (second crux) to a ceiling and fixed anchor just above. 50'
Hardheaded Woman 5.11a G 90' ★★★★
High-quality face climbing, then a stellar crack. Tape up.
Start: 30' right of Crime, Fools, and Treasure [route #2, volume 1, page 415] on a ledge below an overhanging, orange wall. Begin at a black, upward-pointed flake 5' up.
P1 5.11a G: Go up the overhanging wall on incut edges (2 bolts) to a crack. Up this (crux, think face climbing) to where it widens to hands. Follow the incredible handcrack through two roofs to where the crack ends at a slab. Step right (bolt) to a water groove and follow this to its top. Fixed anchor on the left. 90'
Gear: Single rack to #3 Camalot; 2 ea #1 and #2 Camalots.
Mr Ribbon's Last Stand 5.9+ G 90' ★★★
Start: Same as Polar Soldier.
P1 5.9+ G: Stick clip. From the opening jug, reach up and left to a horizontal and hand traverse left. Step up into a crack system and follow it straight up to the top. The last 25' is offwidth. 90'
Gear: Camalots 2 ea #0.5 to #3; 1 ea #4, #5, #6.
Polar Soldier (aka The Tropical Trooper) 5.11c G 90' ★★★★
Climbs the left side of the Polar Soldier ice route. The gear is tricky to place, but excellent.
Start: Locate the mini-pond in the open area in front of the wide black face—the location of the Polar Soldier ice route. Scramble up onto a ledge (from either side) above the pond and begin just left of a shallow right-facing corner that begins 10' up.
P1 5.11c G: Step up to a jug, then angle up and right into a shallow right-facing corner. Up this (first crux, #3 Camalot critical) to a roof, then pull over into the right-facing corner above. Up the corner to a slab, then angle up and right to a left-facing corner. Up the crack in the corner to its top where the corner merges into the face. Crimp up the bulging face (second crux) to a horizontal, then mantel onto a ledge with a fixed anchor. 90'
Gear: Cams up to #3 Camalot.
❏As of June 2018, the road to the parking lot is blocked. You must park down low and walk to the Easy Acres / Bear Den trailhead.
Doesn't Remind Me 5.10c G 160' ★★★★
Two good pitches on the arête left of the Yard Sale [route #7, volume 1, page 417] chimney. This is the completion of project #6, volume 1, page 417.
Start: Begin on Bear Necessities [route #5, volume 1, page 417].
P1 5.10c G: Climb Bear Necessities for 20' to a right-angling crack. Follow the crack right towards the arête. Make a tricky mantle (crux, subtle side pull) a few feet before the arête, then follow thin face to a fixed anchor. 90'
P2 5.10b G: Wander up the face on knobs and edges to a fixed anchor. 70'
Gear: Green through red Aliens plus 0.5 and 0.75 Camalots.
Descent: Two rappels with a single 60m rope.
Location: North side of NY 86 in Wilmington Notch
Aspect: South
Height: 120'
Quality:
Approach: 30 min, moderate.
Summary: Raw cliff with some potential for new routes.
This is the next cliff up and right from the Labor Day Wall. It's easier to get to than Alcatraz (further in the notch), but evidently way easier to get out of.
The cliff is loosely reminiscent of Lake Lila wall, although with below-average rock quality. There are some cracks, some face, and some loose rock. There is a roof band on the left end, and some potential for new routes.
Directions: Park and cross the river as per the Labor Day Wall [volume 1, page 392]. After crossing the river, contour right and slightly uphill across a drainage. Go more or less straight uphill (steep) through open hardwoods to the cliff 587507,4909903. The forest isn't thick, but getting around is tedious.
Bullseye 5.8 G 120' ★
An OK line that would get an additional star if cleaner and closer to the road and near other routes.
Start: Uphill and left from the toe of the cliff, in a section where the rock "touches down". Locate three stacked blocks that you stand on to start the route next to a 4"-diameter yellow birch growing against the cliff. There is an undercut section of rock just to the left.
P1 5.8 G: Climb a short left-rising fingercrack past the birch tree. Face climb (runout, 5.6) up to a short handcrack with a small spruce at its top. Climb the crack to a stance, then move up a short face section (crux). Go past a few small overhangs to the top. 120'
Descent: 120' rappel from trees or walk down (skiers) right.
Gear: Cams to #2 Camelot, med to large stoppers.
❏[volume 1, page 426] If the Garden parking lot is full, you must park at Marcy Field and use the hiker shuttle. Click here for the shuttle bus schedule.
Avalanche Lake
West Face of Mt Colden
A Path in the Wilderness 5.3 G 1090' ★
A good route to enjoy a unique view on Avalanche Pass from above. Easier and not as varied as the Colden Slide route. The 4th class sections are very unprotected.
Start: Same as Colden Slide [route #14, volume 1, page 517].
P1 5.3 G: Go straight up using flakes to an overlap below and left of a large tree island. 200'
P2 5.1 G: Climb up and right to the top of tree island. 90'
P3 4th class: Go straight up with no protection. When the angle lessens, go left to another belay at a flake. 200'
P4 5.1 R: Climb a narrow section of rock between two tree islands past a couple of overlaps, then go left to another tree island. 200'
P5 3rd class: Go up slab with no protection to another tree island. 200'
P6 4th class: Climb toward a band of trees that block the upper part of the mountain, then go left below the trees toward its end to another belay. No protection. 200'
Gear: Up to 4".
Descent: Make two 30m rappels into the Trap Dike.
Wine Bottle 5.7 R 2150' ★★★★
Like Colden Slide [route #14, volume 1, page 517], Wine Bottle offers spectacular climbing on exposed technical terrain. The climb is better, steeper on some pitches and considerably more diverse than Colden Slide. The rock is excellent quality, surprisingly clean in most sections, and quite diverse with extended pitches of technical slab climbing, cliff bands, a small fracture cave and a bouldery 5.7 move at the top. Many parties will prefer to simul-climb and belay only brief difficult sections.
Start: Approach as for Trap Dike [route #9, volume 1, page 515], but stop at the southern end of Avalanche Lake. Follow a faint herd path southeast to a drainage and up to the slide, about 250' from the lake. Begin at a position with a large buttress to the left and a cliffs to the right 582492,4886867. This slide (and the start) can be seen on the right side of the photo in the second edition of Adirondack Rock, volume 1, page 514.
Route Description: Climb up the lower wall staying right of the obvious buttress on the left side (5.2). Divots, pockets, flakes, cracks and edges offer a variety of options and good gear. Above this is the central section of the route—a 400'-wide slab with expansive view of the lakes. Scramble 450' up the center of the unprotected slab to a 5'-tall overlap. Climb the overlap (5.4) and head slightly left up 4th-class ledges with plentiful holds and edges. Traverse back right toward the right side of the slide under a large tree island below a 25'-tall cliff that spans the slide. Climb a left-rising ramp to a terrace. Walk left and crawl through a crevice. Climb up to another terrace and walk to a 15'-tall overhanging cliff. Traverse left to obvious cracks (5.7, crux) and climb these to a low-angled slab, which is followed to the top. To exit, bushwhack left 250' to a narrow slide (known as Rolling Rock) and follow this to the balanced rock on the summit.
Avalanche Lake ● West Face of Mt Colden
Campsite Wall
This wall sits directly below the rightmost section of the Colden Slide, also known as the West Ramp. The wall faces west and captures the afternoon sun.
Directions: From the south end of Avalanche Lake, continue south (towards Lake Colden) on the trail,for 0.25 mile to the campsites on the left. There are two sites here; go to the second (and larger) site, then bushwhack west towards the cliff, picking up a drainage that becomes more distinct. Follow this to the wall, about 8 min from the campsite 582430,4886701.
Apocryphon 5.6 G 80' ★★
Start: At a widening fingercrack 50' right of a large scoop, which is 20' up and 20' left of some stacked blocks. This is 100' left of where the approach drainage meets the cliff.
P1 5.6 G: Follow the crack to its end just below a small overlap and headwall. Fixed trad anchor. 80'
Lost Boys Crack 5.10+ G 80' ★★
Start: At a fingercrack just left of a right-facing, left-leaning corner.
P1 5.10+ G: Follow the steep fingercrack for 30', then a left-leaning crack for 10', then up a face (bolt) a fixed anchor. 80'
Avalanche Lake
East Face of Avalanche Mountain
❏V1 (Avalauncher) of Dorsal Fin [volume 1, page 523] should be ★★.
Wade's Wainy Day 5.8 G 80' ★★★
Start: This route sits on a wall up and left of the second (southernmost) Hitch-Up-Matilda, the wall with the winter route Gatekeeper, and the right side of the gully leading to Avalanche Mountain Gully. Walk past the second Hitch-Up-Matilda, then angle up and left, then back right to the base of this wall. Begin in a jagged crack in a right-facing corner that leads to a stem-box chimney. This is left of a larger, dripping, chimney.
P1 5.8 G: Go up the corner and into the stem-box. Up this to where it narrows to a chimney, then to a handcrack. Follow this to a ledge with a fixed trad anchor. 80'
Hitchup Proj (project)
Closed project. Begin 15' before the end of the first Hitch-Up-Matilda (the first bolted-on bridge when approaching from the north), on a juggy face with a roof 10' up and below a broad, overhanging open book. Stem across from the hitchup onto the juggy face. Climb up to and over the roof to finger locks. Gain a sloping triangular ledge (crux) then follow an overhanging layback crack to a good ledge. Traverse left onto the bulging face to a broken left-facing corner. Up this (cryptic gear) to a low-angle slab; follow this to the top. Same anchor as Standard Deviation [route #16, volume 1, page 519].
Avalanche Lake ● East Face of Avalanche Mountain
Above the Fin
These routes are located on a small wall above The Fin, directly above the route Dorsal Fin [route #25, volume 1, page 523]. To reach the ledge above The Fin, climb a grungy pitch just right of the start of Something Wicked [route #18, volume 1, page 520]. Once on the ledge, bushwhack right to the base of the wall. Bushwhacking is easiest if you hug the base of the wall.
There are four cracks on this face, two of which have been climbed.
Descent: To descend from the base of this wall, rappel from a fixed anchor at the top of Affliction [route #21, volume 1, page 522] with a 70m rope.
Knot Punny 5.10a G 30'
This is the leftmost (and cleanest) of the four cracks on this face. Really fun, but really short.
Start: From the center of the wall, walk left on a left-rising tree ledge to the base of the crack.
P1 5.10a G: Climb the crack to the top. Lower from a cedar. 30'
Lichen Life 5.8 G 40' ★★
The most obvious line when viewed from across the lake, and perhaps the most worthwhile. Steep and sustained for the grade. With some scrubbing this would be a 4-star route (would it not be for the middle-of-nowhere location and grungy approach).
Start: This is the third crack from the left.
P1 5.8 G: Climb the crack to the top. 40'
Click here for an overview of Panther Gorge.
Mt Marcy ● Panther Gorge
East Face
Click here for a photo of Mt Marcy East Face.
Revelations 5.8+ X 600' ★★★
The route incorporates one of the most distinguishable features on Marcy's East Face, an 80'-tall arrowhead-looking flake near the bottom center. The route is a deceptively foreshortened and stout adventure climb featuring textured face climbing, layback cracks and a scary, unprotected start on P3. The first ascent was accomplished as day-hiked from the Keene Valley in just under 22 hours with a night exit through the northern talus field.
Start: At the lowest section of slab below the arrowhead flake 75' right of Ranger on the Rock [route #9, volume 1, page 501].
P1 5.7 PG (5.1 R): Run up the easy slab to a right-rising, grassy crack. Follow this to a right-rising overlap with a handcrack underneath. Follow the overlap to its end, then traverse right to a 4" crack at the bottom of the arrowhead flake. Climb past a small tree-island and belay. 190'
P2 5.5 PG: Climb the flake to its top. Follow right-rising cracks and face to the left side of a tree island under a large, nearly-vertical overlap. Belay from small crack under overlap. 130'
P3 5.8+ X: Step right behind tree island and climb a featured face for 40' to the first gear (5.8+). Avoid the appealing dihedral/detached block to the right. Continue up easier face over several overlaps toward the two obvious huge blocks. Make a sketchy traverse under the right-hand block to a right-facing corner and belay. 140'
P4 5.5 PG: Continue up the right-facing corner with an offwidth beneath to easier dimpled slab. Drift left to the end of broken ledges at its top. Continue up two small ledges and belay from stout trees at the base of the upper cliff band. 140'
Descent: Same as Ranger on the Rock.
Gear: Doubles of mid-size and large cams. Yellow and green Aliens are helpful.
Anorthofright 5.9- PG 710' ★★★★
Climbs slightly overhanging walls, a steep, pocketed slab, and a roof system on the right side of Marcy's east face. The route offers remarkable views of the northern walls of Marcy and the entire Haystack massif.
Start: On a slightly overhanging wall at the bottom right side of Marcy's east face, 20' left of a right-rising chossy gully.
P1 5.9- PG: Boulder up to a rectangular right-facing flake. Gain a narrow grassy ledge and make a sketchy traverse left to an obvious flake-crack. Climb onto a lower-angle face and follow a left-rising crack for 20'. Step out of the crack and face climb to a 1'-high, left-rising, left-facing corner. Follow this to its top and belay below a roof system. 130'
P2 5.6-PG: Traverse left and step down over a left-facing corner. Climb the corner to its top. Belly-flop onto a sloping vegetated ledge. Belay from cracks below a roof. 80'
P3 5.9- PG: Climb obvious right-facing flakes on a slightly overhanging wall. Go up a left-rising handcrack then break right on steep pocketed stone. Continue beyond a right-rising crack to a tree island below a vertical wall with a 6'-wide crack. Belay from smaller cracks. 180'
P4 5.4 G: Walk up a short grassy ramp to a right-rising crack on the white streak from the 2011 rockfall down Marcy's east face. Climb easy pocketed stone following obvious cracks. Belay from a bowl along the left side. 210'
P5 5.2 PG: Climb up easy slab and belay from trees on left or cracks below cliff at the top. 110'
Descent: Walk off right through tree islands. Contour down to Grand Central Slide. Descend slide and exit (skier's) right into trees before cliff-top. Bushwhack down to the top of a 30' ledge and rappel.
Mt Marcy ● Panther Gorge
Chimney Wall
There is an obvious, deep, parallel-sided chimney on the left wall of a right-rising gully several hundred feet right of Grand Central Slide. This is the Chimney Wall.
Click here for a photo of Mt Marcy Chimney Wall.
Directions: From the left side of the Agharta Wall, contour southwest 700' to a glade below the Overhang Slide—a slide with large overhangs at its top and bottom. Continue left (west) from the glade to a right-rising gully and follow it up and right to the east-facing, vertical cliff.
Panther's Pinnacle 5.9 R 250' ★★
Climbs a free-standing spire and the southeastern arête of the Chimney Wall.
Start: Scramble partway up a grassy 4th class gully on the southern side of the Chimney Wall. Look on the right for a couple cedar trees guarding an offwidth and begin here.
P1 5.6 PG (5.1 R): Climb the offwidth and run it out (or bring a very large cam) to a chossy face with good gear. Climb to vegetated ledges and step right through a thin band of cedars to the large gully below an obvious roof. 100'
P2 5.8 PG: Climb a right-facing corner with a 3" crack to its top. Step left and follow cracks up a ramp to a large flake below a seam and belay. 50'
P3 5.9 R: Face climb right with sketchy gear (runout for 15') to a right-rising handcrack that leads to steep featured ramp. Face climb up dimpled slab to a 10'-tall free-standing pinnacle. Climb pinnacle and step from its top to a ledge on the east side of the Chimney Wall arête. Climb ledges to the top. Belay from a 3' crack in a small cliff. 100'
Descent: Walk left around cliff and 30' up to a stout spruce. Rappel down south face down to the grassy gully.
Slacker Cracker 5.9 G 100' ★★★
Start: At a fingercrack downhill and left of the obvious chimney.
P1 5.9 G: Climb fingercrack to a right-rising hand- and fist-crack. Follow the crack to its end, then up a broken face to a small tree ledge. 100'
Marcy's Great Chimney (aka Empty Tomb) 5.8 G 165' ★★★★
This namesake feature of the Chimney Wall, when viewed from Mt Haystack, appears as a plumb shadow splitting the Chimney Wall. Marcy's Great Chimney ascends this striking feature—a parallel-sided, 6'-wide, 20'-deep chimney with a large diagonal chockstone at the top. Fortunately, the chimney is not a primary drainage, so it remains free of vegetation and has good quality rock, although there are still some loose bits.
Start: At the base of the obvious chimney, partway up the gully on the left, uphill of Slacker Cracker. The chimney is hard to miss when approaching from the Agharta Wall.
P1 5.8 G: Climb a crack that runs up the left side of the chimney. The crux is fairly low on one of the slightly overhanging sections. (V1) Switch to the right side and pass through the "open door of the tomb" (the giant chockstone). Belay from trees. 165'
V1 All Ryled Up 5.7 G ★★★: From the terrace below the giant chockstone, climb the 40'-tall handcrack on the left wall of the chimney to the top.
Gear: Double cams up to 4", and 1 ea 5" cam.
Descent: Double rope rappel from trees in the gully.
Mt Marcy ● Panther Gorge
The Huge Scoop
Just left of the Agharta Wall [volume 1, page 499] is this unique feature—a deep rectangular depression about 200' tall, marking the left end of Mt Marcy's highest cliffs. Just left of this wall is Twin Fracture Gully, where you can replenish your water.
Click here for a photo of Panther Gorge.
Predatory Instincts 5.9 PG (5.6 R) 450' ★★★
Climbs an edgy technical slab, slightly overhanging finger- and hand-cracks in the left wall of the Huge Scoop, and breaks through the roofs above the Huge Scoop.
Start: 20' uphill and left of Rumours of War, on top of a 4'-tall "pancake" flake.
P1 5.6 R: Climb slab to the first gear 40' up. Continue to left-rising seam and follow it through a small overhang. Belay 30' below headwall where the slab steepens below the first obvious overhanging crack from the left corner of headwall. 150'
P2 5.9 PG: Traverse left to the right-facing wall with twin chocolate-colored cracks—"double chocolate love" to quote Schneider. Gain cracks and climb to their top. Step left onto face at chockstone and belay from horizontal crack below a tree island. 75'
P3 5.8 PG: Step right and climb diagonally up and right over an overlap and up to a 5'-tall left-facing corner with finger crack. Climb right to another crack and follow to roof and left-facing corner. Break through roof via a handcrack and climb to top of a tree island; belay from crack under a roof. 175'
P4 5.8 PG: Drift slightly right and climb a left-facing corner with a handcrack and horizontals to low angle chossy slab. Take care of loose flakes. Climb to the right of a large tree island and belay from trees at the top. 50'
Descent: Rappel along right side of Twin Fracture Gully.
Rumours of War 5.9 G (5.2 R) 405'
This route ascends the slab and crack in the center of the Huge Scoop. It offers a slab, a vertical handcrack, an offwidth crack, and a chimney.
Start: From Wreck of the Lichen Fitzgerald, follow the cliff left for 5 min to the center of the Huge Scoop. The lower slab is divided into two halves by a left-facing corner; begin to the left of this corner.
P1 5.5 G: Climb slab along left-facing corner to a grassy ledge 20' below the steep wall at the top of the scoop. 180'
P2 5.9 G (5.2 R): Climb a handcrack to an offwidth crack. Step right with awkward move to a fingercrack. Follow up to loose-looking blocks and climb lower-angle runout slab to a grassy ledge. Belay from crack above. 75'
P3 5.7 G: Step right over a corner to a shallow left-rising rail; follow this to a right-facing corner. Continue up to an offwidth chimney with handcrack in back. Go up this, then exit to left-facing corner. Continue up a vertical crack, then up a low-angle slab to the top. 150'
Gear: To 4".
Descent: Rappel with double ropes into Twin Fracture Gully.
The Pride 5.9- G 560' ★★★★
One of the gems of Panther Gorge: clean stone, diverse climbing, a multi-tiered roof system, and a splitter handcrack.
Start: In the center of the lowest section of slab on the right-hand side The Huge Scoop.
P1 5.7 G: Climb a black slab to a thin crack and follow this for 40' to a horizontal crack. Go up a right-rising ledge to the huge corner that forms the right side of the Huge Scoop. Move up the corner and belay under small roofs. 200'
P2 5.9- G: Continue up the huge corner to the dominant roof system. Move left 20' to a vertical crack and climb up below a cantilevered block—the "Dong of Death" (don't touch it)—, then go back right to the corner. Climb through the multi-tiered roof to the lip (critical protection above lip), then traverse right 7' to a handcrack and climb to its top. Follow a crack right and belay. 110'
P3 5.7 G: Move right and climb a short left-facing corner, then up a slab to large left-facing corner. Climb to the top of the corner, then drift left and belay at tree left of the P3 chimney of Wreck of the Lichen Fitzgerald. 170'
P4 5.7 G: Climb cracks for 30', then break right for 50' through 5th class krummholz to belay at top of Wreck of the Lichen Fitzgerald. 80'
Gear: Standard rack plus an optional #5 Camalot. Double 70m ropes recommended.
Descent: Rappel Wreck of the Lichen Fitzgerald.
Mt Marcy ● Panther Gorge
Agharta Wall
Click here for a photo of Panther Gorge.
Wreck of the Lichen Fitzgerald 5.8+ PG 470' ★★★★
Ascends a cerebral line on the face on the buttress right of a huge square scoop at the left side of the Agharta Wall.
Start: From The Cloudsplitter [route #2, volume 1, page 500], walk left for 5 minutes to a drainage below the right side of the huge square scoop. Ascend to a small vegetated bench at the bottom left side of the face below the flake and buttress on the right side of the scoop.
P1 5.8+ PG: Face climb to a series of three open books on the left side of the face. Go up a handcrack in the third open book to its top (#2 Camalot), then make tricky moves (crux) with gear at your feet to a seam (yellow Alien). Traverse to a handcrack leading to a small roof. Break through the roof using the left of two vertical cracks. Move right to a right-leaning crack with two alders. Follow this past loose blocks to an offwidth. Go up the offwidth until it leans left. Traverse right 6' and belay from a 6" ledge with horizontal cracks just above. 150'
P2 5.7 PG: Go back 6' left to the offwidth, then continue up the left-leaning offwidth to lower-angle slab with a series of fistcracks. Follow the face to a steeper bulge at about 110'. Climb it and go slightly right above a large tree island to an obvious left-arching bulge with dominant overlaps. 160'
P3 5.7 PG: Break through the bulge on the right and face climb up and left toward an obvious chimney in the upper cliffs. Go through bushes and climb on grungy stone to the bottom of the chimney. Climb the corner up to a small slab to finish. Alternate exit if too wet: step over a corner to cleaner rock on the wall immediately the right of the chimney. Belay from trees above. 160'
Descent: Rappel the route.
Watery Grave 5.10a TR 170'
Start between Wreck of the Lichen Fitzgerald and CrazyDog's Halo at a short right-rising ramp on a smooth face with a 1'-deep ceiling 35' up and a splitter fingercrack just above that. Climb the ramp then up face to a stance below the roof. Go up the face and over the roof (crux) to the excellent fingercrack. At the top of the crack, go up an easier face, left to a hanging flake, then up this to join Wreck of the Lichen Fitzgerald at the scary pointed block just below the offwidth.
CrazyDog's Halo 5.8 PG 500'
This route ascends a series of corners and cracks slightly north of Wreck of the Lichen Fitzgerald. It offers incredible views to the north across the Agharta Wall before breaking through the upper cliff near a scary detached block.
Start: From The Cloudsplitter [route #2, volume 1, page 500], walk left for 5 minutes to a drainage from the face slightly right of the huge square scoop. Ascend to the face to a position 40' right of Wreck of the Lichen Fitzgerald, and below the dominant left-facing corners on the right-hand side of the slab.
P1 5.8 PG: Face climb to the left-facing corners below a small roof. Go up 15' along the corner and then up to a smaller corner. Follow the obvious crack to a small grassy ledge. Avoid an offwidth crack below the roof, and instead climb up and right to a larger grassy ledge below a splitter handcrack. Climb the handcrack to the top of the flakes and traverse right to a crack that widens into a chimney. Exit the chimney before it gets grungy: traverse up and left on good face holds until a foot traverse brings you to a stance below a 1.5" crack and belay. 165'
P2 5.6 PG: Climb a left-rising fingercrack until it peters out. Face climb up and right to an overlap below a large tree island. Clear the overlap and continue 35' through the trees to a spacious terrace below a steep wall with good cracks. 135'
P3 5.7 PG: Climb the steep wall and break through another bushy area to the upper slab. Face climb directly up to an obvious crack in the cliffs (about 50' left of the Agharta chimney). Climb behind a large block to a ledge and traverse left to a left-facing corner with a small chockstone. Climb the corner and face climb to the trees. 200'
Descent: Rappel Wreck of the Lichen Fitzgerald.
Pioneer Anomaly 5.8 PG 350' ★★
Start: On the left of the slab at the bottom of the Agharta Wall under broken overhangs split by a chimney 50' up.
P1 5.8 PG: Climb up grungy corner to right-facing handcrack–corner to top of pinnacle. 150'
P2 5.8 PG: Climb obvious fingercrack to its end. Make a crux move to a ledge, then go up a series of ledges and belay where it joins CrazyDogs Halo at horizontal cracks on a low-angle slab. 200'
Moonraker Runout 5.8+ R 500' ★★★
As the name suggests, the route climbs heavily dimpled rock (or "moonrock") and has runout sections. It is located left of Toma's Wall [route #1, volume 1, page 499], and right of the semi-wooded buttress to the left.
Start: 20' left of Toma's Wall.
P1 5.8+ R: Climb a dimpled face to an overlap, over this and up a second dimpled face to another overlap. Go over this onto a third dimpled face, then traverse to a handcrack (crux). Follow the crack to a right-rising crack, then up this to a ledge. 90'
P2 5.4 G: Up easy rock to the bottom of an obvious right-facing corner with a wall to its right. 170'
P3 5.8 R: Go up a wall to a green, dimpled, runout slab. There is critical gear at its bottom at a right-rising crack. Run it out 30' and trend left to a right-facing corner where the gear is PG rated. Climb corner to its top and take care of loose rock. Face climb to bottom of overhangs and belay from a crack, again taking care of loose pancakes underfoot. 150'
P4 5.7 PG: Traverse 25' left to a wide crack in the overhangs. Join CrazyDog's Halo here: Climb behind a large block to a ledge and traverse left to a left-facing corner with a small chockstone. Climb the corner and face climb to the trees. 90'
Descent: Bushwhack to belay tree at the top of the Feline Wall or rappel Wreck of the Lichen Fitzgerald.
[route #1, volume 1, page 499]
[route #2, volume 1, page 500]
Tail of Redemption 5.7+ R 320' ★★
Some sketchy rock for the first 40', then excellent rock with some runout face climbing following cracks and seams.
Start: At the highest grassy ramp below the Agharta Wall about 10' right of The Cloudsplitter.
P1 5.7+ R: Climb a ramp with loose rock and good gear to a left-leaning chimney–corner at the left border of the obvious roof system. Continue to a stance below a 4'-tall boulder. Break right and face climb up to the first left-leaning crack–seam. Follow until it turns into a left-facing overlap (runout). Climb about two-thirds up this feature, then step right over the overlap before it arches to the left. Face climb to the next left-leaning handcrack. Follow this and belay from the crack with a stance in a small depression. 150'
P2 5.6 PG: Climb the crack and bulges to obvious left-facing corner. Up the corner to its top then go diagonally to another left-facing corner with a large roof at the top. Face climb slab to roof and belay from tree island. 170'
Descent: Bushwhack to belay tree at the top of the Feline Wall or rappel Wreck of the Lichen Fitzgerald.
Throne to the Lions 5.9+ R 290' ★★★
This route breaks through the center of the Agharta roof system via an airy traverse. Falling from the first pitch crux could have serious consequences.
Start: Same as Tail of Redemption: under a broken roof system on the Agharta Wall.
P1 5.9+ R: Gain the blank slab to the right of an obvious block. Traverse right to a small roof on the opposing wall (crux). Climb the wall on positive edges and gain a grassy ledge. Belay from a vertical crack. 80'
P2 5.8+ R: Climb crack to a left-rising ramp and climb a face to an obvious overlap with a finger crack. Gain the horizontal crack/rail and traverse left to a crack that runs up the Agharta wall. Follow this crack to its end and belay from cracks in an 8'-high wall. 190'
P3 Bill's Great Traverse 5.4 G: Traverse left under the headwall to a large spruce. 20'
Descent: Two rappels to the ground. Double ropes needed for second rappel.
Gear: Standard rack with doubles to 2".
Wrecking my Zen 5.9 A0 360' ★★
Hard moves off the deck and through the roof lead to an exposed arête, then slab climbing above. This was one of the last remaining natural multi-pitch lines to be climbed on the Agharta Wall.
Start: 75' right of Throne to the Lions. Scramble up slab to the center of the roof system on the Agharta Wall. Belay from the grassy ledge at the top of the large tree island below a brown, triangular alcove.
P1 5.9 A0 G: Traverse easy slab to a blocky, left-facing corner at the bottom of the roof system. Make a few tricky moves to an undercling, then traverse steep slab to a small roof with a handcrack that transitions to a fingercrack. Break through the roof and climb a left-facing corner to a large, right-facing corner with tufts of grass. Climb a fingercrack on the left wall to an exposed position on an arête. Top out on a sloping ledge and belay from a vertical crack next to a small roof on its right. 80'
P2 5.6 PG: Climb the slab along a grassy crack to the bottom of a right-facing corner then traverse up and left toward an open book/stem box. Climb to its top then follow an obvious crack to its end at the huge overlap that caps the cliff. Traverse left until it peters out then climb slab to a shallow horizontal and belay. 160'
P3 5.3 PG: Continue up easier slab to a wall and belay from a large tree on the right. 120'
Descent: Bushwhack right and down to the top of the Feline Wall. Rappel from sturdy tree.
Gear: Small gear to #3 Camalot; heavy on the finger sizes.
[route #3, volume 1, page 500]
Mt Marcy ● Panther Gorge
Feline Wall
Click here for a photo of Panther Gorge.
Galaxy of Tears 5.9 PG 600' ★★★
One of the longest routes on the Mt. Marcy's side of Panther Gorge. Highlights include an exposed open book on P2, funky face climbing on P4, and expansive views of the Agharta Wall to the left.
Start: Begin at the left-hand edge of the Feline Wall—the steepest section of the wall—below the left-most fingercrack. Right of this steep section is a forested slope, separating it from the low-angle area further right, and to the left is the Agharta Wall. You may find it easier to bushwhack to the Agharta Wall, then go right up the glade to the start of this route.
P1 5.8 G: Go up the leftmost fingercrack to a handcrack and belay from cracks at the top near a 3'-wide flake that overhangs the Agharta Wall. 120'
P2 5.9 PG: Follow an obvious fingercrack up an exposed arête, then move left before an overhang. Continue up a slightly left-leaning dihedral to an open book with the crux at an exposed hand traverse. Climb to its top and belay from a good ledge. 150'
P3 5.8 PG: Climb a right-facing flake that turns into a corner with sketchy gear. Climb past top of Kat Nap, then drift right on low-angle slab. Break through the trees to the base of the upper cliff band. 170'
P4 5.6 G: Begin 50' left of a large, left-facing corner. Climb obvious cracks on a very featured "cheese grater" face. Traverse along a short wall leftwards to a chimney, then up low-angle slab to trees and belay. 160'
Cracks of My Tears 5.10a PG 115' ★★
The low crux is protected by small gear.
Start: 10' right of Galaxy of Tears at a right-leaning seam.
P1 5.10a PG: Follow a right-leaning seam up to pockets of large crystals. Move right to obvious finger and handcracks and climb to their top. Finish on a comfortable belay ledge with trees. 115'
Descent: Rappel from sturdy cedars.
Gear: Small nuts, cams to 3".
Kitten's Got Claws 5.7+ R 250'
Start: From The Cat's Meow [route #4, volume 1, page 500], walk to the bottom left-hand side of the slab then up and left slightly to avoid mossy slab.
P1 5.7+ R: Climb up to a grassy ledge above a mossy slab. From the center of this ledge, get your claws out and crimp your way up unprotected black slab to small right arcing overlap with a finger pod to its left (critical gear placement). Traverse left to smaller cracks. Climb to lighter colored slab with twin finger cracks that nearly join at the top. Continue up handcrack and belay from vertical cracks above small ledges next to left-facing corner. 110'
P2 5.6 G: Follow the obvious blocky left-rising crack to a right-facing corner. Step right after corner and continue up to gully at the upper left-hand side of the wall. Crawl through a vertical womb of cedar to a 10"- diameter pine tree and belay. 140'
[route #4, volume 1, page 500]
[route #5, volume 1, page 501]
Promised Land 5.8 G 410'
Face climbing, varied crack climbing and a money pitch between large opposing walls make this a worthy climb.
Start: This route is located on the buttress directly right of the large gully that defines the right side of the Feline Wall. Begin 15' up from the lower left side of buttress.
P1 5.7 G: Climb a right-rising ramp, then up the face to a horizontal crack left of two small trees. Continue up vertical cracks in the center of the face. When the cracks disappear 100' up, make some sketchy moves and break through a narrow band of vegetation. Climb cracks to a treed terrace directly below a large roof. 160'
P2 5.4 G: Climb to roof and make a 4th class traverse 20' right. Step up on low-angle slab to huge boulder on the left and belay. 80'
P3 5.8 G: Walk past boulder to left-facing wall with a chest-high ceiling. Traverse using horizontal crack under the ceiling to the face between the gully and a huge left-facing corner. Climb the face to a pair of handcracks. Climb to their end, then go right on low-angle slab to a chimney below a small ceiling. Climb up and left on blocky horizontal cracks to another chimney. Take care of loose-looking rock. Step left and climb along the edge of gully to top. End with cedar pulling and belay from two large pines left of the gully. 170'
Descent: Rappel down gully.
Mt Marcy ● Panther Gorge
Panther Den
Click here for a photo of the Panther Den.
Cat on a Wet Tin Roof 5.8 PG (5.7 R) 200' ★
Wet tin isn't easy to climb, and neither are wet backcountry cracks. This route has a little of everything—unprotected start, easy-moderate cracks, a scenic terrace and a killer finish up an easy chimney between the mountain and a large free-standing pinnacle. Other than the first 15', the route has decent protection.
Start: Left of Le Chat Noir [route #6, volume 1, page 501] at a vertical face 5' left of the mossy blocks at the lower left corner of Panther Den, where the herd path veers back into the woods.
P1 5.7 R: Climb an unprotected face (5.7) to a ledge below an obvious handcrack. Climb the handcrack, then up divots with good cracks along the left-facing corner of the Panther Den wall. Belay from a spacious terrace below a vertical wall. 150'
P2 5.8 PG: Follow a handcrack up to a large free-standing pinnacle. Climb slab along the left side of the pinnacle to a chimney. Go up the chimney 20' to top and belay from trees. 50'
Descent: Walk off northeast around top of cliff.
Climb After Slime 5.8 G 180' ★★
A play on "Time After Time", this route features an absolutely bomber layback flake leading to a traverse out on the prow of the Panther Den Wall.
Start: 10' right of Cat on Wet Tin Roof at mossy blocks and cracks below an obvious gully. The first 15' are often wet, in which case you can start on Cat on a Wet Tin Roof and move right to the gully.
P1 5.7 G: Climb mossy blocks with good gear into a gully. Continue to an optional belay on a ledge next to the beginning of twin fingercracks below an obvious right-facing flake. 50'
P2 5.8 G: Step right to attain the cracks (crux). Climb a flake with an alternating finger - and hand-crack to a horizontal at its top. Traverse 10' right along the horizontal with great hands and ok feet to attain the prow. Go up face and through a series of overlaps to low-angle slab. Continue past a chimney on the left to belay from the trees past a left-facing corner. 130'
Gera: To 4".
Descent: Bushwhack north 75' and rappel Panther's Fang.
Anorthosite Overcast 5.11a G 110' ★★★★★
Start: At an always wet seep at the far left end of the Panther's Den below a prominent right-facing corner that begins 20' up.
P1 5.11a G: Face climb to the right of the seep (tricky gear, water does not affect climbing). Gain the corner and follow it through a small roof to a cramped stance at a second small roof. Follow discontinuous fingercracks up and right to a hero handcrack finish. 110'
Gear: Standard rack to 2", heavy on finger sizes.
[route #6, volume 1, page 501]
[route #7, volume 1, page 501]
You Moss be Kidding Me! 5.7 G 110' ★
This one looks like a mossy mess at first glance. Instead, an alternating chimney system makes a surprisingly fun climb with great hand jams, good feet and plenty of holds.
Start: About 20' right of the Panther's Fang at an obvious crack with moss on either side.
P1 5.7 G: Climb a chimney–crack system to its top. Break right to a left-facing corner and belay above. 110'
Gear: To 5".
Descent: Bushwhack (fourth class) 30' left and rappel Panther's Fang.
One for the Boys 5.9 PG 75' ★★
Start: At the first crack to the left of the 6'-deep right-facing corner of Puma Concolor [route #8, volume 1, page 501].
P1 5.9 PG: Climb the straight crack to its top and belay from a good vegetated ledge. Take care of loose blocks at the top (can be avoided). 75'
Gear: To 4".
Nothing but the Rain 5.9+ R 100' ★★
It takes rare conditions for this to be dry enough to rock climb.
Start: In the 6'-deep right-facing, often-wet corner 8' left of Puma Concolor [route #8, volume 1, page 501]. The winter ice route, Waking Cerberus also forms in this corner. This route would be G-rated with a #8 Camalot.
P1 5.9+ R: Squirm your way up from the obvious ledge to good edges and the first gear above a chockstone. Continue up the off-width in the corner until it pinches down and slightly overhangs at the top. Climb into a small cave and break through the roof up to the forest. Belay from cracks at top. 100'
Descent: Walk off or go up another 30' to a stout tree and rappel (difficult pull).
Gear: Heavy on the large gear: #6, two #5s, three #4s, and a smattering of small to midsize gear.
[route #8, volume 1, page 501]
Belshazzar's Fate 5.8 PG 100' ★★
Surprisingly more interesting and appealing than it appears from below.
Start: 15' to the right of the obvious right-facing corner of Puma Concolor [route #8, volume 1, page 501].
P1 5.8 PG: Climb to flaring chimney and follow to roof. Drift left around dangerous blocks to a small ledge. Climb handcrack in a right-facing corner to adequate belay on the left. Rappel or walk off (climber's) right. 100'
Castle Column 5.9 G 115' ★★★
Be aware of loose blocks in this area.
Start: Right of Belshazzar's Fate and left of the obvious free-standing pillar below a narrow ledge 6' up.
P1 5.9 G: Climb to the narrow ledge and find a short chimney with a fingercrack in the back on the right side. Climb it to a ledge at its top. Gain another fingercrack in a right-facing corner (crux) and go to its top where it transitions to a handcrack. Gain another crack to the right and follow this to a ledge below a gully with large stacked blocks. Climb gully to its top with solid gear on the left; avoid the blocks. Belay from a 10"-diameter tree about 20' into the woods. 115'
Descent: Walkoff or rappel the route.
Practically Roadside 5.9 G 100' ★★★
A stout climb with a short overhang, good feet, and a deep crack.
Start: Start as for Castle Column between a shallow right-facing corner and the large column at the head of Panther Gorge.
P1 5.9 G: Climb along the left side of the column to an alcove at its top. Step left to a gully from the top of the column, then traverse right to gain the obvious fingercrack that dissects an overhanging bulge (critical placement of a #6 Stopper in the crack before the traverse.) Follow the crack past two small chockstones, then make an awkward move into a short offwidth. Climb to a terrace, then step left and climb an arête to its top. 100'
Gear: Small to midsize.
Descent: Rappel from stout trees or walkoff.
Had the Radish 5.8+ G 80' ★
The huge blocks at the far north end of the cliff form the majority of the route.
Start: At the far right end of the cliff in a left-facing corner with a fist-crack, 20' right of Practically Roadside.
P1 5.8+ G: Climb a left-facing corner to two loose blocks and a ledge. Gingerly continue past the blocks to a roof and climb an off-width crack to its top. Trend right at another thin pinnacle and up easy terrain. Belay from a stout tree and walk off. 80'
Gear: Assorted small to medium gear, 2 ea #4 Camalot.
Until recently, all of the reported climbing activity in Panther Gorge has been on the Mt. Marcy (west) side of the gorge. These routes are located on the Haystack (east) side of the gorge.
Click here for an overview of Panther Gorge.
Click here for an overview of Haystack.
Mt Haystack ● Panther Gorge
North End
Directions: Walk south about 525' south into the gorge from the Phelps Trail/Haystack intersection. Here there are three free-standing pillars all within 5' of each other that sit slightly above the drainage on the Haystack side 587601,4885228. Alternatively, you can see the pillars, the largest with an obvious crack on its west face, from the base of the Panther Den Wall and traverse to its position.
For Whom the Lichen Tolls 5.9 PG 40' ★★★
Ascends an overhanging fThe inger- and hand-crack of a free-standing pillar. Recommended music for the climb—For Whom the Bell Tolls by Metallica.
Start: On the largest and most downhill pillar, just right of the southwest corner.
P1 5.9 PG: Climb up good edges and jugs along the south side of the pillar to an obvious ledge on the SW corner. Follow a slightly overhanging, left-rising finger- and hand-crack up to a horizontal seam. Continue climbing the continuation of the crack as it rises slightly to the right. Top out on a small summit split by cracks. 40'
Mt Haystack ● Panther Gorge
Ramp Wall
The Ramp Wall was named for the large left-rising ramp at mid-height on the cliff. The upper portion of the cliff forms a fin with a deep corridor behind it that provides a unique 4th class descent.
Click here for a photo of the Ramp Wall.
Directions: The wall sits directly across from the Panther Den Wall [volume 1, page 501]. Approach as for the Panther Den Wall then bushwhack across drainage to the Ramp Wall.
Luceo Non Uro 5.8+ PG 80' ★★★
An engaging arête climb with fun moves.
Start: 10' left of And Then the Judgement.
P1 5.8+ PG: Follow an obvious crack on the right side of the arête taking care of a loose block on the right wall. Make a big move from the block (crux) to easier terrain and choose between (a) placing gear in a hidden horizontal on the left side of the arête, or (b) running it out to an overlap (critical placement). Traverse left to a left-rising flake, then climb an obvious crack to its top. 80'
Gear: Small gear to #1 Camalot.
Descent: Easy walkoff to the north.
And Then the Judgement 5.9+ G 85' ★★
This route offers challenging face and crack climbing up a variable-width crack on a slightly overhanging wall. This is the first line on the west face of this cliff. There is good potential for additional routes on this wall. Be mindful of loose flakes.
Start: In the center of the cliff, 30' left of Eye for an Eye.
P1 5.9+ G: Climb blocky, overhanging ledges to a right-facing corner with a seam. Up the corner and follow the crack to its top in a small triangular cave. Take a few deep breaths, then climb an offwidth to a right-rising edge and the top of the cliff. 85'
Descent: Rappel from trees or walk off to the north.
Gear: Standard rack up to 4".
Eye for an Eye 5.8 PG 60' ★
Start: Walk to the left end of the Ramp Wall, then continue 100' left and cross a stream to this route. Begin just left of the stream.
P1 5.8 PG: Go up a short offwidth crack, then scramble up ledges to a right-facing corner with many loose looking blocks (they are well anchored). Continue to the top of the corner, move right past flaring cracks in face and past two small pillars. Ascend a fist crack to the top. 60'
Descent: Walk right and rappel from trees.
Less Than Zero 5.5 PG 60'
The intended route—the striking lightning-bolt-shaped crack under the start—is no more than a dirty seam.
Start: 50' uphill and left of All Battered Boyfriends, below some left-facing corners. This is just left of the prominent ramp high above.
P1 5.5 PG: Climb the face left of the left-facing corner to a ledge at the top of the corner. Step right to top of the ramp, then go up the 4'-deep right-facing corner to top. Hurdle moss cornice to belay. 60'
Descent: Rappel from trees.
All Battered Boyfriends 5.7 PG 70' ★
Start: 30' left of lower right end of ramp.
P1 5.7 PG: Face climb past horizontals, then up opposing corners to the ramp. Traverse down and right on the ramp, then up a right-leaning handcrack to a vegetated terrace and belay. 40'
P2 5.5 G: Climb blocks in a right-facing corner (part of a wide stem box) to the top. 30'
Descent: Scramble down the corridor behind the cliff (4th class).
The Lioness Rampant 5.11d TR 55' ★★★★★
An amazing 20° overhanging crack that remains consistently burly from bottom to top. Right of All Battered Boyfriends, locate the rightmost crack on the south-facing prow of the Ramp Wall. Begin at an 8'-high alcove with a handcrack rising out of the back. Jam the crack using intermittent wedged flakes.
Mt Haystack ● Panther Gorge
No Man's Land
No Man's Land on Mt Haystack is characterized by a large slab with broken cliffs above and to its right. This is right of the Ramp Wall and left of the V Wall.
Directions: Bushwhack from the Feline Wall to the base of the large slab. Climb extremely steep terrain along the base of the slab to No Man's Land.
Click here for a photo of No Man's Land.
Tomcat 5.8+ PG 500' ★★
An uncharacteristically long line for Mt. Haystack that follows the left-most side of No Man's Land and incorporates a huge flake next to the most expansive slab on the mountain. The route was named in memory of Tom Wright whose kind, genuine, adventurous soul lives on in the hearts of many Adirondack locals.
Start: Approach as for Paws Off. Begin at the bottom of a narrow slide left of the large slab.
P1 5.7 PG: Climb the slide on good edges. Trend left to the gully and climb to a right-facing corner. Step to the right through a narrow cedar band and onto a slab below a monstrous flake. Belay from a crack in a huge, left-facing corner. 150'
P2 5.8+ G: This is the money pitch! Climb to the flake and make an awkward move off the deck to get in the offwidth. Sling a chockstone (placed by the first ascentionist) as the first piece. Follow to its top and belay from a spacious terrace. 70'
P3 5.6 G: Climb 10' then step left to gain a right-rising crack in a closed book. The crack appears mossy but there are plenty of good face moves and jamming. Step right at its top and walk through small trees to easy slab. Follow the slab rightwards until you intersect the drainage of the wide slab below the upper cliff. Climb partway up the slab and belay in any number of cracks. 190'
P4 5.7 G: Continue left up the slab to an obvious right-facing corner with a slightly overhanging handcrack 3' to its left. Climb the corner past two blocks and up to a small tree. 90'
Gear: Micro cams to #4. A #5 Camalot would be nice for the giant flake.
Descent: Bushwhack upslope and find the top of a gully on the left side of No Man's Land. It may be wise to break the descent into three rather than two full-length rappels to reduce rope drag.
Trigger Warning 5.10b PG (5.7 X) 180' ★★★
Start: At the left end of the terrace below the shield, at an obvious line of holds which lead to the far right end of a prominent ledge 50' up.
P1 5.10b PG (5.7 X): Climb the face with no protection (5.7 X) to a crux move leading to the ledge. Walk left 25' and belay below a large, left-rising flake. 60'
P2 5.8 PG: Climb the flake to its end and step up to a left-facing corner. At the top of the corner, climb straight up on surprising holds and horizontal cracks. When the angle eases, run it out up easier terrain until blocked by a steep headwall. Step right into the trees and belay. 120'
Descent: Walk right and rappel Slab the Impaler.
Gear: Standard rack to #2 Camalot; RPs helpful.
Slab the Impaler 5.9 PG 170' ★★★
This is the first route up Haystack's large shield. The route features airy face climbing and an edgy traverse.
Start: Right of center on the shield, on the left side of an obvious crack system with grassy tufts.
P1 5.9 PG: Face climb the slab along the left side of the crack until it peters out. Traverse left on flaky edges to a short, shallow, right-facing corner. Climb to its top and step left to a flared seam. Make a few moves up the seam to a bugle with a short offwidth. Follow the offwidth to easier terrain. Drift slightly left across several left- and right-rising cracks, and follow the slab to a belay in a stepped gully. 170'
Descent: Step right and rappel from cracks or a pinch-point between two boulders.
Gear: Standard rack to 4".
Paws Off 5.8 PG (5.4 X) 400' ★★
Start: In the center of the cliff to the right of a light streak, in a left-rising, right-facing corner to the right of a recent rockfall.
P1 5.8 PG: Climb the corner to small roof. Break through the roof on its right, then follow several cracks to an open book. Climb a right-facing flake on its left side to a ledge. Follow a handcrack and belay from cracks in a 6'-tall wall. 110'
P2 5.3 PG: Step down right and traverse along the base of an overhanging cliff to an obvious corner below a chossy gully. 150'
P3 5.4 X: Traverse easy slab behind balancing blocks to corner. (A belay here will to reduce rope drag.) Step around corner and climb a left-facing corner with cracks to low angle, unprotected dimpled rock. Climb to a short ledge and belay in woods. 140'
Descent: Rappel along the right side of the cliff.
Mt Haystack ● Panther Gorge
V Wall
Click here for a photo of the V Wall.
This is the gorge below Little Haystack. The wall is shaped like a "V", the left side of which is defined by a deep left-rising gully, and the right side by a right-rising dike-gully.
Directions: Follow the intermittent herd path to the Agharta Wall, then bushwhack to a large boulder located in the drainage stream from the V Wall. Follow stream to wall 587593,4884764. Expect to navigate through heavy moss-covered talus, blowdown and dense tree growth.
Windjammer 5.7 G 140' ★
Start: At the opposing corners partway up the right wall of the left-hand dike that defines the left side of the V Wall.
P1 5.7 G: Follow the right-hand crack of the opposing corners (left-facing corner). Good jugs and jams lead to a stem box with a basketball-size chockstone (crux). Continue past the chockstone and follow the gully to its top. Belay from tree. 140'
Psalm 23 5.7 G 190' ★
Start: At the bottom of the V of the V Wall.
P1 5.7 G: Follow slightly left-leaning cracks and ledges to overhanging hand- and fist-crack and follow this to its top. Belay from trees. 190'
All Things Holy 5.7 PG 505' ★★
Great views of the Mt. Marcy side of the gorge. An aesthetic line on excellent rock.
Start: From the base of the V, go up the dike-gully that forms the right-hand side of the "V" to an obvious left-rising crack in the left-hand face.
P1 5.5 PG: Follow the left-rising crack from the basalt dike around onto the front of the wall. Follow a left-rising fracture through bulges to a small belay terrace at the bottom of a grass island. 90'
P2 5.4 PG: Continue 30' up and left to a right-rising crack. Follow this up bulges of heavily pitted rock. Just before the crack ends, step left over a rounded corner onto the face. Go up the face, then up a crack straight up to trees. Bushwhack 30' through the tree band to the base of a slide and belay from cracks near its base. 180'
P3 5.7 PG: Climb the face up the center of the slide with the crux move on a tier with horizontal fingercracks. Continue to the top where it becomes briefly vegetated. Climb the last section on and left up a handcrack and low-angle slab at the top. Exit to the left and climb a 10'-tall wall with nice cracks to belay at the top. 165'
P4 5.7 PG: Bushwnack 40' up and left to the first face with a vertical crack crossed by two horizontal cracks. Traverse to the crack from the right and climb the vertical crack. Belay from the top at a large tamarack tree. 70'
Descent: Rappel the route, or continue uphill to the Range Trail northwest of Little Haystack.
Mt Haystack ● Panther Gorge
South End
Click here for a photo of the South End.
Haycrack 5.3 PG 150' ★★
This aesthetic route climbs an excellent crack located on the northern of two technical slides joined at the top. The route provides a unique perspective of the Mt. Marcy side of the gorge.
Start: The route is located south in the gorge below Haystack's summit. Due to its position low in the gorge, it is best approached from the Panther Gorge Lean-to. (It's about 20 min south of the V Wall of All Things Holy.) From the lean-to, follow Marcy Brook about 0.5 mile up to 3,375 elevation where a small stream enters from the right. This is near the beaver ponds, which are on the left. Bushwhack just south of the stream to the slides, which you reach after about 200' of elevation gain. Climb several ledges to a right-rising dike that leads to the base of the slab 587429,4884146. If you find yourself at a long, left-rising ramp, then you're on the southern slide.
P1 5.3 PG: Face climb 15' to a handcrack. The serpentine crack offers bomber holds throughout. Follow the crack up the face, over a bulge, to an obvious overlap 80' up (optional belay). Continue up the crack another 30' to a slightly overhanging wall. Traverse right below the wall (stepping down and around a 6'-deep corner) for 40' to the woods. 150'
❏P1 of Woolsey Route [volume 1, page 485] should be ★.
Jazz Cabbage 5.9+ G 100' ★★
Start: Midway between Old Route [route #2, volume 1, page 486] and Cock-a-doodle-do, locate the large, left-facing corner 100' up—the corner that you pass midway on the Old Route traverse. Begin directly below this corner, right of a boulder with a multi-trunked birch tree below and left of an A-shaped notch in an overhang 12' up.
P1 5.9+ G: Get a good nut before you start (so you don't fall down the hill). Boulder up to a good stance 7' up (crux). Follow right-leaning cracks to a face section below a tree in a left-facing corner. Climb to and past the tree, then up the corner to a good belay at the midpoint of the Old Route traverse. 100'
Gear: Standard rack plus doubles 1/2"-1".
Descent: Finish on Old Route or one of its variations.
Free Soul 5.9 G 130' ★★★
Start: At a large flake to the right of Mustard Sandwich [route #2, volume 1, page 496].
P1 5.9 G: Go up the flake to its top. Critical gear placement (for the belayer). Climb 60' of slab to the right side of a block that becomes a left-facing corner. Take care as this appears to be a large free-sitting block with a small tree at its top. Traverse left and follow a corner with a handcrack to its top under a small roof. Fixed anchor. 130'
Gear: Single set of cams to 3".
Sagrada Familia 5.6 PG 205'
A more aesthetic start for the neighboring routes such as Tea and Biscuits or South Face Direct, or used as a better start for the first half of Original Route. The route can be climbed in two pitches or linked together as a single rope-stretching pitch.
Start: At dark, water-marked rock on the slab 20' left of Original Route.
P1 5.6 PG: Climb the dark, featured slab past solid protection in cracks and overlaps for 100' (optional belay in good overlaps). The first delicate moves are 10' above the first placement. Continue up flaring water runnels that occasionally take good, large cams (#1 to #3 Camalots). The rock becomes less steep and runout for the last 30'. Belay on a ledge in a good crack level with the base of Tea and Biscuits. 205'
Descent: There is no fixed protection at the top of the route. Best to continue on another route, or downlead the ramp of Original Route.
Gear: Single set of cams to 3".
Takillya Sunrise 5.7 PG (5.2 R) 610' ★★
Diverse route with an interesting position between South Face Direct [route #8, volume 1, page 476] and Gothic Arch.
Start: 50' right of Original Route below a set of right-facing flakes in a vertical wall.
P1 5.7 PG: Climb flakes to a left-rising ramp. Step left up ramp and climb a short wall (crux) to low-angle slab, then to a tree island. Belay from good trees. 80'
P2 5.6 PG: Climb short, slightly off-vertical wall and continue over a series of overlaps past a large block (take care of smaller blocks behind it). Continue up slab to a deep, left-rising crack and belay at its top (large cams and slung block). 180'
P3 5.4 PG: Continue up easy, dirty slab to the bottom right corner of the large tree island at the right side of Piano Ledge. Climb over obvious left-facing dihedral (critical green Alien). Continue up slab to smaller right-facing dihedral and belay. 150'
P4 5.4 PG (5.2 R): Climb the dihedral to its top and step left. Continue up easy slab to belay from trees. 200'
Descent: Scramble the slide tributary to its top and bushwhack to the Range Trail between Gothics' west shoulder and intersection with Weld Trail. Walk right on the trail, then turn right again at the intersection to return to Pyramid.
Gear: Standard rack including small cams.
Pure and Easy 5.5 PG (5.2 R) 700'
A sister route to Gothic Arch that is similar in quality and position.
Start: Below crescent arch, between Gothic Arch [route #9, volume 1, page 476] and Goodwin Route [route #10, volume 1, page 476].
P1 5.5 PG: Go partway up a shallow left-facing corner, then step right and climb through the arch. Traverse left to big holds which lead to the left end of a grassy ledge. Move back right on this to a comfortable belay above a large, dirty arch. 160'
P2 5.5 PG: Head easily straight up on great holds, then angle right to a small tree and grass hummock in the giant arch. Belay at a tree in featured rock (ancient webbing on tree!) 175'
P3 5.4 PG (5.2 R): Follow large holds over arch and onto low-angle slab. Climb mellow pock-marked grooves staying just left of a tree/shrub island. Belay on the lower left end of a huge tree island. 200'
P4 5.3 PG: Friction up easy slab on left, passing a left-facing arch, up nice clean rock to a traverse right to belay at the top of a tree island. 165'
Descent: Push right through scrub and scramble 400' up the left margin to outcrops and the trail. It is also possible to join the final two pitches shared by Gothic Arch and Goodwin Route.
Location: South High Peaks, accessed from the Northway Exit 29.
Aspect: Southwest
Height: 100'
Quality: ★★★★
Approach: 22 min, easy
Summary: Broken cliff with several very steep walls, including a 35° overhanging wall (similar to The Crown).
Ragged Mountain has a number of outcrops below its southwest subsummit. One of these is particularly good with excellent, steep, continuous faces, corners, and cracks. It's unusual to have so many high-quality routes packed into a tiny area. There's a good range of difficulty, and there's a five-star warmup used to access the fixed anchors of its harder neighbors. The base is comfortable with great views and spotty cell reception. In the summer, the cliff stays shaded until 1:00 PM.
Access to the top of the cliff is difficult with slabs, thick trees, and ledges; hence, every route is equipped with a fixed anchor. A standard single rack will suffice.
There is a marvelous swimming hole known as Blue Ridge Falls, 2.4 miles on the left (when traveling west from I-87) 597753,4867776. Park on the south shoulder and follow a woods road towards the river. Numerous paths lead down to the river, which is wide and flows over smooth slabs forming pools, eddies, and cool waterfall seats.
Access: The cliff is part of the Boreas Ponds Tract, a parcel owned by former Finch Pruyn timber company and leased to the Ragged Mountain Fish and Game Club (North Hudson, NY). In 2007, The Nature Conservancy purchased the land and transferred it to the state in April 2016. It is now state land.
Update (August 31, 2016): The initial section of Gulf Brook Road has been [seasonally] opened, reducing the approach to 8 min. If the road is closed, the approach takes an additional 14 min. Check the DEC web site for road conditions and closures: www.dec.ny.gov/outdoor/9198.html.
Update (April, 2020): The DEC has closed all road-side/shoulder parking on Gulf Brook Road; you can only park in the official, designated parking lots. (The DEC management plan calls for a parking area at the climber trailhead, but this hasn't been implemented yet, and may not for some time.) The closest parking is at the start of Gulf Brook Road before the gate.
Update (July 2020): The DEC has closed Gulf Brook Road due to several washouts. You can still navigate this on foot or by bike. No date has been set for the repair.
Update (April, 2022): The DEC has created a parking area at the start of the hiking trail.
Directions: From Exit 29, from the underpass, drive west on the Blue Ridge Road (CR 84) for 7.3 miles to Gulf Brook Road on the right. Turn right and drive up the gravel road, passable by 2WD vehicles, although high clearance helps. At 7.4 miles there is a gate 590496,4867659 with a large parking area. Continue up the road to a parking area on the right at 8.2 miles 590989,4868517. This lot is 100' past a gravel pit on the left, and there is an old ATV trail that begins here.
This unmarked ATV trail goes to the summit of Ragged Mountain, and may become an official DEC-maintained trail in the future. Follow the trail for 300' to an open patch of prickly plants. On the far side of this open area the trail turns left; go straight and follow a path uphill to the cliff 591238,4868155, about 8 min from the road.
Hella Fly 5.13a G 25' ★★★★
This unique route involves two very large dynos, one after the other. Very close to bouldering on a rope, and the shortest hard route in the park.
Start: Uphill and left of Rags to Riches where the trail meets the cliff, at the left end of a sidewalk-ledge where it goes into the left-rising dirt slope.
● P1 5.13a G: Walk right on the ledge, then up to a good pair of holds in the black bulge. Make a 6' dyno to a good hold, regroup, then make a 5' dyno up and left to another good hold. Move up onto the small ledge and a fixed anchor. 25'
Rags to Riches 5.10d G 30' ★★★
Start: At the left end of the cliff is an overhanging black wall. Begin on the right side of the wall at a right-facing flake.
P1 5.10d G: Up the right-facing flake to a horizontal, then up a gnarly right-leaning crack to a slab-mantel (crux) at the top. 30'
Gear: 1 ea #3, #9 Wild Country rocks; 1 ea #0.5, #0.4, #1 Camalots.
Palm-O-Granite 5.8 PG 140' ★★★
Nice slab climbing that accesses the spectacular Balcony. The slabs left and right of P1 have been purposefully left as topropes.
Start: 100' left of Kittens, Rainbows, and Lollipops at a cleaned strip in the slab below the overhanging headwall of The Balcony.
P1 5.8 PG: Climb up the slab to an overlap (gear) and the up the face to a fixed anchor. Lower from here (40'), or continue up and build a gear anchor where the headwall meets the slab. 80'
P2 5.3 G: (V1) Head left and follow a crack where the slab and headwall meet. Nice climbing and position. 60'
Gear: P1: Red or blue Camalot for the overlap and an optional Green Camalot for the last move. P2: Standard rack.
V1 5.3 PG: Traverse right over blocks to the top of the cliff. 80'. Not recommended.
Invasive Species 5.10b G 80' ★★★★★
An excellent route that face climbs following the underside of an upside-down staircase overhang. Spectacular.
Start: On the main, tallest part of the cliff at a face below a right-leaning, right-facing steep corner. This is just left of a large cedar growing a few feet from the cliff.
P1 5.10b G: Up easy ledges to a stance. Climb a right-facing edge into the right-leaning corner, and follow this to where it straightens to vertical. Finish in a handcrack to a fixed anchor shared with Super Slab. 80'
Gear: Nuts; 1 ea #1, #2 Camalot.
Super Slab 5.12c G 70' ★★★★
Start: 10' left of Kittens, Rainbows, and Lollipops in the middle of the face capped by a triangular roof 50' up.
◉ P1 5.12c G: Stick clip, then make hard moves (first crux) up a shallow left-facing corner, then up and right to a right-facing ramp. Follow this feature up and left to the decent stance and then head straight up the face (second crux) to the triangular roof above. Break this using a right-leaning crack (optional 0.5 Camalot). Step left to a fixed anchor shared with Invasive Species. 70'
Gear: Optional #0.5 Camalot.
Kittens, Rainbows, and Lollipops 5.8 G 100' ★★★★★
Simply awesome; one of the best single pitches of its grade in the park. Despite appearances, this route can be climbed without large gear using a hidden crack on the right wall. Seeps after a big rain.
Start: Below a wide crack in a left-facing corner.
P1 5.8 G: Go up the wide crack to the roof 50' up. Break this on the right and continue up the crack to its top. Climb a short, right-leaning crack on the right wall (crux) to a stance on the left with a fixed anchor. 100'
Gear: To 2.5".
Ragged Kittens (linkup) 5.9 G 100' ★★★★★
Links together the best moderate climbing at the cliff.
Start: Same as Kittens, Rainbows, and Lollipops.
P1 5.9 PG: Go up the wide crack to the roof 50' up. Break this on the right to a ledge. Step right and follow the snaking crack finish of Runnin' Ragged to a fixed anchor. 100'
Gear: To #3 Camalot.
Runnin' Ragged 5.11d G 100' ★★★★★
The first route here and arguably one of the best of its grade in the park. Harder for shorter climbers.
Start: 4' right of the left-facing corner capped by a triangular roof 50' up (the start of Kittens, Rainbows, and Lollipops), at a short crack directly below the blunt arête.
P1 5.11d G: Go up the crack to a ledge. Up the face past two bolts to a good horizontal. Follow a vertical seam into an overhanging scoop to a thank god jam-jug at its top. Follow the snaking crack (5.9) to the top. 100'
Gear: 2 ea #0.5 Camalots; 1 ea #0.4, #3, #0.75 Camalots; 1 ea #2, #5, #6, #9 Wild Country rocks; 1 ea #11 DMM Walnut.
Unlawful Entry 5.11a G 60' ★★★
Looks like a crack climb, but it's easier as a face climb with crack protection.
Start: At the right end of the cliff, at a left-rising crack that begins on a boulder pile just left of a black, right-facing, right-leaning, overhanging corner.
P1 5.11a G: Follow the crack on the overhanging wall to its end, then go straight up into a right-facing corner. Up this, then up a crack to a fixed anchor. 60'
Gear: To 3".
This amazing, sheer wall overhangs 35° and has one project. Its position high above the rest of the cliff increases the exposure. Obviously there's nothing easy here.
Directions: This wall sits above the left end of the cliff. There are several ways to reach the Balcony. The first option is to solo up easy slabs right of Palm-O-Granite (you can see the top of the wall from the cliff-base trail). Second, walk left under Runnin' Ragged to the left end of the black wall. At its left end, cut back right and out onto some slabs. Follow a semi-rotten hand traverse down and right (5.3, essentially reversing P2 of Palm-O-Granite) under the overhanging wall to the slab at the base. A final option is to climb P1 of Palm-O-Granite (5.8).
The Super Proj (project)
Closed project that begins at a fixed anchor on the right side of the face above a pointed slab. Follow a left-leaning crack on a severely overhanging wall as it snakes upward to the upper left side of the face.
This is the large slab clearly visible from Blue Ridge Road.
Approach: From Unlawful Entry walk right to the end of the cliff and then bushwhack uphill switch-backing to avoid smaller cliffs 591367,4868132.
Stairway to Lichen 5.3 PG 250' ★★★
Start: About 1/3 way from the right end of the cliff at a break in the steep footwall. A cairn marks the start.
P1 5.3 PG (5.1 R): Climb up through the footwall then head up and left staying below an obvious left-facing corner (V1). Climb the face to a crack 15' left of the corner to a large ledge. Walk right and belay in a diagonal handcrack. 100'
P2 5.3 PG: Climb the crack which becomes vertical and wide up to a cedar. When the cedar blocks progress step left and follow discontinuous handcracks to the summit. 150'
V1 5.6 PG: Climb the corner. At its top traverse left and make a run-out face move to gain the ledge.
Raggedy Ending 5.4 PG 190' ★
Start: Same as Stairway to Lichen.
P1 5.4 PG: Follow a broad open book up and right to a steep, featureless headwall. Traverse right under the headwall to its end, then go another 10' right. Move up and left on good holds to a ledge surrounded by trees. 100'
P2 5.2 G: Shift the belay left 30' through a screen of trees to the right end of a ledge (the P1 ledge of Stairway to Lichen). Scramble up to a handcrack in the slab and follow it to where it doglegs left to meet a right-leaning, right-facing corner. Climb up corner through a notch and onto easy slab. Go up the slab over a last small step to reach a clump of mostly-dead birches. 90'
Location: Keene, on the south face of Knob Lock Mountain.
Aspect: South
Height: 200'
Approach: 1 hr, difficult.
Quality: ★★★
Summary: Remote cliff on the back side of Knob Lock Mountain.
Knob Lock Mountain is familiar to ice climbers for the north-facing cliff directly across the road from Hurricane Crag with the popular ice route Unexpected Pleasure. On the opposite side of the mountain is a large, lesser known, south-facing backcountry cliff. There are several sections to the cliff, ranging up to 200' high. The rock is alpine (at roughly 2900') and generally good, with a few sections of loose, red-colored rock. The approach is challenging, but easier if you are able to locate and follow the abandoned hiking trail.
The terrain drops steeply downhill to the center of the cliff, flattens, then rises again on the right side. The cliff is highest near the center, and shorter at either end, making even divisions into these subsections: Left End, Main Wall, and Right End.
Descent: Rappel with one or two ropes for the main section. It's possible to walk off the left and right sections in some areas.
Directions: Park on the south side of NY 9N, 6.2 miles west of the intersection with US 9 in Elizabethtown and 3.8 miles east of the intersection with NY 73 near Keene (and 0.3 mile east of the Hurricane Mountain Trailhead) 602499,4896042. This is at the "9N" highway sign.
Cross the highway and enter the woods about 75' east (towards Elizabethtown) from the "9N" highway sign, directly across the street from two short green phone company posts. Cross The Branch, a very small stream that parallels the highway, then continue straight into the woods. In a few feet you will reach the brook which flows from the col between Knob Lock and Tripod. Follow this brook; the going is easiest on the left (east) side. At 3 min, reach a large 15'-high boulder with a flat wall facing the brook. Just before the boulder, go up left away from brook and parallel the brook up a steep ridge through open woods. At 6 min, reach a low, 15'-high cliff band; go right along the base, cross a small, seasonal waterfall, then resume going uphill.
Just past the cliff band, look for an old hiking trail, which is now more obvious. There was a hiking trail in this drainage described in the 1941 and 1947 hiking guidebooks for the area. At that time, it was described as rough and difficult to follow, and it was abandoned shortly thereafter. However, ongoing use by bushwhackers has, to some extent, maintained the trail bed. If you are able to find and follow the old trail, the approach takes about 1 hour; otherwise, the approach is an arduous bushwhack.
Follow the old trail to the col 602922,4894693 between Knob Lock and the subsummit 942 of Tripod. Continue straight through the col. As the terrain begins to slope downhill towards Slide Brook, remnants of the old trail traverses along the slope of Knob Lock on your left. At some point, the old trail turns steeply uphill to the northeast to the Knob Lock summit. Turn off the old trail and continue traversing the hillside using a maze of deer paths heading east. The best path wanders up and down the hillside, and then steeply up to a promontory overlooking the Slide Brook valley. This is near the west end of the cliff, about 10 min from the col 603118,4894730.
The Left End is about 130' wide, and is short and low angled on the left, and higher and steeper on the right, which ends at a barely-visible 4th class gully.
Wandering Delight 5.5 G 50' ★
Start: At a low-angle face with incut holds, above which are two cracks 4' apart, and 20' left of a three-trunked, gnarled birch. There is at a small cairn here.
P1 5.5 G: Climb the face and cracks to the top. 50'
Slash 5.7 G 55' ★
Start: 20' right of Wandering Delight at a low-angle face with incut holds directly above the three-trunked, gnarled birch.
P1 5.7 G: Climb the face to a steeper crack line. 55'
The Main Wall is very high, and the upper section is obscured from the ground. It extends from the 4th class gully (on the left) to a 100'-wide section of 3rd and 4th class, bush-covered rock (on the right).
The Landmark 5.7 G 100' ★★
Start: 100' into the Main Wall, at a striking left-facing corner with a jagged boulder sticking out of the ground at its base.
P1 5.7 G: Climb the corner to the top of the cliff. 100'
Hummingbird 5.6 G 140' ★
P1 is a bit loose. P2 is stellar.
Start: 60' right of The Landmark, at a low-angled section of angular rock.
P1 5.6 G: Climb the angular rock to a large ledge. Go up past a birch tree, then traverse right across a corner and up to the base of a black, left-facing corner. 70'
P2 5.6 G: Climb the impeccable, black, left-facing corner to the top of the cliff. 70'
Right of the Main Wall is the Right End which begins with a steep face with good potential for routes. 150' right is a huge gully, 230' right is another large gully, and 300' right the cliff tapers into the ground.
Black Onyx 5.7 G 60' ★★
Start: 80' right of the huge gully, at a striking handcrack.
P1 5.7 G: Climb the crack. 60'
Location: High Peaks Wilderness Area, accessed from the Adirondack Mountain Reserve Trailhead.
Aspect: South
Height: 800'
Quality: ★★★★
Approach: 3 hr, difficult
Summary: An alpine technical slab and face with excellent rock.
The south face of Pyramid is a huge, high, alpine slab tucked away from sight, but is only a short bushwhack from a well-traveled hiking trail. It has some of the best views in the region, out over the High Peaks and south over the Boreas Ponds and other lands that have been privately owned until very recently. When viewed from the ponds, this face would be impressive if not for the even more impressive south face of Gothics directly behind it.
Despite the modest grade of the Mountaineer's Route, the route Stage Show is the preferred line with good protection and cleaner rock.
In 2012, JL Michaud became interested in the face and began to explore for possible technical lines. He returned on Feb 18, 2013 with Kevin "MudRat" MacKenzie to climb the face solo in winter, exiting via this 2nd class left-rising gully. In 2015, Matt Dobbs, who had seen the face from the Boreas Ponds, met Michaud. Together they completed the Mountaineer's Route. Dobbs returned later that year to straighten out the line, calling it Stage Show. A year later, and without knowledge of the other routes, Tad Welch visited solo and climbed several lines.
The face has been skied, and named Out of Egypt.
Directions: Park at the AMR Trailhead (0 hr 0 min) [volume 1, page 426], then hike the Lake Road to Lower Ausable Lake. Cross the foot bridge near the dam and follow the Weld Trail uphill towards Sawteeth and Gothics to the col between Pyramid and Sawteeth at 2 hr 30 min. Continue up the trail towards Pyramid Peak for 10 min to where the south face can just barely be seen through the trees when the foliage is not too dense 591814,4885851. Bushwhack west to the south face reached at 2 hr 45 min. Scramble down (some 3rd and 4th class) following the edge of the face, then (climber's) left under the face to a prominent 30' x 20' flat area known as The Stage 591466,4885782 that sits below the left-hand side of the face, reached at 3 hr; this is the start of Stage Show and Mountaineer's Route.
Stage Show 5.7 PG 340' ★★★★
This is a three-pitch direct start to the Mountaineer's Route with excellent rock and setting. With a slab this steep, it's surprising that it goes at such a modest grade. Once past the lip on P1, the route has an airy feeling rare for slabs. After P3, finish on P5-P7 of that route.
Start: At The Stage below the left-hand side of the face.
P1 5.6 PG: Go straight up slab on friction past a hollow sounding crescent, then slightly right past two edges (medium nuts, small cams), then up again on friction (5.6, fixed protection) to a large crack at an overlap. Belay here (medium to large cams). 100'
P2 5.7 PG: Follow the wide, flaring crack up through the overlap, then straight up on slab (fixed protection) to fixed anchor just left of a tree island. 130'
P3 5.6 G: Move up and right (5.6) to gain a vegetated, left-facing corner (joining P4 of the Mountaineer's Route here), and follow it up (5.0) to an overlap. Gear belay. 110'
Mountaineer's Route 5.4 PG (5.2 R) 880' ★
Finds an easy way up the slab on generally clean rock to the large, left-rising tree island that diagonally splits the face. A prominent feature of the route is a long left-leaning crack, which is almost a gully.
Start: At The Stage below the left-hand side of the face.
P1 5.2 G: Traverse right to the left-rising arch. Follow it until it's possible to break right. Traverse right on slab to a series of overlaps. Belay on large, slung boulder. 165'
P2 5.2 PG: Go straight up slab to the right side of tree island. 100'
P3 5.3 PG: Go left and pass below the next tree island to the bottom of a large, prominent crack–gully. A little dirty. 115'
P4 5.3 G: Follow left-leaning crack–gully to a natural belay below a steep section. 110'
P5 5.4 G: Continue up the crack–gully through the steep section to slab. Up the slab to a fixed anchor. 110'
P6 5.4 PG (5.2 R): Go straight up on friction (fixed protection) which becomes increasingly easy (and runout: 5.2 R) to reach a crack and left-facing overlap with a gear belay in a flaring crack (two 0.5" to 1" cams). A rope stretcher. 200'
P7 5.3 PG: Move up right over the overlap and traverse right to the tree island that diagonally splits the face. 80'
Descent: Follow the tree island down and (climber's) right through steep grass, raspberry bushes, and trees. Just before you reach the base, make two, short, single-rope rappels off trees to return you to the base of the right side of the face.
A Dream of Wind Horses 5.6 G (5.4 R) 570' ★★
A moderate alpine trad route that follows predominantly clean rock. The climbing is secure and clean on the run out sections. The upper corner is unique for the cliff and excellent. The route ends on top of a rock pinnacle.
Start: In fern garden on right edge of The Stage.
P1 5.5 PG: Climb easily up left-facing corner for 25 ft. to perfect cam placement (on Mountaineer's Route). Step right and cross mellow slab and wide sloping ledge to wafer-thin flake holds (5.5) and up a 10'-tall tips crack. Belay on stance just above. 130'
P2 5.5 PG: Walk right on wide ledge, then up grass ramp to birch tree. High step right onto excellent rock (5.5) and continue to superb 6" ledge. 70'
P3 5.2 R: Continue up and right on clean, featured slab (5.2 R) to solid 3' flake belay stance. 100'
P4 5.4 R: Head a bit left, then straight up a nice, textured clean streak (5.4 R) to short dirty arch with good gear. Bypass arch on left to a garden belay just above. 120'
P5 5.2 PG: A short lead over dimpled "moon" rock leads onto the giant left-rising tree ledge. Belay at base of prominent 60'-tall corner. 70'
P6 5.6 G: (V1) Follow the impressive left-facing, blocky corner to the top of the pinnacle. 80'
V1 5.4 PG: Right of the left-facing corner, climb a short, curving crack through bulge and continue just left of thicket using many hidden holds. Go past a prominent balsam to a handcrack and follow this to the top of the pinnacle.
Descent: Rappel to tree ledge, then scramble down and (climber's) right as for Mountaineer's Route.
Rockwork Orange 5.8 PG 480' ★★
A nice line that would be three stars if the top of P3 was cleaned.
Start: Same as Return to Forever.
P1 5.7 G: Climb the fingercrack to a shrub, then move left through a right-facing corner that leads to the slabs above. Continue up and slightly left, then either (a) follow the ramp and a left-facing vegetated corner (5.3 G), (b) move further left and go straight up a blank slab (5.7 R), or (c) move even further left and follow a flaring handcrack (5.5). Belay in a scoop with a right-arching crack on the left. 165'
P2 5.8 PG: Left of the belay, climb a right-facing corner (good gear) out of the scoop to a strange 2'-diameter hole at its top. Traverse right 10' to featured black rock (delicate gear placements). Follow fun knobs and pockets up steeper rock (fixed protection) then climb the blank slab (5.8-) straight up on black rock (fixed protection) to the left-arching overlap. Follow this until it's possible to break out to a gear belay on the grassy ledge above the overlap. 165'
P3 5.7 PG: Follow an arête straight up a ladder of pockets to a short slab and steep 10'-high vertical section above. Pass this using the short squeeze chimney on the left (5.7). Belay in trees. 150'
Descent: Make a 60m rappel off trees, angling (climber's) left to reach the left-rising gully. Continue down as for Mountaineer's Route.
Return to Forever 5.7 PG (5.5 R) 350' ★★★
A beautiful alpine route that features clean and varied climbing interspersed with grass tufts and comfortable belays. Note that some of the smaller ledges on the south face are botanical wonders and should be respected.
Start: Just right of the left-leaning, tree-filled gully that splits the face, at a fingercrack just right of a large, leaning, right-facing corner.
P1 5.6 PG: Follow the fingercrack (5.6) to a short grass ramp and onto the easy slab above. Belay in shallow right-facing corner at intersection with blueberry ledge. 100'
P2 5.5 R: Go straight up highly featured face (5.5) to hidden left-rising crack. Run it out on pocketed slab to big, left-facing overlap. Easy laybacking leads to grass hummocks and spacious belay. 120'
P3 Jigsaw Corner Pitch 5.7 PG: Continue directly above ledge on more beautifully textured rock, then traverse right across slab (5.7) to large, left-facing corner. Fun climbing on puzzle piece holds and cracks bypasses the roof. Walk right to tree belay. 130'
Descent: Three single-rope rappels through thickets to forest.
❏The lean-tos described [volume 1, page 491] in the approach to The Courthouse (Bear Brook and Deer Brook) are no longer directly on the hiking trail. Look for signs to the lean-tos, and keep track of the stream crossings.
Location: Low on the easternmost shoulder of Table Top Mountain.
Aspect: Southeast
Height: 110'
Quality: ★★★★
Approach: 2.5 hr, moderate
Summary: A scenic backcountry cliff with a few established routes and potential for very difficult face climbs on solid, monolithic rock.
Dispite the Siberia reference, this cliff is not cold and dreary; in fact, it's exactly the opposite—a sun oven and probably impossible to climb at mid-summer. November is an ideal time to climb here.
Directions: Park at the Garden Trailhead [volume 1, page 426] and follow the Phelps Trail past John's Brook Lodge to Bushnell Falls; about 5 miles to here, about 2 hr. Turn right on the Hopkins Trail and follow it to the lean-to 589283,4888667. A short bushwhack at 306 degrees leads to a forested footwall. Negotiate this and walk up to the broad terrace below the cliff, reached at 2 hr 30 min. If done correctly, you arrive directly below the massive left-facing chimney of Tatarus 588938,4888793.
Tomboy Princess 5.11b G 55' ★★★★
Start: 175' left of Tartarus, just left of center on the cliff, at a detached triangle flake which leans against the wall.
● P1 5.11b G: Climb the ever thinning flake system. Fixed anchor. 55'
Fragile Thunder 5.11a G 60' ★★★★
Start: 150' left of Tartarus at an obvious left-facing, left-leaning flake which starts as a small overhang 8' up.
P1 5.11a G: Make hard moves off the ground to get established on the flake then jam, layback and undercling to its top. Fixed anchor. 60'
Gear: Standard rack to 4". Due to the shape of the flake large hexes are extremely helpful in the upper section.
Tartarus 5.9 PG 100' ★★★
The finish ledge may have the best view in the entirety of the Adirondack Park. Some swear this is 5.10, so be prepared for a full-body pump.
Start: At the unmistakable chimney.
P1 5.9 PG: Climb the chimney and exit right to a good ledge at the top. Fixed anchor. 100'
Gear: Single rack to 6".
Simply Irresistible 5.11d PG 90' ★★★★
This route just begs to be climbed.
Start: 10' to the right of the Tartarus chimney at an overhanging handcrack flake.
P1 5.11d PG: Climb the handcrack to a good stance then make a long reach left to a fragile horn. Swing around a corner, move left on overhanging rock then up an arête past a bulge. Continue up the left side of the face to the top and anchor as for Tartatus. 90'
Gear: #3 Camalot to protect the initial crack, then single rack to 1.5".
❏The described approach to Porter Mountain is closed. Click here for more information.
❏The route A. Minor Mellor Route [route #5, volume 1, page 506] gets ★★★★.
Imposter Syndrome 5.5 PG 50' ★★
Start: Same as Cross Dresser [route #38, volume 2, page 72].
P1 5.5 PG: Climb as for Drag Queen to the three parallel cracks. Follow a right-trending crack, then back left staying on the face to the top. 50'
Access: As of July 2019, the private land you cross to reach Potash Cliff has active logging and the directions for accessing the cliff has changed (see below). Both the parking and trail are easy to find and make for a fast approach to Potash. That said, there are still several access issues to remember when visiting the cliff; respect private land access, obey Peregrine Falcon closures, and observe snowmobile right-of-way along Potash Road. The local snowmobile club has the right-of-way from December to April for the uphill (east) shoulder of Potash Road. Take this into consideration when parking and walking the road to the approach trail. The approach to Potash Cliff crosses private property, specifically, the new trail that goes directly uphill between the road and the cliff. The landowner generously allows climbers to access the state land using this trail. Avoid loitering at the parking area and along the trail to the state land. Camping is not allowed on the private land, and the climber trail is not intended for general hiking on Potash Mountain. Peregrine Falcons have been nesting for many years at the right end of the cliff, but the closures have little effect on the climbing routes. Respect all closures and check the DEC website each spring for further details.
Directions: [map volume 2, page 81] From Northway (I-87) Exit 21 (0.0 mile), go south towards Lake Luzerne on NY 9N for 7.0 miles to the hamlet of Fourth Lake. Turn right (north) onto Potash Road which is opposite the entrance to the Fourth Lake DEC Campground and next to Harris Grocery. At 8.0 miles, Potash Road crosses beneath a powerline. Park along the shoulder on the right (uphill) side of the road, below the powerlines 594525,4803161. Walk back (south) along Potash Road for 500'. The cliff is visible low on the mountain. Locate a cairn next to the road on the left (uphill) shoulder; the approach trail begins here 594684,4803095. If you walk past a "Children at Play" road sign, then you have gone too far. The easy trail goes through open woods and ascends through a talus field to reach the left end of the cliff near Eat Dessert First, a right-rising finger- and hand-crack on a steep, 30'-tall wall 594825,4803138. The hiking time from the road is 5 min. There are three poorly marked property lines, including the state land boundary, in the vicinity of the approach trail. Additionally, there is a house within view of the trail, so keep to the trail until you reach Potash Cliff.
Access: Do not park on the road next to the start of the new trail. Respect the local landowners and park on the shoulder toward the powerline to the north. The right end of the cliff is private and has been posted. Hence, there is no access to the top of the cliff from the right side.
Click here for an updated map.
❏There is a new start for El Regalo, Cara Bonita, and Endless Journey:
Start: At a left-rising ramp at the base of the cliff, beneath a traverse ledge 10' up. Climb the ramp up to the traverse ledge. Go left and get on top of the car-sized boulder of the old start. A 60m rope is required to lower from the anchors.
❏Black Dog [route #17, volume 2, page 86] is now ●.
Anopheles 5.9 G 110' ★★★
[This description replaces route #2, volume 2, page 82] The route name is the scientific name for the mosquito. P2 has exposed climbing between nice belay ledges.
Start: 50' right of Eat Dessert First beneath a left-rising dike–ledge that begins 10' up.
● P1 5.8 G: Scramble up a slab to a short, open book beneath the dike. Cross the dike, and go up a steep wall with a left-facing flake. Climb the flake and continue up low-angled rock to a second, left-rising dike. Go past the dike (crux) to the base of an enormous arrowhead block. Move around the left side of the block, and up a steep corner to a stance with a fixed anchor. 80'
P2 5.9 G: Step left and go up to a right-facing horn. (V1) Mantel a ledge on the right. Work up a left-facing corner and make an exposed step onto a short slab. Climb easy rock to a ledge with a fixed anchor. 30'
● V1 Tsetse 5.9- G ★★: Step left to dodge a bulging wall, then back right to the short slab.
Descent: Rappel from the P2 anchor with a single 70m rope.
Koenig fur einen Tag (aka "Tag") 5.9+ G 50' ★★★
Climbs waterworn rock with featured holds. Sustained.
Start: 50' uphill and right of Black Dog, next to a refrigerator-sized boulder.
● P1 5.9+ G: Up secure edges to an overlap. Step left then back right into a scoop. Up the scoop (crux) to a fixed anchor. 50'
Pappa Ron's Cracksaw 5.9 PG 50' ★★
Be mindful climbing at the start, and beware of possible ledge fall at the crux.
Start: At a left-facing corner 55' uphill and right of Black Dog.
● P1 5.9 PG: Go up the insecure corner. Step left then over an overlap to a ledge. Follow a vertical seam over a bulge (crux) to a fixed anchor. 50'
RON TOFT 5.7 PG 50' ★
Stands for "Too Old For Tatoos". Ledge fall potential at the crux. Climbs the winter route Butter.
Start: At a small tree in the center of the wall with dark rock.
● P1 5.7 PG: Go up past a horizontal crack to a big ledge. Boulder a steep wall (crux) above the ledge and up to a fixed anchor. 50'
❏As of 2017, the day use fee for Rogers Rock Campground [volume 2, page 87] has been increased to $10.00 per day. This applies from late May through Columbus Day; outside those dates parking is free.
❏As of 2017, the cove parking [volume 2, page 87] and canoe put-in is posted "Do Not Enter". Instead, park and put-in at the normal boat launch. This increases the paddle by 10-15 minutes.
❏V1 (Direct Finish) of Little Finger (aka New Moon) [volume 2, page 98] should be ★★★★★.
To The Top 5.9 G 150' ★★
This route provides a high-quality extension to The Plunge or Flake 'n Bake [Routes #9 and #12, volume 2, page 90].
Start: At the large ledge at the top of The Plunge and Flake 'n Bake. Climb either route to access this ledge.
P1 5.7 G: Go up the offwidth crack in the back of a corner to its top 60' up. Scramble 4th class up and left to a very large white pine tree. 75'
P2 5.9 G: Above the pine, make a tricky slab move (5.6), then go easily up and right to a red-colored pillar-like corner. Climb this corner (5.9) to the very top of the cliff. 75'
Shelving Rock
Desert Shield Area
❏Wolfshack Corner [route #70, volume 2, page 59] is ●.
Sloppy Seconds 5.6 G 50'
Start: 150' from the left end of the Main Wall, and roughly 300' right of the Carhartt Wall, on a narrow face with two right-leaning cracks, just left of a right-facing corner. Begin below the right-hand crack.
P1 5.6 G: Climb the crack to a fixed anchor at the top. 50'
Busta Gutt 5.5 TR 50'
Stem the corner just right of Sloppy Seconds. Staying strictly on the left face goes at 5.10d.
Stable Weather 5.9 G 40' ★★
Start: 300' left of Snake Charmer [route #12, volume 2, page 45] below a zigzag crack that begins a low ceiling 8' up above orange rock.
P1 5.9 G: Climb the zigzag crack to the top. 40'
Good Day 5.10b G 100' ★★★
A nice addition to the Main Wall. It follows clean, water-worn rock and has sustained, quality climbing.
Start: 6' right of Grin and Bear It [route #16, volume 2, page 46].
● P1 5.10b G: Scramble up and right to the base of a shear, black wall. Edge your way up and left (very close to Grin and Bear It) to reach the left end of a long overhang. Reach over and mantle (crux), then climb up and right on less-sustained rock. Finish with a move into a V-slot to a ledge and fixed anchor. 100'
❏Variation to Dweezil [route #42, volume 2, page 51]:
● V1 Dweezil Extension 5.8 G ★★: Just before the anchor of Dweezil, step left and follow bolts up, then right to a belay left of Diva. Be mindful of rope drag (bring many 2' runners).
Evolving Tendencies 5.10b G 60' ★★
Start: Right side of the Neanderthal Cave on low-angled rock right of the corner.
P1 5.10b G: Climb the low-angled rock then step left to the base of an overhanging corner. Up the corner, then onto a slab. Work left across the slab beneath a long roof. At the left end of the roof join Protruding Forehead to a ledge with a fixed anchor. 60'
The Mountain King 5.12c G 90' ★★★
Listed as a project in the guidebook [route #54, volume 2, page 56].
Start: At the top of the talus field, just right of Gotta Go [route #53, volume 2, page 56].
P1 5.12c G: Easy slab climbing leads to a small overlap and then a tiered roof. Power through a series of underclings to a hard-to-decipher crux below the final tier. Pull the roof, then up more slab to a fixed anchor up and to the right shared with Pinching One Off. 90'
❏The route The Cold Bare Rapport [route #64, volume 2, page 58] is ●.
❏The route Winds of Change [route #66, volume 2, page 58] is ●.
❏The route Democralypse Now [route #63, volume 2, page 58] is ●.
Inception 5.7 G 60'
This replaces the former toprope route named Indecision '08 [route #65, volume 2, page 58].
Start: On the right side of the buttress, facing the gully, at a left-rising crack just left of Winds of Change.
● P1 5.7 G: Climb the crack to the fixed anchor shared with Winds of Change. 60'
Directions: There is a new parking lot on the left just before that listed in the book [volume 2, page 60] that holds about 30 cars.
Unnamed 5.11c G 80' ★★★
Closed project. This is route #9 [volume 2, page 62], which should be between Two Evil Deeds and Lost Ark.
Start: 8' right of Two Evil Deeds below a gray wall and pillar that is right of a vegetated corner.
◉ P1 5.11c G: Go up past a horizontal crack, then up the pillar (optional 0.5" cam) to the base of a bulging wall where Lost Ark goes right. Make moves left past steep, blocky rock to a fixed anchor shared with Lost Ark. 80'
Two Snake Tango 5.11b G 50'
Easy-ish climbing to a puzzling boulder problem.
Start: On top of a scary-looking talus pile left of Two Bum Knees.
◉ P1 5.11b G: Trend up and right through the narrowest part of a large roof. If you're short, a #1 Camalot reduces the pucker factor between bolts three and four. 50'
Two Bum Knees 5.10a G 80' ★★
A pumpy start and a secure crack at the top.
Start: 20' left of Timbuk-2 [route #10, volume 2, page 63] in back of depression beneath a bolt on the overhanging right-hand wall.
P1 5.10a G: Protect the steep start, work the corner and make a big reach right up an overhanging wall. Climb an easy groove past a cedar tree to a ledge. Follow a left-leaning crack to a fixed anchor. 80'
Gear: To #0.4 Camalot.
TMT 5.9 G 70' ★★
Means "too much thought."
Start: On the arête just left of Timbuk-2 [route #10, volume 2, page 63].
● P1 5.9 G: Go up steep, juggy rock to a ledge, then up face to a fixed anchor. 70'
Timbuk-2 5.8 G 60' ★
[This description replaces route #10, volume 2, page 63]
Start: Same as Stemtastic: at the high-point of the path, before it enters the talus, at a chest-sized rock.
● P1 5.8 G: Climb easy rock to an open book and up to a ledge. Go right along the ledge to a small right-facing corner. Up the corner and jugs to a fixed anchor. 60'
Smirkus 5.12b G 90' ★★★★
Listed as a project in the guidebook [route #11, volume 2, page 66].
Start: 8' right of a black streak beneath a right-facing corner and tiered ceilings.
● P1 5.12b G: Climb incut edges to the base of the right-facing corner. Strenuous stemming (5.11) up the corner leads to a stance out left. Pull back onto the face and follow good edges rightward to a position beneath tiered roofs. Climb through the roofs (crux) using desperate slopers, edges, and more technical stemming. A short, steep headwall leads to the lip of the cliff, above which a final moderate step, not visible from below, gains a fixed anchor shared with Bouncy Bounce. 90'
Gear: A few shoulder length slings will reduce rope drag. An optional #0.3 Camalot or #1 Metolius TCU protects a short runout on moderate terrain between the last bolt and the anchor.
Stewart's Ledge
Stewart's Shops
Directions: Leave the hiking trail 200' before the approach path that goes to the main face. Go 150' up to the base of a buttress with a vertical crack and a slab on the right.
Flavor of the Week 5.6+ PG 35' ★
Climbs the vertical crack. A small cam protects the crux move with no option to back it up.
Start: Base of the buttress.
5.6+ PG: Up ledges to a thin crack. Pull over a bulge and continue up the crack to a fixed anchor. 35'
Milk Club 5.4 G 35'
Would be a one-star route if cleaned.
Start: Blocky rock below a slab.
P1 5.4 G: Up blocky rock to a horizontal crack on the slab. Up the slab to an overlap and left-facing corner. Follow the corner to a fixed anchor. 35'
The Curly Shuffle 5.10a G 40' ★
[This description replaces route #3, volume 2, page 74] Finishes with some aesthetic arête climbing.
Start: Beneath a low ceiling next to a large tree, 45' left and uphill of where the approach trail reaches the cliff.
● P1 5.10a G: Climb out the ceiling and onto a slab, then to the left side of the arête. Step up, then work right to pass tiered overhangs. Make a long reach back to the left side of the arête. Follow the arête to a fixed anchor. 40'
Gear: 1 ea 1/5" cam.
The White Spider 5.5 G 40' ★
Once a variation to The Curly Shuffle, this is now an independent route that climbs a full-length vertical crack.
Start: At a crack 40' left and uphill of where the approach trail reaches the cliff.
P1 5.5 G: Climb steep rock into a v-slot. Follow the crack through opposing corners (crux) to a ledge with a tree. Continue up a shallow crack to a fixed anchor next to a boulder. 40'
Bit Buster 5.10b G 60' ★
The rock on this cliff is hard on bits.
Start: Same as Dog Pounder [route #6, volume 2, page 76].
5.10b G (sport): Stick clip (V1) then climb the face to its left. Go up to a detached pillar. Hug the pillar, move right into a tight corner, then up to a ledge. Go up a short wall to a fixed anchor. 60'
V1 5.10b G: Do the crux mantle of Dog Pounder to gain the corner, then continue up the corner to the detached pillar of the normal route.
Luminous 5.9+ G 40' ★★
Watch the potential for groundfall above the low crux. Not as clean as the other routes at this cliff.
Start: At a detached block partway up the left wall of the 3rd class gully that defines the left edge of the Main Face. This route is between Dog Pounder and Limelight [routes #6 and #7, volume 2, page 76].
● P1 5.9+ G: Stick clip. Traverse left to an overhanging arête and climb this to a horizontal crack. Step right, then straight up to an overhang with a fixed anchor just above. 40'
Politics 5.10c G 40' ★
New routing can be a personal opinion, much like politics.
Start: Right end of Entertainer Ledge, same as The Refrainer.
5.10c G (sport): (V1) Make a boulder start and go up and right to a blunt arête. Make a move up and then right onto a steep slab. Climb the right side of the arête to a fixed anchor. 40'
V1 5.9- G: Go up easy rock at the base of a dirty gully, then step left onto the blunt arête.
Crunchy on the Outside, Chewy on the Inside 5.10c G 70' ★★★
[This description replaces route #18, volume 2, page 77] Named after the loose rock encountered on the first ascent. The bolts have been replaced on this excellent face route.
Start: Same as Nevermore.
● P1 5.10c G: Scramble the easy start of Nevermore to the base of the arête. Climb the arête, then reach right onto a steep wall with a right-leaning crack. Up the crack, then right to a stance beneath a short overhanging wall. Up the wall to a fixed anchor. 70'
❏As of Aug 2020, the first bolt on Tuesday Layback [route #16, volume 2, page 70] is missing.
Location: Accessed from NY 74 (between Schroon Lake and Ticondaroga), north of Pharaoh Mountain.
Aspect: South
Height: 200'
Quality: ★★★★
Approach: 2 hr, difficult
Summary: Large, remote cliff with high-quality rock.
Devil's Washdish [Volume 2, page 134] is located in a beautiful and remote setting in the Pharaoh Lake Wilderness. It is a substantial cliff, roughly 200' tall at its highest, and 0.5 mile wide. The rock is generally excellent with a high quartz content yielding many hidden, solid holds. The exceptions are the large, low roofs, which tend to be orange, smooth, and scaly. Surprisingly, there are very few cracks or other natural features for protection. The terrain along the base is easily negotiated and has multi-level terraces used to access the rock.
Regarding the best time to visit, early spring is possible before the bug season and if there are dry conditions; the cliff does seep. Once into May, the bugs shut the place down. In summer, since the cliff faces south, it becomes an oven; look for overcast days. The fall is the best time, from late September through early November. Very cold days are the best, as long as there is sun.
Putnam Pond Campground is one of the best state campgrounds. If you stay, try to get site #47! Click here for the campground brochure and map.
Click here for an overview of the cliff.
Directions: The approach involves a 3.5 mile hike, followed by a 30-minute bushwhack through relatively open forest with easy navigation. The hiking distance can be reduced using a canoe.
From the Northway (I-87) Exit 28 (0.0 mile), go east on NY 74 towards Ticondaroga. At 12.6 miles, turn right onto Putts Pond Road (CR 39, marked with a DEC sign that reads "Pharaoh Wilderness, Putnam Pond") and drive to its end at Putnam Pond at 16.2 miles. Enter the Putnam Pond Campground (518.585.7280) and follow the signs to the trailhead, just past the boat launch 614807,4854786 at 16.6 miles.
From the trailhead (0.0 mi), follow the yellow-marked trail south along the east shore of Putnam Pond towards Treadway Mountain. The first intersection is with a yellow-marked spur trail on the right used to access the east shore boat landing. Continue straight and reach the second intersection at 1.4 miles. Straight ahead goes to Pharaoh Lake and Grizzle OceThe Number ofDian Lean-to; go right onto the blue-marked trail towards Treadway Mountain and Clear Pond Lean-to. At 1.8 miles reach a third intersection. Straight ahead leads 0.3 miles to the southwest shore; left goes to Treadway Mountain.
You can reach the third intersection by canoe, avoiding about 1.5 miles each way of hiking. Put in at the Putnam Pond State Campground boat launch and paddle to the southwest shore boat landing 613759,4854544. Follow the hiking trail 0.3 miles to the third intersection.
From the third intersection, follow the red-marked trail towards Treadway Mountain. The trail climbs steadily. At 1 hr 30 min the trail switchbacks down into a ravine and crosses a faint stream, then turns left with a yellow-arrow sign pointing the way 611855,4854306. Leave the trail and bushwhack due south following this stream. At the first open, boggy meadow, stay high on the west bank, then leave the drainage 611910,4853728 and contour southwest to the cliff. (The stream continues south, then doglegs west into Devil's Washdish below the cliff; the bushwhacking along this section is not recommended.) At 2 hr arrive at the right end of the cliff 611641,4853357.
If you want to reach the top of the cliff, instead of leaving the trail at the ravine, continue on the hiking trail another 7 minutes to a 10'-high rock step. Scramble up this, then leave the trail to the left and follow cairns and occasional flagging across open rock slabs, staying on the height of land. Reach the cliff near the top of North Country for Old Men 611410,4853462.
The Number of the Beast 5.11b G 70' ★★★★
Start: 120' left of The Devil You Know, at an obvious left-rising handrail that begins 10' up and leads to a large right-facing corner.
P1 5.11b G: Follow the handrail and make some hard moves to gain the corner. Stem up the corner and around the large roof to another hard series of moves around a smaller roof using the arête. Easier climbing leads to a fixed anchor. 70'
Gear: to 1"
Devil's In Every Woman 5.10c G 70' ★★★
Start: Same as Dishin' It Out.
● P1 5.10c G: Scramble up to the corner of Dishin' It Out, then move up onto the left-hand wall. Traverse left across the wall to the arête (crux), then follow the arête straight up. Eventually move back right onto the face and go straight up to a ledge with a fixed anchor. 70'
Dishin' It Out 5.10b G 100' ★★★★
Start: 40' left of The Devil You Know below a massive right-facing corner.
P1 5.10b G: Make a few moves up grungy rock to gain the corner. Climb the corner which turns into a crux roof-slot just before the top. Rappel from a ledge with a fixed anchor. 100'
Gear: To 4".
One of the major features of the cliff is a huge, smooth, 200'-tall, 80'-wide slab known as the Treadway Face, located left of center on the cliff. It is quite prominent in aerial photography (Bing's "birdseye" images) but is virtually invisible from below due to low roofs. The left side has a single point of access, however, and marks the start of The Devil You Know. Unlike many slabs in the Adirondacks, this one has no exfoliation, and is completely lacking any major features (no corners, cracks, corners, or overlaps).
The Devil You Know 5.10c G 250' ★★★★
Start: On the left side of the Treadway Face 611353,4853432. Walking left along the base of the cliff, you will come to some very large, low, crumbly roofs, which define the bottom of the Treadway Face, hidden above. Walk uphill and left under these roofs to almost the height of the terrain and a small opening onto the slab with several left-leaning flakes.
P1 5.7 G ★★★★: This fantastic pitch can be climbed by itself, as it ends at a fixed anchor (a 70m rope is required to rappel from this anchor). Gain the slab via the left-leaning flakes, then go straight up using fixed protection and ample vertical slots for gear. 130'
● P2 5.1 G: Traverse left along a ledge to a fixed anchor at the left side of the slab. 40'
P3 5.10c ★★★: On the left side of the Treadway Face is a huge, right-facing wall. This pitch climbs a steep crack on this gently-overhanging wall. Step left across the vegetated gully to an alcove at the base of the obvious crack. Climb the fantastic crack past a rightwards dogleg to the top. Tree anchor. 80'
Gear: P1 requires a sparse rack to 2.5". P3 requires a single rack to 3".
Descent: From the top, walk right to the top of the Treadway Face, then continue down and climber's right to a tree on the edge of a right-facing wall. A 60' rappel leads to a terrace. From here you can scramble down climber's right to the base of the cliff, passing along the way the ledge-start of North Country for Old Men.
Unnamed (project)
Closed project. Scramble up the gully as for North Country for Old Men. Continue up to a cedar growing in the corner, then through a hidden step behind the cedar to a higher terrace. This project climbs an obvious cleaned crack in a right-facing wall.
North Country for Old Men 5.11a G 160' ★★★★★
Incredible position on the tallest section of cliff. The climbing on P2 is fantastic, and is well worth the walk to get here. This route is technically easier than Backcountry Brawl, but more sustained and pumpy.
Start: Right of the Treadway Face is a gully in a giant right-facing corner-gully. On the face right of the corner is a broken chimney and wet streak that ices up in the winter. Scramble up the gully, through a short corner, then up until you can move right to a ledge with a red pine below a slab right of the wet, broken chimney. You can also rappel to this point from the anchor at the top of the route 611410,4853462.
● P1 5.7 G: Step left up a slab to steps that lead to a notch (#0.5 Camalot). Go through this to a blueberry ledge below the slab. Go straight up the slab to a short right-facing corner. Up the face right of the corner (#0.4 Camalot), then step left to a spacious ledge on top of the corner. Fixed anchor. 80'
● P2 5.11a G: Step right off the ledge and climb up an overhanging right-facing corner system to a sloping ledge. Go up a crack that starts in a shallow left-facing corner, then up the overhanging face to a fixed anchor at the top. 80'
Backcountry Brawl 5.11c G 120' ★★★★★
This is the sister route to North Country for Old Men, and climbs through intimidatingly steep and exposed terrain. The top perch is a thrilling place to be. Unlike North Country for Old Men, the route doesn't top out. There is a sequential crux going over the first roof, and good rests between the difficult sections. The short face below the crux is wet in the spring, but safe and still climbable.
Start: On the narrow ledge 25' right of North Country for Old Men, at a cedar tree and flat-topped rectangular boulder below the left end of a ceiling 12' up. To approach from the top, simply rappel North Country for Old Men.
● P1 5.11c G: Go up slab to the left end of the ceiling. Go past this on its left end, then up easy slab to a narrow ledge below an orange face. Go up this, then weave up the slab (5.9) to a roof below a steep, white corner. Pull the roof on slopers (crux), then follow the steep, white corner to a large roof system. Move rightwards through the roofs (knee bars and big air) to an amazing, exposed perch with a fixed anchor. 120'
Descent: You can lower back to the starting ledge with a 70m rope.
Devil's Washdish
Lichen Boobies Terrace
The right side of the cliff has two beautiful, open clearings at the base, presumably the bombardment zones for falling ice. 30' above this is a terrace that spans nearly the entire right end of the cliff. The routes Lichen Boobies, Rural Juror, and Soul Sacrifice begin from this terrace. Gain the ledge from the left; a couple cairns mark the short gully approach through orange rock.
Rural Juror 5.11b G 70' ★★★★
An exercise in technical stemming on compact, difficult-to-read, light-colored rock.
Start: Near the left end of the Lichen Boobies terrace is a wide chimney through black rock and capped by a large overhang. Begin 15' left of the chimney below a shallow right-facing corner in light-colored rock.
● P1 5.11b G: Go up the corner to its top, then foot traverse left to a shallow, 5'-high, left-facing corner. Go up the corner, then up the seam to a right-facing corner. Up this to its top, then climb up and left to a fixed anchor. 70'
Iron Maiden 5.11a G 100' ★★★
Excellent climbing up an impressive corner, and a deceptively hard (and exposed) diagonal crack. Slow to dry.
Start: At a huge right-facing, right-leaning corner that defines the left side of the Soul Sacrifice face. Scramble up and left from the start of Soul Sacrifice to a good ledge below the corner.
P1 5.11a G: Go up the face following the right-leaning corner, then break left on jugs and go up the overhanging wall to a right-leaning crack in black rock. Follow the right-leaning crack (crux) to the Boobie Trap arête, then traverse up and left to a fixed anchor. 100'
Gear: Standard rack to #2 Camalot.
Soul Sacrifice 5.5 G 100'
This route climbs an attractive, naturally protected corner, then finds an easy, less-attractive way off the cliff. The variation is recommended and provides a challenging and more direct finish.
Start: Left of Lichen Boobies is a large right-facing corner. Scramble up the corner to a high ledge and begin below a left-facing, left-arching corner on the right wall.
P1 5.5 G: Climb a clean crack in the arching corner to its top at an overhanging headwall. Continue up and right for 15' following an open book formed by the main face and the headwall to some cedars, (V1) then traverse straight right to the woods. 100'
V1 Boobie Trap 5.7+ G ★★★: A better finish. The first ascent avoided the "boobie trap" (5.10a R) by exiting the corner at the appropriate time. Go up a right-facing corner and the arête to its left. Move left around the arête using jugs, then traverse up and left along a horizontal crack to a fixed anchor shared with Iron Maiden.
Lichen Boobies 5.8 PG 70' ★★★
This route ascends a black, naturally-clean, blunt arête. A great warmup.
Start: Gain the terrace that divides the right end of the cliff above the open clearings. Walk right on the terrace past a huge chimney to a large right-facing corner. Begin below the black arête 25' right of the corner.
● P1 5.8 PG: Climb the arête to a large ledge at the top. Fixed anchor. 70'
Wet Hot American Pumper 5.11b G 100' ★★★★
Beautiful, naturally-clean, black rock, but somewhat slow to dry (like the Poke-O Waterfall).
Start: From the base of Debaser, scramble (3rd class) left on sloping ledges to the base of a black wall. Begin at a fixed station just right of a thin crack in black rock.
● P1 5.11b G: Step left from the station and climb the thin crack to a horizontal rail. Mantel this, then go straight up the steepening face (crux) to its top. Pull onto a slab and run up to a fixed anchor. 100'
Debaser 5.13b G 80' ★★★★★
Perhaps the most difficult backcountry route in the Adirondack Park with back-to-back boulder problem cruxes and excellent rock. The style is face climbing on a gently overhanging wall. The route has two boulder-problem cruxes; the first boulder problem is harder (V7/8), but the redpoint crux is finishing the second boulder problem (V6) and hanging on to the chains.
Start: At the right end of the cliff above a continuation of the Lichen Boobies terrace is a beautiful, smooth, overhanging, black-streaked face. Begin on the left side of this face below a left-leaning seam, and just right of a large, left-facing corner.
● P1 5.13b G: Follow the left-leaning seam to its top, then make a boulder problem to gain a shallow, right-leaning open book (crux). Using the open book and flat edges to the left, make a second boulder problem to gain a narrow ledge. Once established, step right and punch it to the top and a fixed anchor. 80'
Profusion 5.10c G 60' ★★
[route #1, volume 2, page 106]
Start: 30' left and uphill from the low point of the terrain, at a car-sized block leaning against the cliff, below an arête 20' up.
● P1 5.10c G: Clamber up the car-sized block to a stance beneath a vertical seam. From here there is a fork; take the left fork up the seam, and work up and left on an overhanging face. Pull over an overlap, then step left to a steep face. Up the steep face and over a high overlap to a fixed anchor. 60'
Untamed Stimulation 5.11a G 60' ★★★
[route #2, volume 2, page 106] One of the nicest routes here.
Start: Same as Profusion.
● P1 5.11a G: Climb Profusion to the vertical seam. Move right and climb the beautiful, juggy arête to a ledge on the arête. Continue up the face right of the arête to a large ledge with a fixed anchor just above. 60'
Unnamed (project)
Closed project. Begin 15' up and left from the low point of the terrain and scramble up blocks to the top of a sharp-edged boulder below the overhanging wall just left of Wild Things. Climb up the overhanging wall (crux) to where the angle eases, then up an easier face to the fixed anchor shared with Wild Things and Untamed Stimulation. ●
Wild Things 5.10b G (5.5 R) 70'
[Route #3, volume 2, page 106] Follows the left-leaning crack that begins 25' up. Formerly known as Wild Rumpus.
Start: At the low point of the terrain, 15' left of Hysteria.
P1 5.10b G (5.5 R): Work up and right on easy terrain to a large flake resting on top of a ledge beneath a steep, left-leaning crack. Follow the crack through steep terrain and onto a delicate face beneath a large, crescent-shaped arête that overhangs 70°. Continue up and left between the two walls to a ledge with a fixed anchor shared with Untamed Stimulation. 70'
Gear: To 3".
Bonsai 5.13b G 70' ★★★★
One of the steepest routes in the park.
Start: Same as Wild Things.
● P1 5.13b G: Climb the steep, left-leaning crack of Wild Things to the apex (bird poop here) below the steep 70° overhanging arête. Continue up the underside of the arête to the prow, then up the overhanging face to a fixed anchor below the rim. 70'
Hysteria 5.9+ G 70' ★★★
[route #4, volume 2, page 106]
Start: At the low point of the terrain beneath huge, right-leaning corner, the landmark feature of the cliff.
P1 5.9+ G: Scramble up blocky terrain to a broad ledge at the base of the corner. Climb a sustained fingercrack with good stems and fingerlocks beneath an impressive overhanging wall. Make a tough move at the top of the corner to a fixed anchor. 70'
Thrill Ride 5.11b G 70' ★★★
[route #5, volume 2, page 106] Clean rock, big moves, and a high crux with two ways to the top.
Start: 15' up and right from the low point of the terrain, and 5' left of Dura Dura, below a blocky, right-facing corner 10' up.
● P1 5.11b G: Work up and right past ledges to a stance on the left side of a blunt arête. Move left past two left-facing flakes, then work back right to a rest at a small ledge. Reach out right to the left end of tiered overhangs, then make a long reach to crimpy rails and finish at a fixed anchor. 70'
Dura Dura 5.12c G 70' ★★★
Intricate, crimpy, and a heart-breaker finish. Perhaps the best route here.
Start: 5' right of Thrill Ride [route #5, volume 2, page 106] below the prominent arête.
● P1 5.12c G: Climb 15' up unstable blocks to a ledge on the left side of the arête. Step right and climb the arête straight up to its top. Fixed anchor. 70'
Double Recracker (project)
[route #6, volume 2, page 106] Closed project. Begin 25' uphill and right of Hysteria at a slab below a crack that tapers to fingers. Follow this past an overlap with long reaches to twin cracks and a fixed anchor.
Commotion 5.8+ G 70' ★
[route #7, volume 2, page 106]
Start: Same as Double Recracker: 25' uphill and right of the low point of the terrain.
● P1 5.8+ G: Scramble up and right on a slab to a ledge with a tree. Go up a black streak left of a left-facing corner to a fixed anchor. 70'
❏Captain Crimper [route #3, volume 2, page 68] is an open project, not a toprope.
❏P1 of Pharaoh's Phallus [volume 2, page 128] should be ★★★.
❏Variation to Ali-Kat [route #10, volume 2, page 121]:
V1 5.8 PG: Provides an alternate start, reducing the overall grade to 5.8. Like the normal route, it's in need of a proper cleaning, and if cleaned, would have many stars. Start to the right of the normal route and move up and left to gain the crack.
Mike's Pick 5.7 PG 210'
Start: 100' left of Reckless Endangerment [route #6, volume 2, page 120] at the top of a dirt slope. Locate a 4' square roof 8' up with a nipple of rock protruding at the bottom that is just left of a 10'-tall, 3'-wide chimney.
P1 5.7 G: Start on slightly bulging face on the right of roof. Ascend face with cracks to the left of a steep prow of rock 100' up. Belay on the left behind an 8'-tall free-standing pinnacle. 130'
P1 5.7 PG: Climb the face behind the pinnacle and the traverse right into an open book. Follow this to the top. 80'
Biviot Climbing Club 5.8 PG 190' ★★
Ascends the grove on the prow of cliff directly beneath the gigantic triangle roof south of Excellent Adventure [route #7, volume 2, page 120]
Start: 50' right of Excellent adventure and 15' feet left of the toe of the cliff with a 10"-diameter birch tree growing at the base of a 15'-tall, right-leaning vegetated ramp.
P1 5.7 G: Ascend the mossy ramp up and right and traverse right into a large grove. Go up the grove until directly below the large roof. Traverse right around corner to a ledge with a 10"-diameter pine tree and belay. 130'
P2 5.8 PG: Exit up and right past a thin undercling crack (yellow Alien; only gear for 40') to a steep face with an orange scar (exposed) 30' from the belay. Move through scar (crux) on square cut holds to the left and onto a flat-topped nose of rock. Climb face above scar to an exit in a 20'-tall grassy chimney and belay at tree. 60'
Descent: Walk north 100' feet to the Excellent Adventure rappel.
Biviot's Deviant Little Brother 5.7 G 90' ★★
Start: 20' right of Biviot Climbing Club on ramp below two right-leaning cracks that lead to a ceiling.
P1 5.7 G: Ascend right-hand crack through broken section to a birch tree growing below the left side of ceiling. Escape left around ceiling and head right to the large pine tree ledge shared with Biviot Climbing Club. Rap from tree or finish on P2 of Biviot Climbing Club. 90'
Ode to Solitude 5.8 A1 180' ★★★
If cleaned, would probably go at 5.10. P2 is junk; best to rappel after P1.
Start: 200' right of Excellent Adventure at a buttress with a crack on the right side.
P1 5.8 A1: Follow broken cracks for 30' to bulge where the crack becomes offwidth (gear to 5"). Move up through more wide crack to top of the buttress and belay in trees. 80'
P2: Climb straight up to large ceiling and escape right on ledge to a tree-filled gully. 100'
Location: In the Three Sisters range, southwest of Warrensburg.
Aspect: South
Height: 230'
Quality:
Approach: 1 hr 10 min, moderate.
Summary: A small cliff with two exploratory routes, but room for more.
Middle Sister is the middle of three hills west of Warrensburg, called the Three Sisters. The eastern hill is named Pine Mountain on USGS maps and better known as Hickory Hill for the ski center located on it. The western hill is labeled Bald Mountain on USGS maps. The middle summit has no official name, so "Middle Sister" seems appropriate. Each of these hills has cliffs on them, but they are all difficult to reach or private property.
Like most cliffs on the Hudson River's flanks, the rock is loose, and some of it is impressively large and unstable. There are a plethora of intriguing corners, books, and flakes, many of which are disappointingly crackless. To date there is only one route, but there is potential for many more.
Be aware that private land begins where the cliff bends to face south. A yellow arrow painted on the face of the cliff marks this boundary.
Access: Much of the cliff (but not all) on Middle Sister is on state land on the west side of the summit. Access was by a right-of-way beginning at the end of the road that goes by Hickory Hill Ski Center. However, as of 2021, the DEC right-of-way has been withdrawn by a new land owner. A new approach will have to be worked out.
Directions: From the Northway (I-87) Exit 23 (0.0 mile), drive north on NY 9. At 0.4 mile, turn left onto River St (NY 418), cross the bridge, then turn right, staying on NY 418. At 3.7 miles, and just before the bridge over the Hudson River, turn left onto Hickory Hill Road. At 3.9 miles, the road goes left into the Hickory Hill Ski Center; go straight instead on a dirt road, now Katts Corners Rd. At 4.2 miles reach the end of the road, just past a house and close to the Hudson River. Park here at the DEC trailhead 595075,4814443. As of 2021, this DEC trailhead no longer exists. A new approach will have to be worked out. For reference, the original approach is as follows: From the parking area (0 hr 0 min), follow a good trail along the river for approximately half a mile, to where it climbs up away from the river through a dirt-bank notch at 20 min. At 25 min, turn upslope steeply to meet an old log road. Follow this upward to level ground at 55 min. The cliffs are an additional five min walk to the east, clearly visible when the leaves are down 594841,4813159.
Boundary Boys 5.7 G 220' ★
A recommended route if cleaned up. Lots of fist- to offwidth-crack climbing along this route.
Start: At a narrow, left-rising, right-facing ramp that wraps around an outside corner, 8' left of the state line boundary, marked by a large yellow arrow pointing upward on the face to the right.
P1 5.6 G: Follow the ramp up left around corner to a stance under an overhang. Pull up around the overhang onto a slabby stance below another overhang. Move right around this overhang into a groove that turns into a left- rising open book ramp. Follow the ramp to its end, then climb a crack in the face on the right to a large, sloping ledge. 75'
P2 5.7 G: Step left behind a boulder blocking entry to a chimney formed by the main face and a large block perched to its left. Go up to a stance beneath an overhanging, flaring chimney. Ascend this to another stance beneath an overhang. Turn the overhang on the right and climb an offwidth crack. Step right onto an exposed stance with a large, frightful-looking—but apparently stable—block perched on the edge of a notch. Climb up the notch and fingercrack above to a good ledge. 75'
P3 5.6 PG: Shift the belay: walk left onto a steep, wooded ramp, then upward 70' to a dirty, wet groove. Climb left on good footholds to a thin crack in a right-facing corner. Go up this and the stepped corners above to the top of the cliff. 70'
Gear: Include double #2 and #3 Camalots, and at least one #4 Camalot.
Onnedge 5.5 R 120' ★★
Despite some runouts, this is an excellent line.
Start: At a choss pile on the right edge of a large ledge at the top of the first pitch of Boundary Boys. This ledge is accessible via a steep ramp on climber's right. (Note: The climb is on state land, but this steep ramp may be on private land.)
P1 5.5 R: Climb up choss pile to reach solid rock on the right edge of the arête above the talus. Climb superb holds onto the arête, and go up this to its top. Climb up a short, open book blocked by an overhanging face. Reach left and climb excellent holds around the overhang and onto another arête; follow this to its top. Step right into a wide crack and follow it to a white pine tree girdled with a screen of scrub oaks. 120'
Bladerunner 5.9+ G 35' ★★
Start: 120' right of Up Yanda [route #1, volume 2, page 110], near the center of the cliff, in a dirty open book.
P1 5.9+G: Up the open book to the sharp right-facing flake. Continue up flake, then follow a thin seam to good side-pulls through a bulge. Tricky top-out. 35'
Martindale Rd 5.5 PG 35'
Start: 15' right of Bladerunner and 4' right of a short arête.
P1 5.5 PG: Up a dirty, low-angle face to a bulge. Follow a left-rising ramp to a right-rising fingercrack, then follow this to the top. 35'
Rogers Rock
Last of the Mohicans
Aspect: West
Height: 100'
Quality: ★★
Approach: 10 min, easy
Summary: Very accessible, bolted, single-pitch slab routes.
Last of the Mohicans is a new, west-facing cliff accessed from Rogers Rock Campground. It consists mainly of bolted slab routes, although a couple of the routes require traditional gear. Most of the routes involve high-angle face climbing with the occasional cruxy friction move.
There are presently three groupings of routes: the left, center, and right sides. The center section has the tallest routes.
The base area at the cliff doesn't have any poison ivy, but the forest near the campground is loaded with it. It's best to walk the campground roads to the specific campsite described below, then take the trail. Also beware of chiggers (barely-visible mites that crawl onto you from the vegetation and leave itchy welts around your midsection...use bug dope).
Directions: Drive to Rogers Rock Campground and pay the day-use entrance fee ($10.00 per vehicle as of 2017). Make sure to ask for a campground map at the front gate. Park at the boat launch, then walk the campground roads to site #210, reached at 5 min. There is an unofficial trail to a viewpoint at the top of Rogers Slide that begins behind the picnic table for this campsite. (If the site is occupied, discretely walk in the woods between sites #210 and #212 and pick up the trail behind site #210.) Follow the trail to a perched, flat-topped boulder on a slab at 9 min (you can see under this boulder). Continue another 200' to an obvious talus field on the right. Leave the trail on the right into the talus, and contour the talus-covered slope to the base of the cliff 622426,4850554, reached at 10 min.
Rogers Rock ● Last of the Mohicans
Left Side
This is the first section of climbable rock you come to on the approach. It has a pleasant, level base below a 50'-tall black slab.
Leftorium 5.9 G 50' ★★
Start: 12' left of Crash Course. This is the leftmost of three bolted routes on this face.
● P1 5.9 G: Climb the face, difficult at first, then an easier run up to a fixed anchor. 50'
Crash Course 5.10c G 50' ★★
Hard start, then really easy.
Start: In the center of the slab, 5' left of a shallow, right-facing, 3'-tall corner 5' up.
● P1 5.10c G: Make several hard slab moves (crux) to gain the first horizontal, then continue up easier (5.6) terrain past many horizontals to a fixed anchor. 50'
Leftovers 5.9 G 50' ★★
Easier and slightly more sustained than its neighbor.
Start: On the right side of the slab, 8' right of Crash Course.
● P1 5.9 G: Begin with several hard slab moves (crux), then up past several horizontals to a ledge. Finish up a short face left of a right-facing corner to a fixed anchor. 50'
Rogers Rock ● Last of the Mohicans
Center Section
75' right of the Left Side is the tallest section of slab that begins at the lowest point of the terrain. The slope rises uphill to the right to a tree-filled gully.
Outbreak 5.9 G 60' ★★
Similar in difficulty to Leftovers and Leftorium.
Start: Uphill and left from Collateral Damage at a short groove behind a dead pine.
● P1 5.9 G: Climb groove and then pull out right and follow blunt arête a fixed anchor. 60'
Collateral Damage 5.10a G 110' ★★★
Great top section.
Start: Left side of the slab, at the low point of the terrain above two terraced rock steps.
◉ P1 5.10a G: Up through tan-colored, broken rock, then up a slab (first crux) past several horizontals. Continue up easy slab to a left-facing, left-arching overlap with a leaning finger of rock. Break through the overlap to a good stance, then make a final boulder move (second crux) to a fixed anchor. 110'
Gear: 0.5" cam for the top.
Playing with Madness 5.10b G 110' ★★
A nice start with a dirtier top.
Start: In the middle of the slab.
● P1 5.10b G: Up the slab angling right. At midpoint, (V1) step right to some flakes, up these, then back left to a fixed anchor. 110'
◉ V1 Collateral Madness 5.10a G: Move left to the leaning finger and finish on Collateral Damage. Combines the best of these two routes.
Butting Heads 5.10d TR 50'
This is the arête between Playing with Madness and Rubicon. It can be toproped off the Playing with Madness anchor, or the Rubicon anchor with a directional.
Rubicon 5.9+ G 90' ★★★
Nice, varied climbing. The initial crack could use some cleaning for pro.
Start: In a 5'-deep, right-facing corner that defines the (uphill) right side of the slab.
P1 5.9+ G: Up the right-facing corner to its top, move right 10', then up slanted edges on the face to a final groove. Fixed anchor. 90'
Gear: Small nuts and cams to 0.5".
Aftermath 5.7+ G 85'
Lots of edges!
Start: 10' up and right of Rubicon.
● P1 5.7+ G: Scramble up root system to a tree. Pull onto the slab at the tree stump, go up the slab, then right to the last bolt. From there diagonal up and left to a shallow groove and the Rubicon anchors. 85'
Rogers Rock ● Last of the Mohicans
Right Side
Roughly 100' right of the Center Section is a slab below a 30'-wide roof 40' up.
ASCII 41 5.10c G 80' ★★
Breaks the roof at a crack in the middle.
Start: 10' right of a shallow, right-facing corner (that leads up to the left side of the roof), at the right end of a tabletop-sized flake leaning up against the slab.
● P1 5.10c G: Follow a right-leaning seam up the slab (first crux) to the roof. Break through the roof at the crack (second crux), trend right, then back left to a fixed anchor. 80'
Lizards and Buzzards 5.6 G 70' ★★
Excellent rock once you break out of the corner. Needs cleaning.
Start: Below the right-end of the 30'-wide roof, below a left-facing corner.
● P1 5.6 G: Go up grass and grunge to gain the corner with a birch tree. Step up into the corner, then move right onto the face (crux; 5.9 if you don't use the birch). Follow the black, sculpted face to the top. 70'
❏The route Dope-a-Mean [route #12, volume 2, page 134] is ●. Stick clip!
Crane Mountain ● Crane West
Beaverview Cliff
Livin' on the Edge 5.8- R 100' ★★
Start: On the left edge of the face 52' left of Drumthwacket [route #3, volume 2, page 147], at a faint, right-rising seam 8' up. It is easier to start slightly higher yet.
P1 5.8- R: Climb along the edge of the face, along a narrow rock ramp, until even with a left-facing corner on the main face. Climb the corner as it rejoins the edge, then go up along another (higher) narrow rock ramp until it dwindles and steepens. Step out onto the face and climb along the edge to the top. 100'
Gear: Brass nuts, micro-cams, and small to medium cams for the top.
Unnamed (project)
Open project follows a crack line 12' right of Livin' on the Edge and 40' left of Drumthwacket. It goes through two overhangs along the way.
Leaver Your Beaver 5.5 PG (5.3 R) 230' ★★
Start: 25' right of Beat the Crowd [route #4, volume 2, page 147], at an ill-defined right-facing flake below a left-rising horizontal crack. This is roughly 10' left and below a stepped, left-facing corner that begins 20' up, and turns to become an overhang 30' up.
P1 5.5 PG (5.3 R): Make a tricky move off the ground to reach the left-rising horizontal crack. Step onto this and move left 8' to a subtle rock rib. Climb up the rib without protection to an overhang formed by the aforementioned left-facing corner. Climb through the overhang at a vertical crack, and follow vertical seams and cracks to a ledge. 80'
P2 5.5 G: Begin at a pair of vertical cracks that lead up a slab to a wide crack. Climb slab and cracks to a large, sloping tree ledge. 50'
P3 5.5 G (5.2 R): At the top of the tree ledge is a left-leaning crack leading up to meet a left-facing, left-leaning corner. Climb crack and corner to lower-angle slab, then up a textured black slab on the right to another wooded ledge. 100'
Eager Beaver 5.4 PG 80' ★
Start: 10' right of Leaver Your Beaver and 35' right of Beat the Crowd, at tiny right-rising footholds that lead to the bottom of a stepped, left-facing corner system, which becomes an overhang 30' up.
P1 5.4 PG: Climb out footholds to reach the base of the corner, then climb the slab right right of the corner until it is possible to reach a vertical seam running up the slab. Up this to a left-rising horizontal crack, move left 6' along this feature, then up easy slab to a ledge. 80'
Crane Mountain ● Crane West ● Beaverview Cliff
Beardsley Buttress
Afternoon Tea 5.6 PG 95' ★★
Previously a toprope [volume 2, page 148], this has now been led.
Start: At an S-crack that begins 4' off the ledge of the Beardsley Buttress.
P1 5.6 PG: Climb crack to a small ledge 20' up. Traverse 6' right, go up on good holds through a small overlap. Climb up to a left-leaning crack and follow it to the top of the buttress. 95'
Crane Mountain ● Central Crane
Connector Slab
This slab lies above the left side of the Brown Slab [volume 2, page 148]. There is a good crop of blueberries along the top.
Directions: Climb anything on the Brown Slab, then go to the high point of the left side. Thrash upward for about a minute to reach the base of the Connector Slab.
Brown to Blue 5.5 R (5.3 X) 100'
Start: At the low point of the slab.
P1 5.5 R (5.3 X): Climb up the middle of the slab. Near the top, stay right of an overhang. 100'
Crane Mountain ● Summit Cliffs
Sweeper Wall
❏The route Divide by Zero [route #10, volume 2, page 156] has been led.
Brownies and Beer 5.9 G 90' ★★
[Between routes #10 and #11, volume 2, page 156]
A good line that would be much better if cleaned.
Start: 50' right of Dividing Line at a vertical crack that fades 40' up. From Dividing Line, go right and up a steep, wooded slope to a vertical crack between two pines growing up against the cliff, 4' apart.
P1 5.9 G: Climb vertical crack to its end at a bulge. Move right to gain another crack system, and climb to the top. 90'
Gear: Standard rack to #3 Camalot, 2 ea #1, #2 Camalot.
Crane Mountain ● Summit Cliffs
Firecamp Wall
❏The variation Everywhere That Man Can Be [route #23, volume 2, page 158] should be ★★.
Amid the Flood 5.8- R 85'
[This is up-to-date description, replacing route #22, volume 2, page 157.]
A good line, but with ledge-fall potential.
Start: On the left side of a narrow grassy ledge near the right side of the Firecamp Wall, 10' left of a steep tree gully.
P1 5.8- R: Scramble up a right-facing open book to a stance below an A-shaped overhanging notch at a right-facing corner. Move out onto the face left of the A-shaped notch, and climb through a bulge via a shallow V-groove. Weave up the face utilizing cracks along the way for gear, finishing on the final moves of Seam Ripper. 85'
Fooled Again 5.9 G 90'
Maybe not the best route to simul-climb with heavy packs, as the first ascent party did.
Start: Same as Amid the Flood [route #22, volume 2, page 157].
P1 5.9 G: Climb the broken corner to a right-leaning, right-facing corner with a pronounced A-shaped overhanging notch. (This notch is directly right of Amid the Flood.) Climb through notch and up the corner to the top. Tree anchor. 90'
Crane Mountain ● Summit Cliffs
The Prows
❏V1 (Lost in the Crowd) of Cornerstone [volume 2, page 161] should be ★.
Crane Mountain ● Crane East ● Measles Group
Above-the-Measles Wall
Boogie Woogie Flu 5.8 G 30'
Start: Right of and around the corner from Resistant Strain [route #4, volume 2, page 168], at a vertical crack about halfway up the steep gully that separates Jungle Rot from all the other routes.
P1 5.8 G: Climb the crack, which is much harder than it looks to both ascend and protect. 30'
Crane Mountain ● Crane East ● Measles Group
Lower Measles Wall
Trench Foot 5.1 G 30'
A beginner route.
Start: At an open book 30' left of the spring that flows from below the low point of the cliff.
P1 5.1 G: Climb open book to the top. 30'
Divots 5.3 X 30'
Because it's there. There is no gear on this route; any fall will go to the ground.
Start: 10' left Hypoxia [route #6, volume 2, page 168] and the spring that flows from below the low point of the cliff, at the least-mossy strip on the slab.
P1 5.3 X: Climb the excellent knobs running straight up the least-mossy bit of slab, to just barely right of a spruce tree. 30'
Crane Mountain ● Crane East ● Measles Group
Upper Measles Wall
Virgins in the Dark (project)
Closed project. Begin on the arête left of Roped Bouldering [route #18, volume 2, page 169]. Climb the arête and face to meet the crack of Roped Bouldering. Continue on the overhanging lip of the arête to its end.
Cabin Fever 5.4 G 65'
[Between routes #19 and #20, volume 2, page 169]
Start: At a wet, vertical crack leading to a cluster of trees on the sloping ledge 25' up, just left of the wide black wet streak near the center of the Upper Measles Wall.
P1 5.4 G: Climb up crack to a flake, then go out right onto a slab and onto a ledge. Step left behind the cluster of trees to a chimney formed by a large block left of the overhanging face of the cliff proper. Climb the chimney to the top of the block, then step onto the slab above the overhang and scramble left to the outside right edge of a large dihedral. Climb into the dihedral and up the wide crack in its corner, then move out to the right edge to reach the top of the cliff. 65'
Hydrophilia 5.2 G 35'
Often wet; the dry spell of 2015 allowed this massive cleanup operation.
Start: 20' right of Hydrophobia [route #23, volume 2, page 170] at the base of a left-rising crack in a shallow left-facing corner. The crack meets the top of Hydrophobia at the top of the cliff.
P1 5.2 G: Climb crack and corner to the top. 35'
Crane Mountain ● Crane East ● Measles Group
Campsite Wall
This wall lies directly below the campsite, above and right of the Below the Measles Wall [Volume 2, page 170], and accessible by the same path.
Rocksport 5.10 5.11a G 40' ★★★
A short amount of real climbing, but what there is, is exquisite.
Start: At the base of the leftmost outside corner of the wall.
● P1 5.11a G: Reach or lunge for a good triangular hold, then move up and right to a right-facing side-pull. Move left and up to a small, arcing, right-facing corner, climb to its top, then move onto the easier slab above and up to trees. 40'
Kirby's Nine 5.10b G 75' ★
Diminished by friable holds and a dirty top-out, this is certainly far harder than its namesake's implies.
Start: Below the right outside corner of the wall, at a blocky ramp left of a pointed, 6'-tall boulder.
● P1 5.10b G: Climb ramp up and left to a stance at the base of the main wall. Make difficult pulls on friable crimps up and right to a positive (though suspect) hold, then up to a small shelf. Move right to the edge of a large flake, and go up this as it turns to become a rounded small ledge. Reach for the lip at the end of the steep wall, then make a difficult transition onto the slab above. 75'
Crane Mountain ● Crane Ease
East Path Boulder
This is the first 20'-tall boulder beside the East Path above the campsite.
Mammut Oasis 5.9+ R 25' ★★
With a better landing, this would be a boulder problem. As reported, it's not a safe lead, though adequate protection can be found with enough stamina.
Start: At the obviously-cleaned crack on the right side of the boulder.
P1 5.9+ R: Make a difficult move off the ground to reach a hold up and right of the left-leaning crack. Reach left to the crack and follow it to the top. 25'
Crane Mountain ● Crane East ● Belleview Area
Springfield
This area is short, steep slab right of and slightly above the bottom of the Green Stamp Walls. It is uphill and left of Unnamed Slab, and about halfway between Bellavista Slab [volume 2, page 174] and Tablerock Crag [volume 2, page 152].
There are several vertical cracks here, and after extensive development and cleaning, revealed themselves to be quite easy. The views are good, and the cracks are suitable for learning gear placement.
Directions: Go to the Bellavista Slab [volume 2, page 174], then contour left (west) on a herd path to Unnamed Slab, the first long slab you come to. Continue uphill and left along the base of this slab to Lower Long Slab, then on to Springfield.
Homer 5.2 G 60' ★
Start: Below the leftmost crack on the left side of the slab. The crack does not quite reach the ground.
P1 5.2 G: Up slab to crack. Climb crack through a short steep section, then climb the slab left of a brush-filled, low-angle crack to a stance below a spruce tree. 60'
Lisa 5.4 PG 55' ★
Start: Same as Maggie, at a short slab below a vertical crack 20' right of the left end of this slab.
P1 5.4 PG: Climb up to crack and follow it to its end. Make a tricky move up and very slightly rightward to reach the reappearance of the crack, then climb up easing angled rock to the top. 55'
Maggie 5.5 PG 50'
Start: Below a short crack which does not reach the bottom or the top of the slab, left of center.
P1 5.5 PG: Climb a crack near the left edge of the slab a few feet, then reach right to the base of a shallow crack, and climb it to its end. Reach up and right to a bushy crack, and climb it to the top of the slab. 50'
Bart 5.2 G 65' ★
Start: At a low-angle open book leading to a crack which jogs left 20' up.
P1 5.2 G: Climb up to crack and follow it left around the jog, joining Maggie to the top. 65'
Moe Szyslak 5.3 G 65' ★★
One of the better routes on the slab.
Start: Same as Bart.
P1 5.3 G: Climb the slab right of Bart to a crack, then follow this to the top. 65'
Diamond Joe Quimby 5.7 G (5.4 R) 60'
Start: 15' right of Bart at a left-rising, left-facing corner beneath an overhang just left of where the cliff turns right and slopes uphill.
P1 5.7 G (5.4 R): Climb up corner and steep slab on the left to reach a good horizontal above the overhang. Traverse right a couple feet and make a long reach to another horizontal, then move up and follow a short vertical crack in the slab above. Continue up an unprotected, dirty slab to the top. 60'
Kang & Kodos 5.6 PG 55'
Start: The right side of the crag is steeper. Begin 8' up from the low point of the formation.
P1 5.6 PG: Climb up small, right-slanting corner until it is possible to traverse left across the face to a pair of horizontal cracks on the edge of the buttress. A hidden crack along the way takes a micro-cam. Climb onto the uppermost horizontal, then run it out up easy slab to the top. 55'
Mr. Burns 5.7 PG 50' ★
Start: Right of Kang & Kudos at the first crack on this steeper section of face, about 12' up from the low point of the formation.
P1 5.7 PG: Climb crack, which thins to a near-useless seam for a few feet (crux) as it leads through the steepest part of the wall. 50'
Principle Skinner 5.6 G 50'
Start: Beneath a left-rising, left-facing corner 6' right of a vertical crack running through a ground-level overhanging bulge.
P1 5.6 G: Step up onto a small ledge, then stem using the corner on the right and the vertical crack on the left until it is possible to shift left to a good stance below a bulge with a crack. Make a committing move to pass the bulge. 50'
Marge 5.6 G 40'
Start: At a 5' by 5', flat boulder lying on the ground 35' right of the low end of the right face of the crag.
P1 5.6 G: Make a difficult move up to reach a thin, right-rising crack, then follow it up and right to the easy slab and on to the top. 40'
Crane Mountain ● Crane East ● Belleview Area
Lower Long Slab
This is the slab sits between Springfield (to the west) and Unnamed Slab (to the east). There is a lower and upper section; you walk past the lower as you walk west from the Bellavista Slab towards Springfield. Climbing here is a "pleasant relief from mere bushwhacking."
Directions: Go to the Bellavista Slab [volume 2, page 174], then contour left (west) on a herd path to Unnamed Slab, the first long slab you come to. Continue uphill and left along the base of this slab to Lower Long Slab.
Cleanin' Jerk 5.4 X 120'
Start: The base is split by a thicket on its right side. Begin at the low point left of the thicket, below a wide, shallow rounded groove.
P1 5.4 X: Climb up through groove onto easier slab above, then to the top. Several loose plates lie askew near the top of the slab. 120'
Crane Mountain ● Crane East ● Belleview Area
Upper Long Slab
This is the longish slab above Lower Long Slab. Routes here are a "terrifying, engaging solo."
Directions: Approach as for Lower Long Slab, then either climb Cleanin' Jerk, or hike up around the left (west) side of Lower Long Slab to its top.
Brushin' Roulette 5.8 G (5.7 X) 150'
It's a tough decision: cling desperately to the holds you have or clean off the next ones. There is good gear for the hardest moves, but the climbing between it and the easy slab is desperate.
Start: At the base of a long slab above and slightly right of the top of the Cleanin' Jerk slab, below a dual-seam box-notch left of a left-facing corner.
P1 5.8 G (5.7 X): Climb up into the notch, up this to its end at a small overhang. Go up and right onto a steep slab and weave upward, first slightly left, then rightward, to get through the steepest section. Above this, the angle eases and the climbing becomes enjoyable, unprotected 5.4 terrain (a brush-filled crack to the left can be utilized for gear, that is, if you bring a trenching tool). 150'
Crane Mountain ● Crane East ● Belleview Area
Unnamed Slab
This is the first major slab area west of, and roughly the same elevation as Bellavista Slab [volume 2, page 174]. It's the longest and most continuous section of rock in this area.
The area is named "Unnamed Slab". Go figure.
Directions: Go to the Bellavista Slab [volume 2, page 174], then contour left (west) on a herd path to this slab. This is the first slab you come to when walking towards Springfield.
Unclaimed 5.7 G (5.3 X) 200' ★
Start: At two tilted blocks near the left side of the slab.
P1 5.3 X: Climb up blocks on the right side of a chocolate-colored slab. Below a large spruce tree, traverse right across a mossy section, then go up to get behind the tree. 100'
P2 5.7 G (5.3 X): Climb a vertical crack through the short steep wall, then up a crack on the slab until it is possible to escape left or move right onto the main slab. Move right, cross a left-facing flake (good pro here) onto a knobby face. Climb good knobs to cleaner slab and merge with Unnamed to the top of the slab. 100'
Unwanted 5.5 G (5.3 X) 200' ★
Start: Below the right corner of a flagstone-like block lying askew on the slab.
P1 5.4 G (5.3 R): Climb up to top of block, then friction up and right to a right-facing corner capped by a triangular boulder. Go to the top of this boulder, step left onto dirty slab, then move up and right on cleaner rock to the base of the headwall at a point where it is broken by a hanging open book (about 16' right of the short vertical crack crux of Unclaimed, and about the same distance left of the crux of Unnamed). 100'
P2 5.5 G (5.3 X): Climb into the hanging open book and climb it its top. Move right to a crack in a small left-facing corner, and climb this to its end. Friction diagonally up and right on the slab (no protection), arching upward in the center of the slab. 100'
Unnamed 5.7 G (5.4 X) 340' ★
Yes, the route's name is "Unnamed," hence the name of the slab.
Start: At the lowest point of the slab, near its right end.
P1 5.4 X: Climb up the slab weaving between dirty streaks. Pass through a constriction at a steep part of the slab, then move up grooves toward a tree on a shelf near the right side of the slab. Climb up left of the tree to a stance at the top of a right-rising seam at the base of a short headwall. Presently, there is a small, dead pine tree here. 230'
P2 5.7 G (5.3 X): Climb through the short headwall using good holds and cracks, then move up through a vegetated groove to a cleaner slab above. Move up and right along cleanest rock to the top of the slab. 110'
Crane Mountain ● Crane East ● Belleview Area
Bellavista Slab
P2 5.5 X: Climb up the left edge of the headwall. Make a few tricky slab moves up the headwall, trending rightward to reach low-angle rock. Join Le Jeure de Bon Heures where it traverses right onto the slab. Follow that route to the fixed anchor on an oak tree shared with the other routes. 60'
Crane Mountain ● Crane East ● Belleview Area
Water Slip Downs
There are several low-angle slabs with prominent black streaks right of the second pitch of Leftover [route #4, volume 2, page 175; the slab is visible above the legend in the photo, volume 2, page 172.] Jay Harrison soloed three lines here (Blackavar, Campion, and Hazel) in 2012 and 2014, ranging from 5.2 to 5.4 with R protection, each about 100' in length. The area is not predicted to be popular.
Crane Mountain ● Crane East ● Belleview Area
Belleview Slab
The Fist 5.9- PG 65'
Start: 10' left of Belleview [route #5, volume 2, page 173] and just right of Giucco Piano, below a right-facing, blocky flake 10' up.
P1 5.9- PG: Friction up to the flake (5.8, unprotected) and follow this to an overlap. Continue up the slab (bolts) to the top. 65'
Crane Mountain ● Crane East ● South Corner Cliffs
Upper Walls
V1 5.10a G: Cleaner than the normal start in that is bypasses the dirty, wet corner. Go up the first 10' of Solar Grace, then move right directly across the slab to rejoin the normal route.
❏Never Alone [route #16, volume 2, page 192] has been scrubbed and is now ★★.
❏Variation to Animal Farm [route #30, volume 2, page 184]:
V1 5.10c G: After the crux (at the first horizontal crack), move right to the end of the crack (micro cam), then step right to a vertical crack (0.3 Camalot). Up the crack to its end, then right to good holds. Go up and left to rejoin the normal route to the top.
Chicken Soup for the Sole 5.5 R 95'
Currently quite grown-in; not recommended.
Start: 70' left of McNeill–Harrison [route #4, volume 2, page 176], on a sloping ledge above a filthy, 12'-tall slab, at a point where a right-rising diagonal crack meets a vertical crack 10' up. 4' above this junction, the crack ends at a slightly right-rising ledge.
P1 5.5 R: Climb up either crack to the ledge. Step right 6' and use good knobs to get onto the slab above. Move left and up, go past a short, wide horizontal crack to the left, to reach a stance with a low-angle slab above and a down-shifted block to the left. Use the brushy crack or climb the unprotected slab, move up and left to reach a nice crack in a low-angle slab. Follow this to the top. 95'
The Mote in God's Eye 5.8 R (5.3 X) 170'
[Left of route #6, volume 2, page 177]
Raw, dangerous, and intricate adventure climbing. This route pads up the slab underneath the Eyebrow Overhang, then breaks through it at an unlikely locale. P2 has excellent moves with good exposure; if cleaned it may yield more gear. There are several loose blocks, some large, but they can be avoided. It may be possible to avoid the difficult, unprotected opening moves by traversing across the slab from the beginning of H2 Alpine [route #6, volume 2, page 177].
Start: On a narrow, low tongue of moss-covered slab directly left of the bottom of the gully–ramp that leads up to Blueberry Ledge (the ledge where the "blueberry" routes end—Blueberry Crumble, Madam Blueberry, etc.).
P1 5.8 R (5.3 X): Climb holds hidden in the moss just right of a water-cleared streak, aim for a good hold visible at the top of the steep part of the slab. From there, climb up clean swathe of easy, unprotected slab, then head left toward the right-rising headwall of the Eyebrow Overhang. Reach it 20' below the point where it turns sharply to become a horizontal overhang. This is directly below the upper end of a wide, flaring crack running underneath an overhanging block just above head level. 100'
P2 5.7 R: (V1): Climb up onto the ramp at head level, then make delicate moves up and right around the overhang. Above the block is a rubble-choked crack under another overhanging wall; reach it and follow it back left and slightly down to a stance below a notch in the wall. Climb up through this notch onto a slab, and move up and left to the base of the final headwall. Step up onto a left-rising crack, shuffle left along it a few feet, and make tricky moves to surmount the steepness and reach easy ground. 70'
V1 5.8 R: Friction up the slab to the point where the wall turns to become a horizontal overhang. Climb up the notch into a cave shared by a very large, disconnected block lying at a very frightening angle on the slab. Chimney up and away from this obstacle without using it, then head leftward to a stance under an overhang. Rail left and down along a crack to rejoin the standard route below the uppermost headwall.
Gear: Wire brush, superglue, double set of cams from 0.5" to 4".
First Amendment 5.10a G 150' ★★★★
Not as difficult, but more sustained, than Second Amendment [route #12, volume 2, page 179].
Start: 10' left of Second Amendment, near the left end of the terrace, 10' right of a dirty gully, at a tiny, rounded, left-rising ramp that ends 10' up.
P1 5.10a G: Go up the ramp to its end, then go up and right on a clean slab to where the angle eases below a left-rising, shallow crack. Climb the crack and continue up easy slab to an overlap with a right-rising crack. Follow this crack past the large horizontal (below the P1 anchor of Second Amendment) and continue up knobs to a fixed anchor. 150'
Gear: Single set of cams from 0.5" to 3".
Second Helping 5.10b G 175' ★★★
Start: Same as Second Amendment [route #12, volume 2, page 179], at the base of the tall, orange-colords slab, next to a right-rising crack. This is the same start as the V1 variation Bill of Rights).
P1 5.9 G: Climb up the right-rising crack to a shelf, then make a friction move upward left to a small stance. Climb up the slab directly above to the left end of a horizontal crack, then move up and left to a stance under a large hanging block. Continue up the slab past the block, (V1) then step left across a dirt gully and climb the slab along a black streak to the right end of a small overlap. Pass the overlap, then step right and climb good knobs to a horizontal crack below the fixed anchor of Second Amendment. Traverse left to the fixed anchor and belay. 120'
P2 5.10b G: Traverse 10' right and climb knobs to a point 8' left of a block pinned beneath the right end of an overhang. Climb through overhang (harder for short climbers) to a stance on a sloping ledge, then follow a right-rising crack to a tree ledge. 55'
V1 Short Change 5.10a G: This variation provides an alternative finish for anyone under 6' tall. Do not cross the dirt gully; continue up the slab to its end at a left-facing corner. Climb along the arête to the ledge and anchor shared with Saratoga and Solar Grace (5.7 PG 50'). Step down from the anchor to the ledge, then step left across the dirt gully and traverse 15' left to rejoin P2 the standard line. At the overhang, climb up through the notch in the overhang using the block pinned underneath, swing left from it to gain a sloping ledge stance (hard for tall climbers). Climb directly up the face to the top (5.10a G [5.5 R] 60').
Saratoga 5.8 PG 95' ★★★
Adequate gear, but tricky and occasionally strenuous top place.
Start: Same as Solar Grace [route #14, volume 2, page 179].
P1 5.8 PG: Climb vertical crack to rounded ledge. Traverse left 10' to a rounded, left-rising ramp below a bulging face. Go up the ramp then stand up into the right end of a horizontal crack. Follow knobs up and right (this is very near Solar Grace). Move up left to an elongated plate, climb up this to reach a good crack behind a left-facing flake, and climb it to a small overhang. Reach another horizontal crack, then go up the center of the knobby face to the ledge shared with Solar Grace. 95'
I Don't Want No Scrub 5.8 PG 110' ★★★
[Between routes #15 and #16, volume 2, page 182]
Would be ★★★ if cleaned up. This is a direct line on this section of cliff.
Start: 30' up and right of the start of Solar Grace, 10' left of Never Alone, at a waist-high slab that leads to a small, left-rising overhang.
P1 5.8 PG: Up slab, then through overhang using a thin, left-facing flake. At flake's end, mantle onto a horizontal crack, then climb a knobby face directly above to another horizontal crack. Step up and left on this, climb the thin slab to one more horizontal crack, then join the final moves of Never Alone: climb knobs on face to a ledge with a fixed anchor on an oak tree near the edge. 110'
Gear: Standard rack to #4 Camalot.
Crane Mountain ● Crane East ● South Corner Cliffs
Mad Cows Wall
Trad Cows 5.8 G 70' ★
This direct line takes natural features to the top of the cliff.
Start: Same as Mad Cows [route #18, volume 2, page 182], below the right side of an arching crack near the midpoint of the wall.
P1 5.8 G: Step up on small edges to reach the bottom of the arching crack. Climb to the peak of the arch, then reach up to a short, vertical crack and pull to a good stance. Climb up a natural break to the base of an overhanging pillar. Work up across to its left side, then to its top, and make easy moves via broken features on the left to the top of the cliff. 70'
Stamp Day for Superman 5.7 G 40' ★
Start: At a vertical crack 5' right of the right-facing flake system where P2 of Rise & Shine begins.
P1 5.7 G: Climb the crack to a stance with a large, triangular block. Continue up the crack through a short overhanging face and finish up either via a notch with a handcrack on the right or make an awkward traverse left around a bulge to finish in a fistcrack. 40'
Secrets of the Pyramid 5.6 PG 145'
The first pitch is uninspiring, but you can bypass this by climbing the P2 of Rise & Shine. The route finishes on a pyramid-shaped formation.
Start: 12' right of the flake–crack system of P2 of Rise & Shine, at a left-leaning horizontal crack, on the far right side of the Mad Cows Wall.
P1 5.6 PG: Use the crack to gain a left-rising ramp, and follow this to its end at a right-facing corner with a boulder lying askew on the ramp. Move delicately around the boulder and out onto the face, following a right-leaning rail which ends at a good stance below a right-facing corner formed by stacked blocks. Step across leftward along a low-angle slab to a headwall, then continue left and downward onto a brushy, large ledge. Walk left to a point directly below a steep, right-facing corner. 75'
P2 5.6 G: Climb up the corner 4', then foot traverse right to a left-facing flake. Climb flake to its top, then traverse right along a narrow ledge. The ledge sweeps upward, diminishing as it does to become a crack and a steep rail. Follow it to a stance below a final, triangular block (aka The Pyramid), then climb past a bolt to the peak of the formation. Walk across the top edge to reach level ground. 70'
Crane Mountain ● Crane East ● South Corner Cliffs ● Upper Walls
Jammer Wall
❏The route Jug, Tug, and Jam [route #31, volume 2, page 185] has been cleaned and now gets a star.
Goosesteps 5.10a G 40' ★★
Similar to Baby Steps, but slightly easier.
Start: Same as Baby Steps. At a ledge at ground level at the extreme left end of the Jammer Wall.
◉ P1 5.10a G: Walk left along a ledge to knobby face just left of a rounded, right-rising, right-facing corner. Climb knobs to a horizontal crack, then up face, rightward at first, then leftward, then straight up to a ledge with the fixed anchor on an oak tree near the edge. 40'
Gear: #2 Camalot.
Baby Steps 5.10a G 30' ★
Start: 12' left of Stutter Steps, behind an oak tree at the far left end of the Jammer Wall (walk any further left and you fall off the ledge).
◉ P1 5.10a G: Step up left to a flake and climb onto a small ledge. Delicate moves past a horizontal crack and two bolts lead to easy slab. Up and left is a tree anchor (for On the Fence). 30'
Stutter Steps 5.8- PG 90'
[Left of route #24, volume 2, page 184]
Might be decent if it were thoroughly cleaned. Dry conditions must prevail.
Start: 15' left of Stand Your Ground at a right-facing corner with a wide crack.
P1 5.8- PG: Climb up corner to a horizontal crack on the main face. Pull up onto a small horizontal stance above this, and move left to a right-facing flake. Climb flake to its end at an overhang. Move right 5' to and break the overhang on knobs, then go up to a crack under a right-rising overlap. Follow this to its end, then continue up and right to join Action Steps for the last 20'. 90'
Action Steps 5.8 G 90' ★★★
[Left of route #24, volume 2, page 184]
Not a sport route, though the only gear-placements are at the easiest climbing. Bring a #0.3 and #0.75 Camalot, quickdraws, and one long runner.
Start: Same as Stand Your Ground [route #24, volume 2, page 184].
◉ P1 5.8 G: (V1) Climb to the first ledge 7' up. Step left onto the slab, traverse onto knobs above a small overhang. Follow a vertical line of knobs to a slight bulge, then up easy rock for 10' to a horizontal crack. Climb knobs above the crack onto slab, with one last tricky friction move before reaching a fixed anchor. 90'
Gear: 1 ea #0.3, #0.75 Camalots.
V1 Action Steps Direct 5.9+ PG: Begin on the steep slab 10' left of the Stand Your Ground crack, at a small foot edge just above knee height. Step up on small edges to reach a horizontal crack under a small overhang (5/8" cam possible to the right). Move up, right, up and right again to join the regular route. There is only a single piece of gear on this variation.
Losing Streak 5.8- R 65'
[Right of route #24, volume 2, page 184]
Start: 40' up the ramp right of the start of Stand Your Ground, just right of and above a large oak tree.
P1 5.8- R: Climb the slab along the left edge of a water streak. At the point where the water streak becomes mossy, climb knobs on its left edge to good right-facing side-pulls to reach a good ledge. Climb straight up to the fixed anchor of Stand Your Ground. 65'
Crack of Dawn 5.7 G 175' ★★
[Right of route #32, volume 2, page 185]
Start: 12' right of Little Jam, at the rightmost vertical crack on the Jammer Wall—a hand crack filled with malicious sharp crystals.
P1 5.7 G: Climb the crack (V1) to its end, then up several squat bands of rock to a sloping wooded ledge. Walk up to the base of the next cliff, at the right end of a rounded ledge at head height, with a fragile tongue of rock hanging below a flake bordering the right end of the ledge. 35'
P2 5.6 G: Get up on the rounded ledge, stab for a good knob, then (V2) move right to reach a flaring vertical crack. Climb this to its end, then step left onto holds below an overhang. Climb through the overhang and up the left edge of the block forming to a stance below a short, dirty face. 50'
P3 5.7 G: Move the belay: go up to the higher of two left-rising ramps, and walk left to its end, left of an oak tree and 10' left of a vertical fingercrack leading up to an A-shaped overhang (the start of Ape X [route #36, volume 2, page 185]). Climb a right-leaning crack and knobs to a left-rising horizontal. Reach up past this to good holds, then foot-traverse along the horizontal crack to a stance. Follow a right-rising crack to an overlap, and move right around this, and up to a good ledge below a large overhang. 50'
P4 5.5 G: Same as P2 of Ape X: walk right to a block providing access around the roof. Climb vertical crack to its end at a horizontal, step right to a thin vertical crack and climb it to reach a notch leading to the top. 40'
V1 5.4 G: Easier, less intuitive, but much more enjoyable than the crack. Sidepull the crack to reach right-rising holds blending into a rounded ramp. Follow the ramp, then climb easy face to rejoin the standard line above the crack.
V2 5.8 G: This was the original line to reach P3, and dries quicker than the standard route. Traverse left following P4 of Rise & Shine along left-rising cracks until they join a horizontal crack under a small overhang. Reach up over the obstacle to another crack system trending left, and follow it 10' left. Traverse right across a slab, and up to a left-rising ramp. Climb through a short wall above this to the left and of another left-rising ramp to rejoin the standard route at the base of P3.
Crane Mountain ● Crane East ● South Corner Cliffs ● Upper Walls
Animal Charm Wall
SMASH! 5.12b G 70' ★★★
Crimpy; wait for cooler temps for this one. The crux is short and well-protected, but much harder if you're short.
Start: 4' left of The Slash, at a waist-high horizontal.
● P1 5.12b G: Stand in the horizontal, then climb straight up the face through an overhanging scoop (crux). Continue up the steep face to a beautiful, spacious ledge. There is a fixed anchor high on the overhanging back wall of the ledge. 70'
The Slash 5.11a G 90' ★★★
[Right of route #36, volume 2, page 185]
Strenuous and demanding with excellent, but fiddly, gear.
Start: 25' right of and down from Ape X, on block on the left-rising ramp, at a right-rising crack that breaks a head-height overhang and rises through a steep face and bulge.
P1 5.11a G: Climb through overhang and continue up the crack, over the bulge to easier climbing. There is a fixed anchor on an oak tree left of the crack. 90'
Gear: Cams from 0.25" to 1.5"; 2 ea #0.5 Camalot; full set of nuts.
Chesty Puller 5.11a G 90' ★★★
[Right of route #36, volume 2, page 185]
Start: 6' left of Crazy Lace, at an ankle-high horizontal seam below a left-rising overhang at head height. 40' above, the wall bulges significantly.
P1 5.11a G: Climb up onto a sloping ledge under the left-rising overhang. Reach right for a blunt, left-facing flake, swing up and right onto the face above it, and go past a bolt to a good stance. Climb over a small overhang to reach an upward-facing, right-slanting flake, then climb the bulging face to obtain a good stance above it. Go up and slightly left to reach a right-rising crack line (the top of The Slash), and follow it to a fixed anchor on an oak tree. 90'
Gear: To 3".
Crazy Lace 5.8 G (5.3 R) 95' ★★
[Right of route #36, volume 2, page 185]
Start: 50' right of and down from Ape X below a small overhang 8' up, which has a right-rising vertical crack running through it.
P1 5.8 G (5.3 R): Climb to and through the overhang via the crack, then follow the crack as it diagonals right, then becomes a horizontal under an overhang. Traverse right along the crack, then up where it once again begins rising right. Break the overhang to reach the left end of a large ledge (escape possible here). Traverse left along a horizontal tips crack 7' to its end, then climb unprotected knobs to a small stance with a thin crack. A few more knobs gain a right-rising crack (the top of The Slash); follow this up and right until it is possible to step left onto a final slab below an oak tree anchor. 95'
Gear: Standard rack plus 2 ea 3/4" and 1" cams.
Tourist Trap 5.7 PG 170' ★
An attempt at perusing the possibilities on this wall that went bad.
Start: Slightly right of the start of Crazy Lace, at a left-leaning crack at ground level.
P1 5.7 PG: Reach directly right (#2 C4 helpful) to good holds on top of a left-facing flake. Climb up to a horizontal, then move right 5' to good knobs leading to another horizontal crack. Traverse right along the crack to its end, then make a committing reach up and right to a left-rising mini-ramp. Climb up ramp to its top and make a tenuous reach to the left end of a thin horizontal crack. Traverse right (V1) to the crack's end (last gear) (V2), then make a long step right and slightly down to sloping footholds. Continue right to reach a line of three sloping knobs, one above the other, just left of a shallow, rounded, right-facing groove-corner. Climb knobs to the refuge of a large, sloping ledge. 70'
P2 5.5 G: Climb through a notch formed by a right-facing corner on the left and a large block lying on a slab to the right, to gain a ledge below a wide horizontal crack. Traverse left and follow the crack as it sweeps up and leftward. Cross the right-rising crack of The Slash, to another right-rising crack. Step up this crack a short distance, then continue the traverse up and left to reach a blueberry-carpeted ledge at a large flake leaning against a final short wall (Ape X climbs up into the notch on the left side of this flake). Climb up the right-facing corner formed by this flake to the top. 100'
V1 5.9 TR: At the left end of the crack, climb straight up the short slab above.
V2 5.8 TR: Traverse along the crack until it is possible to reach up to a very rounded knob. Hidden crimps near this ease the passage up.
The Clash 5.11a G 65' ★★★
Overhanging jugs at the start contrast sharply with the tiny crimps that commence thereafter.
Start: At a large incut hold just above head height, 25' left of Ambulance Chaser, behind a large, healthy spruce tree.
P1 5.11a G: Follow jugs to a stance at a wide horizontal crack. Shift slightly left of a short, right-facing flake, then move up past two bolts and a short, exhilarating runout to good holds at a horizontal crack. Continue upward on small knobs to a left-rising, right-facing flake with a shallow, flaring, worthless crack. Follow this up (terrain shared with Tourist Trap) to its end, then step up and right through an obscure rounded notch in the final headwall to gain the large ledge. 65'
Gear: Cams to 0.75", medium and large chocks.
Descent: Hack rightwards through the thicket to reach the anchor above Ambulance Chaser, or climb P2 of Tourist Trap.
Ambulance Chaser 5.9+ G 70' ★★★
Start: Near the right end of the Animal Charm Wall, below a slightly past-vertical, right-facing corner that begins at a ledge 10' up.
P1 5.9+ G: Make a difficult, bouldery move to gain the ledge. Climb the corner to its end at a horizontal crack. Traverse right around a small right-facing corner, then climb it to a stance in a chimney formed by the main wall and a large block on the right. Stem the gap to a fixed anchor on an oak tree. 70'
STaT (aka Superior Toes and Techniques) 5.12a G 70' ★★★★
The grade is unconfirmed and is reported to be "somewhere between 5.10d and 5.12b". If you like insecure slab climbing, then you'll love this route.
Start: At the rightmost outside corner of the cliff, 30' right of Ambulance Chaser, at a thin crack that leads to a slab below a left-leaning open book. There is a steep, left-rising ramp beneath the open book.
P1 5.12a G: Climb up to the base of the ramp, then follow the open book and ramp to where it becomes a vertical, left-facing corner. Up this to an overlap, then move up and right to the final moves of The Gash. 70'
Gear: A wire protects the initial move off the ground; back clean this, then run out 30' to the first bolt. After that, there are two placements: #1/#2 C3, then #0.5/#0.75.
The Gash 5.8 G 70' ★★
Start: 30' right of the right-facing corner of Ambulance Chaser (which begins at a ledge 10' up), the wall turns uphill, below the bottom of a sweeping, bent open book (the open project Crooked Book); then is broken by a deep, steep, dirty gully. Begin 20' left of and down from this gully, below a stepped, thin, left-facing flake left of a left-rising vertical crack system.
P1 5.8 G: Climb a low-angle face between two rocks lying against the bottom of the wall. Move up and right to reach the left-rising crack system. Take the crack system to the tree anchor at the top of Ambulance Chaser. 70'
Gear: Cams to 3"; 2 ea 1"-3" cams.
Crane Mountain ● Crane East ● South Corner Cliffs
Land of Overhangs
❏The route End of the Line [route #48, volume 2, page 187] is more like 5.10c.
Logging Flight Time (aka Tom's Roof) 5.11a G (5.3 R) 55' ★★
This route was previously the project known as Tom's Roof [route #41, volume 2, page 186].
Start: Below the large ceiling, 8' left of the corner at a flaky, pockmarked face.
P1 5.11a G (5.3 R): Climb easy, friable face up and right to the juncture with the ceiling. Make a long reach to a good horizontal, traverse left to a vertical crack, then go up this to an easy slab. Scramble to a fixed anchor on a spruce tree. 55'
Ledgehopper 5.5 PG 480'
An easy tour of the South Corner Cliffs (easier than Rise & Shine, at least), linking several good routes and adding a smattering of new territory. Expect raw conditions in several spots along the way, particularly on the variations.
Start: Near Misty Mountain Hop [route #44, volume 2, page 186] on the left edge of the Stairway to Heaven buttress.
P1 5.4 G: Traverse to the top of the chimney via a rounded ledge beneath a bulging face. Climb up the crack system of Spiral Staircase to a small ledge beneath the final offwidth chimney, then traverse left to finish on the final moves of Misty Mountain Hop. 45'
P2 5.5 PG: Walk left 20' and climb a right-rising ramp system, cross the second pitch of Stairway to Heaven to a ledge, then continuing up the short, steep face to a scruffy finish on a sloping, wooded ledge. 50'
P3 5.4 PG: Shift the belay by walking uphill 60' to the terrace below the Provando Wall. Begin on the right end of the terrace (same start as Fireworks), but make an awkward traverse on a sloping ledge beneath the bulging wall, go right onto a steep ramp leading to a short, left-facing, blocky corner. Climb up and left to the oak tree partway up Fireworks. 30'
P4 5.4 PG: Follow Fireworks onto the slab a few feet, then head left along a horizontal crack, climb up to a second horizontal crack at the bolt of Riprovando. Continue leftward to the upper portion of Provando and climb that crack to the ledge with the herd path leading to the Jammer Wall. 60'
P5 5.3 G: Shift the belay 50' left along the herd path, to the base of a right-rising crack with a small, rounded, left-leaning, right-facing corner to its left. Climb corner to the right-rising ledge near the start of On the Fence, then climb that route. 120'
P6 4th class: (V1) Walk up the right-rising ramp on the right end of the ledge (V2), pass through broken rock to an oak tree with a 12'-long, sharp-edged boulder-flake above and to its right. 100'
P7 5.0 PG: Scramble up around the large flake, walk up a narrow, sloping rock ledge to easier terrain, then make a final move up a short slab to reach the ledge at the top of the Animal Charm Wall. 75'
V1 5.2 PG: Walk left on the ledge, drop down to an oak tree at the top of a left-facing corner on the right side of the Second Amendment Wall. Make an airy step left across a gap to reach a vertical grassy slope and claw to a short offwidth crack above it. Move up the right-rising, grassy ramp to another grassy ledge. Move up and left to stacked blocks and weave up through them (this is part of the Lane-Harrison route) to their top.
V2 5.7 R: This was a failed attempt at finding an easy original finish to the linkup. Shift the belay 60' right, up the ramp, at an oak tree. Scramble a few feet farther up the ramp, then move out left onto easy slab. Walk up to a headwall, climbing knobs past twin horizontal cracks with a small wedge of rock between them, reach another crack, then make a committing move off the crack to a small ledge above it. Climb up slab (#3 or #4 help protect the initial moves, but there is no protection on the rest of the slab) through a shallow scoop on crystalline crimps and rounded knobs to belay on a ledge with an oak tree 20' to the right (5.7 R, 65'). Walk right 10', then climb up a left-rising, right-facing corner to underneath a bulging block. Move right onto a brushy ledge beside the bulge, then climb up left onto the block, beneath a face with a right-rising, right-facing corner. Climb up the corner until it is possible to step left onto a flaring horizontal seam. Make a very dicey move across the slab to reach an undercling hold near the edge of the slab, then climb up easier slab to the top (5.5 R, 55').
Descent: Walk right into the woods, all the way across the top of the Carnivore Crack then traverse climber's left downward to the rappel anchor at the top of Animal Charm.
Going to Thee 5.7 G 40' ★
[Right of route #47, volume 2, page 187]
Better than it looks.
Start: At a crack system above a dirty notch at the top of a dirt mound, 15' right of the Stairway to Heaven [route #47, volume 2, page 187] face.
P1 5.7 G: Go up a crack system to a tight V-notch in steep rock. Step right to a short, wide crack. Climb up this onto a large block. Top out at the start of End of the Line [route #48, volume 2, page 187]. 40'
Crane Mountain ● Crane East ● South Corner Cliffs
TeePee Wall
Rise & Shine 5.9 PG (5.4 X) 420' ★★★
This route begins on the TeePee Wall and is threaded through various other walls to ascend the full height of the South Corner Cliff.
Start: Same as Kissing Pigs [route #50, volume 2, page 188].
P1 5.9 G: Climb flake and crack to end of flake, then continue up the right-rising crack to a crystal-studded horizontal. Traverse right 6' and up a scruffy bit to a stance below the right end of an overhang, at a left-facing corner. Up the corner, then go around the right edge of an overhang via a good hand- and fist-crack. Climb the crack to its top, and scramble up wooded slope to the base of the next cliff. 90'
P2 5.7 G: Climb into a scoop below an ornate jumble of left- and right-facing flakes. Climb these up and left to a stance below a broken, right-facing corner. Climb corner (V1) to its end at a dirty, sloping ledge. Scramble 50' upslope to good trees. 60'
P3 5.9- PG (5.4 R): Move the belay: At the base of the next cliff, walk right around a large block to belay at a left-rising, narrow ramp, which becomes a right-facing corner. Climb the ramp and corner (good holds on the left face) to the left end of an overhang. Climb through this via a steep hand- and finger-crack to a stance beside an oak tree. Follow a left-rising crack to a narrow ledge below a bulging wall, make an awkward mantel, then move right (blind 1" cam placement) and up to a sloping stance. Climb leftward up onto the right end of a ledge (it is possible to escape left to the base of the Jammer Wall here). Make unprotected moves up a right-rising rail to another sloping stance with a right-rising overhanging wall above. Step up left and use a good right-rising edge (tricky offset brass nut placement critical here) to make a hard mantel, then move up right to find holds and gain easier ground. Climb slab and face up and left to join the top of P1 of Crack of Dawn. 90'
P4 5.8 G: Begin same as Crack of Dawn, at a chest-high rounded ledge, with a rock tongue below a left-facing flake on its right side. Get up on the rounded ledge, make a long reach for a good knob, then move directly left to gain a left-rising crack system. Ascend up and left to the point where the crack system meets a horizontal at a small overhang. Reach up for another horizontal crack, which becomes a left-rising crack system, and follow this as it steepens to its end beneath a large block lying on the right end of a ledge midway up the Animal Charm Wall. 120'
P5 5.8: Same as last pitch of Gray-Harrison [route #46, volume 2, page 187]: climb a steep fingercrack up a 12'-tall wall to a brushy ledge. Scramble up and right to a deep, right-facing corner capped by a roof. Climb a thin crack on the outside edge of the corner, up and around onto the face. Go up low-angle, dirty rock to a tree. 60'
V1 5.9+ PG ★★★: This variation (the line of the original ascent) adds 45' to P2 (making the pitch 105'-long). Instead of working up and right to get off the cliff, climb onto an awkward stance below the right edge of bulging wall. Tricky offset brass nut placements protect this move. Rail along a thin crack leading leftward above the bulging orange wall (A tricky-to-place purple C3 useful). Move left until it is possible to pull up onto an easy slab. Climb up to a right-rising flake (last gear), then climb the easy triangular face (the "Pyramid", bolt) to its top. Walk across or "á cheval" to safety.
Crane Mountain ● Crane East ● South Corner Cliffs
Long Play Wall
Straighten Up 5.8+ G (5.4 R) 90' ★★
Start: Same as the Paris-Harrison [route #61, volume 2, page 190]. You can reach this position by hiking up the left-rising ramp along the base of the Long Play Wall, about 150' left of Bodhi Tree. Alternatively, rappel from the right end of the Jammer Ledge and walk right 100'. Begin below a right-rising vertical crack that leads to the left edge of a small overhang 10' up, formed by a large block lying on a right-leaning ramp.
P1 5.9 G (5.4 R): Climb the crack to the right-leaning ramp, step up on the block and make a gymnastic move onto a narrower right-leaning ramp. Walk 12' left, down the ramp, to a nice vertical handcrack. Climb the crack to its end, then climb straight up the face above via an ornately-fringed plate (3 bolts). Climb easier rock with some run-out to a fixed anchor (or continue up a scruffy, sloping ledge to reach the base of the Animal Charm Wall near its right end). 90'
Crane Mountain ● Crane East ● Black Arches Wall
Amphitheater
❏There is now a fixed anchor at the end of P1 of Birthday Corner [route #91, volume 2, page 200].
❏The route Four Ounces to Freedom gets ★★★.
❏A hold broke on Torcher [route #98, volume 2, page 205], and is now a little harder.
Unnamed (project)
Closed project located right of Gun Show [route #97, volume 2, page 203]. Begin next to a tree at the toe of the arête. Stick clip, then solve a boulder problem and move up to a stance below a roof. Pull the roof, then face climb up to the fixed anchor shared with Gun Show. In the 5.11d range. [Sport]
Crane Mountain ● Crane East ● Slanting Cracks Wall
Underworld
Underworld is described in the guidebook in the approach to the Slanting Cracks Wall [volume 2, page 209]. It's essentially the left side of the Slanting Cracks Wall, and sits directly below the Black Arches Wall. The lower section of the cliff is overhanging right off the ground with Crane's signature textured, orange rock. The upper portions are broken and vegetated with trees and completely uninteresting to climbers, with the exception of the Underworld Roof.
There are two closed projects on the right end of the cliff just before you reach the Slanting Cracks Wall.
Underworld Roof 5.12d TR 50' ★★★
Not really a roof, but a 45° overhanging wall with a crack. With only one hand jam, this crack is harder than it looks, and it looks hard. It has been toproped successfully, and awaits a lead. From the East Path, walk downhill as per the approach to the Slanting Cracks Wall. About 100' down the slope, contour (skier's) left (east) on ledges for 300' to an open promontory with a good oak tree. The roof is completely hidden from view; rappel down a slab, then directly over the roof to a ledge. (Consider leaving the rappel line in place, with an ascender to retreat.) Climb up and left on a ramp to a handrail ledge on the overhanging wall. Rail right to the crack, then follow it (crux) up to a stance below a slab. Make a hard mantel onto the slab, then walk to the oak tree.
Gear: To #1 Camalot.
Crisis Inverted 5.12c G 35' ★★★★★
A super gymnastic route which will have you horizontal trying to reach the fingercrack. Stick clip if you're short. The upper fingercrack is totally protectable, but unnecessary.
Start: On the left side of the cliff, at an overhanging scoop split by a right-leaning seam that begins 10' up. The base here is pleasant, level, and open.
● P1 5.12c G: Make a hard slab move to gain the right-leaning seam. Up this a few feet to where the wall overhangs, then move up and left on a huge pasted-on flake. At its top, launch out right (crux) to gain a fingercrack in a left-facing corner. Up this to a fixed anchor. 35'
The Drop 5.12d G 70' ★★★★
Start: At the right end of the cliff, 15' left of Say Hello to My Little Friend and 10' right of a bottomless vertical crack that begins 20' up.
● P1 5.12d G: Reach a horizontal, then a jug-ledge just above. Use a left-hand gaston to make a long stretch to a thin right-facing flake (crux), then throw to a sloper and gain the next horizontal crack that spans the face. Move 5' left (0.5 Camalot optional) then continue straight up the sustained face using small crimps to an overlap. Finish on a clean slab to a fixed anchor. 70'
Say Hello to My Little Friend 5.12c G 70' ★★★★
Ascends an incredible textured orange face. It has one really hard section that can be bypassed by pulling on a draw, but is otherwise fairly moderate (5.11a).
Start: Locate the overhanging orange face at the right end of the cliff, just before a broken area. Begin 40' left below a horizontal crack 7' up.
● P1 5.12c G: Latch the horizontal crack, then climb up to an overhanging bulge. Make a desperate grab to a hidden crimp at a prominent horizontal that spans the face. Step left, then go straight up a beautiful, textured, orange face to a roof; over this at a nipple hold to a ledge, then up a short easy slab to a fixed anchor shared with The Drop. 70'
Crane Mountain ● Crane East ● Slanting Cracks Wall
Prone to Wander Area
[route #8, volume 2, page 210]
#4 Crack 5.5 G 35' ★
Start: At a vertical crack that begins 3' up, 20' left of the Call Me Gone Buttress and 15' right of Prone to Wander.
P1 5.5 G: Climb cracks and knobs on either side to a wooded ramp that leads up and behind the Call Me Gone buttress. 35'
Call Me Crazy 5.10b G 70' ★★★
This is the obvious route just left of Call Me Gone.
Start: Behind a white pine tree at the base of the left side of the buttress, on the slab just right of an often-wet, left-facing corner with an intermittent crack.
● P1 5.10b G: Climb up the left edge of the slab to the first horizontal. Weave up the face above to a stance at an undercling. Move left to a small stance on the outside edge of the buttress, then climb the outside corner on orange plates to trivial fifth-class terrain at the left edge of a left-rising ledge. Clamber up easy, dirty slab to the top, or traverse right to the fixed anchor of Call Me Gone. 70'
Call Me Gone 5.10a G 70' ★★★
This is toprope route described in Adirondack Rock [route #9, volume 2, page 211], and is now a lead route.
Start: On a rounded bulging slab beneath a buttress on the left side of a large alcove, 60' left of the large, left-facing corner of Hands that Work. This is 50' right of Prone to Wander, and 30' right of #4 Crack.
P1 5.10a G: Go up through the bulge to an easier slab that leads up to the right nose of the buttress. Move up to a corner, then up along its left edge, through a bulge. Continue up steep rock on the arête to a horizontal. Step 3' left and climb easier knobs to a fixed anchor. 70'
[route #10, volume 2, page 211]
Madcap 5.7 G (5.4 R) 100'
Start: 65' left of Fifi Fingers [route #11, volume 2, page 211] at a shallow chimney–notch that ends at several diverging cracks 15' up.
P1 5.7 G (5.4 R): Climb up into notch, then follow right-leaning cracks to a stance where a wide handcrack leads sinuously up and left. Go up the sinuous crack up to a stance below a final, unprotected slab, and up this to a large, slanting ledge. 100'
Gear: 3 ea #2 Camalot; 2 ea #0.5, #1 and #3 Camalot; 1 ea #0.3 and #0.4 Camalot; medium to large nuts.
[route #11, volume 2, page 211]
Canine's Little Helper 5.10b G 65' ★★★
Similar climbing to Fifi Fingers, but easier.
Start: Below a rounded, right-facing corner that begins at the left side of a ledge, in the clean, chocolate-colored face shared with Fifi Fingers.
◉ P1 5.10b G: Either climb directly up to the rounded right-facing corner (5.8) or walk to it via the ledge. Climb up the corner until it curves right to become a rounded bulge. Step right a few feet, stem up to a cluster shallow divots, and go up. Step right to top out on a ledge. Move up and left to a fixed anchor. 65'
Gear: 1 ea #0.5 Camalot, green C3.
Crane Mountain ● Crane East ● Scout About Slab
Left End Blockade
This cliff is left of the Scout About Slab. The outstanding feature is a large, right-facing corner with a left-rising crack that goes from the base of the corner 10' up to the outside corner.
Objet d'Irt 5.4 R 60'
Start: 25' right of the large right-facing corner, at a notch in the base of the cliff, below the right side of a huge, tilted block 25' up.
P1 5.4 R: Climb up and right to a short vertical handcrack and climb to its end. Move up and left behind the large, tilted block, then traverse up and right along a narrow right-rising ramp to the upper section of a crack in the slab above. Follow that crack to the top (same as Block Aid). 60'
Block Aid 5.7 G 60' ★
Would be better if not for the stacked blocks that form the lower 15'.
Start: At a vertical crack leaning slightly leftward, 35' right of the large right-facing corner.
P1 5.7 G: Climb the vertical crack through blocks to a ledge, then step left and finish in the vertical crack (shared with Objet d'Irt). 60'
Last Call 5.7 G 55' ★★
Start: At a right-facing corner on the right end of the 15'-high stacked blocks.
P1 5.7 G: Climb corner onto the ledge on top of the blocks, then follow a vertical crack in the same diminished corner through a small overhang where the corner ends. Continue up the crack to the top. 55'
Crane Mountain ● Crane East
Scout About Slab
This slab is up and left of the Waterfall Wall, and presently has several routes. Additionally, a couple linkups can be achieved starting at the Waterfall Wall and finishing on this wall.
The lower left-hand section of this slab is broken into two tiers. While several routes have lower pitches, the best climbing tends to be on the upper slab. You can reach this via a steep, slippery, 3rd-class gully on the left edge of the Main Slab.
Directions: From the left side of Waterfall Wall [volume 2, page 211], scramble up a steep, nasty gully to the right end of a long, tree-filled ledge system that runs gently downhill to the left. The face just above is the Scout About Slab. An easier approach can be done from the left side.
Scrounge About 5.6 PG 140'
Start: The first ascent on this slab, Scout About, goes up a vertical crack, then wandered up onto, then leftward across the slab via a thin foot traverse. Begins on the lowest section of cliff toward the left end, at a short, blocky slab 150' left of the class 3 gully.
P1 5.2 G: Climb up blocky slab to notch between trees on a sloping, wooded ledge. 20'
P2 5.4 G: Climb up a pleasant, but dirty vertical crack in the slab. Step right to top out between two trees. 30'
P3 5.6 PG: Walk 30' left to a large, right-facing corner. Climb the corner to its end 20' up at an overhang. Traverse right around the overhang on mossy holds, then go up the right edge of a tree island. Continue upward along a thin seam in the slab to a tongue of trees where the slab becomes trivial. 90'
Descent: Walk (climber's) left, go around a short cliff, then turn back to regain the base of the route.
Scout About Direct 5.5 G 40' ★★
Start: Same as Scout About [visible in the cliff photo, volume 2, page 211].
P1 5.5 G: Climb a vertical crack to its top. The original route goes up and left across the slab via a thin foot traverse. Instead, move up and right to a stance at a small horizontal. Go directly up the slab past two bolts. As the angle eases, angle left to an oak tree. 40'
Arbor Eat 'Em 5.5 G 60'
This exploratory route wrestles prickly branches for protection; not an instant classic.
Start: Scramble up the steep gully left of the waterfall slab, to the right end of a long, tree-filled ledge system that runs gently downhill to the left. This is the Scout About ledge [visible in the cliff photo, volume 2, page 211]. Begin just right of Scout About at a dirt-filled, vertical groove that leads to a spruce tree, and beyond that, a pair of large pine trees.
P1 5.5 G: Step up the left edge of the dirt groove, move out left onto the slab to circumvent the spruce tree, then move back right, above the spruce tree into a left-facing corner leading up to pine trees. Climb the corner to the first pine tree and rappel. 60'
Crane Mountain ● Crane East
Waterfall Wall
Tumbling Dice 5.6 PG 190' ★★
This linkup begins at the base of the Waterfall Wall and finishes on the Scout About Slab. Each pitch can be reached by scrambling up the steep gully on the left side of the Waterfall Wall. The top pitch on the Scout About Slab is good, but scary with a long runout.
Start: At the right-facing corner on the left side of the steep gully used to access the Scout About Slab, which is immediately left of the Waterfall Wall.
P1 5.6 G: Climb up blocky rock on the outside edge of the corner to a horizontal crack beneath a bulging block. Traverse left to a right-rising crack and climb that to a narrow top-out. Scramble 25' up and left to the toe of the next slab. 45'
P2 5.5 PG: Start 10' left of the toe of the slab, friction right to a vertical crack, then step up onto a small stance. Continue up the outside edge of the slab to the top. Either skirt around the "Big Die" to its right, or step around its lower point to the left and climb directly up it to top out You are now at the base of the Scout About Slab. 45'
P3 5.5 PG: Begin just right of Scout About and Arbor Eat 'Em. Climb directly up the slab right of a dirt runnel until even with another spruce tree. Traverse right 12' on a sloping foot ledge to reach a left-rising diagonal crack. Climb the crack to its end, then move up a short way to a left-rising seam. Climb it to a stance on the left near the end of the seam, make a few easy friction moves, then move left to a large white pine tree to belay, or scramble up and left on an easy slab for 40' to the top of the formation. 100'
The Verge 5.5 PG 110' ★
Start: At the left edge of the main waterfall slab, just left of Waterfall Left [route #1, volume 2, page 211]. At the time of the FA, the bottom of the route was blocked by an inverted tree trunk (in which case, begin on top of the trunk).
P1 5.5 PG: Follow twin thin left-rising cracks to a stance atop blocks on the left edge of the slab. Continue up a left-leaning, left-facing corner and crack to its end at a rounded bulge. Climb up the bulge and slightly rightward to the top of the slab. 110'
The Verge Inn 5.7 X 310' ★
While the initial runout of P1 is unavoidable, the most dangerous sections of P2 can be mitigated with a cagey belay and clever rope tricks.
Start: Same as Waterfall Left [route #1, volume 2, page 211].
P1 5.7 X: Climb directly up the dimpled face past a pair of small slit pockets 50' up. Head to a left-leaning, useless crack and follow it upward. The crack provides some protection before pinching off; follow it past a final steep wave (5.6 R). Once over the wave, move up and slightly right, up a black streak to the top of the slab. 110'
P2 5.7 X: Shift the belay 35' up and left, to the right edge of another slab. Step out onto the slab at the base of the ledge (immediately putting you 60' up this slab), then climb along the right edge of the slab. Continue up the slab past a difficult wave 50' up to where the climbing eases. Belay at an oak tree growing between the slab and a large flake of rock. 120'
P3 5.2 PG: Climb up and left on easier slabs to the top of the formation. 80'
Descent: Walk climber's left to a left-descending ramp and follow this taking care not to turn directly downward until in sight of the boulder-choked streambed. At that point, skirt back to the base of the Waterfall. It is also possible to escape climber's right into a gully at the top of P2, descend this then make a 20' rappel to reach the sloping ledge at the top of P1. From there, make a descend 3rd class along the (climber's) left side of the main slab or rappel, angling left if using a 60m rope.
All Wet 5.7 PG (5.5 X) 800'
The Waterfall Wall is popular as a long, mild ice climb, and early in Crane climbing, was also the most popular rock climbing area. Over the years as summer conditions allowed, every pitch of this route has been soloed, except the topmost one. What follows is a summer ascent of the ice route; during the FA, much was wet.
Start: Same as Waterfall Left [route #1, volume 2, page 211].
P1 5.6 PG: Climb P1 of Waterfall Left. You can also climb P1 of The Verge (5.5 PG). 90'
P2 5.6 PG (5.4 X): Several options exist, especially if dry. For this ascent, start on the bottom left edge of the dry buttress right of the watercourse and climb to its upper right edge. There is a crack 35' up with the only protection. 140'
P3 5.3 X: Several options here. The right-facing corner where the water usually runs is a class 3 scramble. The slab to its right is an unprotectable 5.6 that gets easy after 10'. There are a couple overhangs left of the watercourse that have been climbed, all of which involve tricky unprotected pulls to easy, short slabs into forest. For this ascent, climb the low-angle, green slab right of the watercourse. While low-angle, there is almost no gear (effectively, one oak sapling), and a few moves that would otherwise be trivial on sparkling clean rock are much harder in their present condition. Tip-toe up the start, about 8' right of the boundary with the wet (and/or brown) rock, past the aforementioned sapling, traverse left 6' along a seam to the edge of the green slab, then make a tricky move up following a suspicious line of clean patches to the top of the slab. 75'
P4 Class 2: Cross the stream, then head up and right to a ramp leading to the base of the next pitch, a slab with a 7'-tall overlap above a scruffy ledge 75' up. 260'
P5 5.5 X: The most dangerous pitch on the route: there is no protection for the first 65', and although the lower, steeper section has holds and dries relatively quickly, the upper, lower-angled stretch is usually wet and quite dirty, and almost impossible to climb in this condition. Since the upper section is not visible from the base, it is possible to climb into a trap. While this slab has been climbed in thoroughly dry conditions, this ascent escaped leftward by sneaking under a loose rock plate on wet (though clean) rock, getting pro in a wet right-facing corner, then scrambling up woods and moss to rejoin the regular ice climbing path after traversing right under an overlap. 150'
P6 5.7 PG: The only new terrain for this ascent. This pitch will be excellent if cleaned. Climb up the left side of the 20'-tall block lying near the center of the face, to its top. Traverse left to a right-facing corner (both wet and dirty), make a couple funky moves up, then hop left onto a dry, clean slab. Go up this to a stance under an overhang. Commence a long and very wet traverse, 25' right to a position 8' below and right of the bottom of a vertical crack. Climb up to the crack, then follow it to the top. 85'
Learning to Fly 5.5 G 170'
Learning to Fly [route #4, volume 2, page 212] has been extended to the top of the cliff, and one piece of fixed gear has been added at the start (to replace the tree that has since fallen).
Start: 150' right of the waterfall is a bulging wall with two chest-sized blocks on a ledge 4' up. Begin 30' uphill from and left of the blocks at a 3'-long right-rising ramp. This is left of the level area where I'll Fly Away begins.
P1 5.5 G: At end of foot ramp, traverse right past a horizontal pod, a vertical crack, and a vertical seam, to reach a crack that begins in a left-facing corner. Follow this crack up and right, then move up and right to another crack left of the anchor for I'll Fly Away. Climb crack to a horizontal, above which the crack closes to a seam. Traverse the horizontal crack to another vertical crack, and take that up to a cluttered ledge. Belay at an oak tree on the right. 120'
P1 5.5 PG: Walk up low-angled rock to a headwall 12' from its left side. Climb the headwall using knobs to an easy, dirty slab and belay at a hemlock. 50'
I'll Fly Away 5.10a G 40' ★★★
This route [route #5, volume 2, page 212] is now a lead route.
Start: 150' right of the waterfall at two chest-sized blocks on a ledge 4' up.
◉ P1 5.10a G: Scramble onto the blocks, then up the face to a short horizontal at the base of an elliptical formation in the rock. Go 5' right, then up and slightly left to a small left-facing corner. Up this and onto a slab. 40'
Gear: An optional #0.5 Camalot helps protect the opening moves.
Live and Let Fly (project)
Open project is 10' right of I'll Fly Away, at a right-rising tips crack that leads through an awkward right-facing, right-leaning corner to an overhang.
Porco Rosso 5.11b G 40' ★
Start: 15' right of I�ll Fly Away below a slab.
● P1 5.11b G: Stick clip the second bolt to avoid bad falling potential. Go up the slab into two big moves. After the second bolt, go up easier terrain to a fixed anchor. 40'
Keymaster C2 85'
This route opens the door to the potential climbing above the large overhang that blocks much of the cliff above.
Start: 50' right of the blocks of I'll Fly Away, on a block in front of a ramp on a right-facing corner under the large overhang.
P1 C2: Aid up to the thin crack nearest the upper, outside edge of the overhang, then aid rightwards until the crack becomes wide. Move up and out via a good, vertical finger- to hand-crack, then follow this until it fades. Pendulum right into the next vertical crack, which also fades at about the same spot. Free climb to where the crack reemerges and climb it to a tree. 85'
Gear: A set of brass nuts and a set of offset brass nuts, a full set of C3s, doubles of 0.25" cams, triples of 0.5" cams, one 3" or 4" cam.
Seam Stress 5.10b G 45'
Start: Below a trace-seam 10' left of Wreck Me Baby, 30' left of the large left-facing corner of De-hedral.
P1 5.10b G: Climb up left of the seam, then (V1) stem across it and make a long reach to a good hold. Move up and left across the seam again to reach a right-rising block with good holds. Gain a horizontal break just below the large sloping ledge. Weave up good holds onto the ledge. 45'
V1 5.11b TR: Stay left of the seam through the initial 30'
Wreck Me Baby 5.10a G 45'
Start: At a 6'-high left-facing edge 6' up, 20' left of the large left-facing corner of De-Hedral.
P1 5.10a G: Work up the left-facing edge, traverse right 6', then move up and gradually back left to a rounded groove below a sloping ledge. Gain the ledge via that groove, then move right to the anchor of De-Hedral. 45'
De-Hedral 5.8 G 45' ★★
The seam in the steep face above the anchor is an open project.
Start: 200' right of the blocks of I'll Fly Away, at a 45'-tall left-facing corner, which ends at a ledge below an overhang on a steep face with a vertical seam rising directly above the corner. This is very near the right end of climbable rock.
P1 5.8 G: Climb up block to the base of the corner, then follow the corner to a ledge under an overhang. Over this to a fixed anchor on the steep face above. 45'
Seamless (project)
Open project. The steep right side of the Waterfall Wall. Begin on the right-hand point of the boulder lying under a ground-level overhang, midway between De-Hedral and the right end of the overhang.
Crane Mountain ● Crane East
The Laboratory
This cliff lies between the Waterfall Wall [volume 2, page 211] and the East Nose [volume 2, page 212]. Originally discounted as disjointed mini-walls separated by intervening crud, a more recent look as yielded this small cliff.
The Laboratory is located (climber's) right of the giant talus that blocks access past De-Hedral at the Waterfall Wall, and is left of the cliffs that you pass on the herd path to the East Nose [volume 2, page 212]. The most noticeable feature is a 20'-tall, narrow, A-frame alcove at the left end of an open, level area. Above this and 50' right is a white pine on a ledge system; this tree has an anchor on it. Most of the routes continue through the headwall above this ledge.
Directions: For the best approach, hike along creek bank opposite the Waterfall Wall downstream (northeast) another five min. At a 10'-high, 20'-long rectangular boulder, cross the creek and walk 50' to the base of the cliff 584991,4821950. This is 200' upstream of where the creek makes a sharp right and goes down a small cascade.
Slaboratory 5.5 G 100'
Worth doing if cleaned.
Start: 60' left of the A-frame alcove is a low-angle, 60'-tall slab below a 40'-tall headwall. Begin near the highest point of the base of the slab.
P1 5.5 G: Scramble up slab, past a perched block, to reach the bottom of a right-rising ramp. Follow the ramp up right and go behind an oak tree to reach a left-facing corner with a wide crack in the main face. Climb the corner to its top, then make a few easy mantles to reach a large white pine tree at the top. 100'
Dependent Variable 5.8 R 100'
Start: At the left end of a short, steep face with a closed vertical seam 10' up, 30' left of the A-frame alcove. There is a parallelogram-shaped notch in an overlap at chest height.
P1 5.8 R: Go up the face (crux, no protection) to the seam, then up this to its top. Go up easy slab to reach several right-leaning cracks in the final headwall. 100'
Margin of Terror 5.6 X 60'
Every crag requires a thrutch-fest. The intended finish runs up the large, left-facing notch in the overhang above the easy ramp, but was postponed by a bees nest. A fall from the crux would deck, but a large protection device might work.
Start: At a narrow chimney between a 10'-tall block and the left side of the A-frame alcove.
P1 5.6 X: Climb onto the top of the 10'-tall block. Traverse along a ledge with a wide, horizontal crack 4' left, and make a committing move on small holds and friction to reach low-angle rock below two loose blocks. Go above them, then move right to the white pine tree belay anchor. 60'
White Mice 5.8+ PG 120' ★★
Start: At a left-rising, vertical crack right of a 6'-high buttress of rock below and right of a tall, acutely-angled A-frame overhanging alcove.
P1 5.8+ PG: Climb crack and buttress, step left onto face holds as you reach the right side arête of the A-frame alcove. Break the overhang just right of the alcove and climb a crack on easier rock, onto a right-rising ledge just left of an oak tree. Above, two right-rising seams break through another overhang, the left one forms a flaring, right-facing corner, the right one an acutely-angled, left-facing corner. Climb up these through the overhang, then climb the easy slab straight above them to another pair of cracks 6' apart. Work up either of these to an oak tree belay. 120'
Lab Rat 5.8 G 80' ★★
Start: At a head-high, triangular notch with a vertical crack rising from its apex.
P1 5.8 G: Go up to a vertical crack and follow it to its end, then straight up the face to a ledge left of a white pine tree. Climb up and left to a face with a right-leaning tips crack. Climb up the crack until it fades to a seam (5.8- to continue straight up; no pro), traverse left to another right-leaning crack, climb this and a low-angle slab to an oak tree. 80'
Guinea Pig 5.7 PG 80' ★★
Start: At a left-rising ramp of flakes that leads to a left-leaning crack system, 10' right of Lab Rat's triangular notch.
P1 5.7 PG: Ascend flakes to the left-leaning crack, and climb this to its end. Reach up and left for good holds, then weave up along good shelves to a stance right of a white pine tree. Climb up to the right of two right-leaning, left-facing corners and climb it to its top, then go up a low-angle slab to an oak tree belay. 80'
Fruit Fly (project)
Closed project. Devious moves for the first 40' (5.10c) block the way to the typical short easy stretch, with a thin crack finish. Avoiding the rest stance off left 25' up increases the grade to 5.11a. Begin at an overhanging, left-facing, head-high flake, 25' right of the large A-frame alcove. Climb up flake to reach an oval pod. Traverse left a couple steps, then follow a left-leaning seam that turns vertical, then becomes a tiny left-facing corner. Climb this feature to its end. A good rest stance lies just left. Step right and stab for good holds, then go up to a ledge left of a small hemlock tree. Clamber directly up easy steps to a right-leaning tips crack, and go up this to the top.
Pinky and the Brain 5.11a G 90' ★★★★
Start: 40' right of Guinea Pig, on a ledge to the right of the wall about 15' up.
● P1 5.11a G: Clip the first bolt and climb straight up (or stick-clip the first bolt and try the seemingly holdless wall). Work up an easy slab to a thin finish at the top. Fixed anchor. 90'
The Skew (project)
Closed project. Begin in a left-leaning, right-facing corner above a giant ash tree. Follow the corner to its end, then up a rapidly-diminishing seam. Go over a final bulge.
Shattered 5.6 PG 80'
Could be great, but has questionable rock.
Start: Next to the large ash tree at the arête on the right side of the wall.
P1 5.6 PG: Up stacked blocks leaning on the arête until it is possible to step left onto a stance on the main face. Climb up the edge of the main face using a tips crack on the left and small holds to a ledge. Go up a crack (hand and fat fingers) to a block stance, then up a steep ramp along the outermost edge of the corner. At the top of the ramp, move right on a right-rising, ramp that leads up an overhanging face. Stretch for good holds and weave up along more large in-cut holds to the top of the wall. 80'
The Scenic Route 5.6 PG 200' ★
This is an exploratory scramble with a fair amount of technical climbing, starting above the first tier of cliffs. It does not reach the top of the entire cliff, but as with much of this area, precisely when one is at the top is unclear. Along the way, note the possibilities—all of them short, but interesting. Reach the first major tier of sloping, sparsely wooded slab via any lower route (it is possible to make a long traverse into this area by hiking partway up to the East Nose area, then traversing along occasionally sketchy terrain back nearly a quarter mile, but it's easier to climb up from directly below, such as Guinea Pig or Lab Rat). This line explores the area left of center. The first pitch involves bits of mountaineering— chimneying, traversing, and clawing—to reach another sloping, wooded ledge that lies (climber's) right of a very steep, 30'-tall wall. From here, wander up a drainage, then step left to climb a groove in a right-facing corner (crux). On the steep slab above this, move up and left and follow a crack that runs along the outside edge of a large, right-facing corner until it is possible to move left along other cracks to a good exit gully. Go up the gully and low-angle slab above to a good perch on the left. Rappel off trees.
Crane Mountain ● Crane East
East Nose
Majesty 5.10a G 170' ★★
Start: 60' right of Polar Vortex [route #8, volume 2, page 212] at an oak tree below an open-book chute on the right edge of a 100'-tall slab. This is 40' left of Weather Clown.
P1 5.8- G: Scramble up the dirt to open rock and stem up the open book until it is possible to swing right onto the face and into a vertical crack system; go up this to a left-facing corner. Continue up the corner via a fist crack and face holds to a good belay stance. 60'
P2 5.10a G: Follow a wide crack up and right to a stance below steep rock. Step up right of an arête and climb through an overhanging, right-facing corner. Continue along the right edge of the arête using thin, left-facing flakes until it is possible to move left onto a small stance below an even-larger ledge. Pull onto this ledge, then step left to a right-facing flake. Make a delicate move to past this, then climb straight up along a nose. Step left and weave up and back right to a fixed anchor. 110'
Crane Mountain ● Crane East
Caterpillar Cliff
Caveman Cam 5.7 G 85'
[Right of route #11, volume 2, page 214]
Start: 50' right of Caterpillar Chimney, at a 20' long offwidth crack leading to the left side of an overhanging block.
P1 5.7 G: Climb the offwidth crack to tight alcove below overhang. Go up into the bottomless chimney along the left side of the block, then up stacked blocks to a stance on the right edge of the steep face to the left. Follow a left-rising, narrowing ramp up the edge of the face until it is possible to step left to a right-facing open book. Ascend the book onto an easy, dirty slab, then move left to a shaky shadbush tree to belay. 85'
Gear: A #6 Camalot (or even larger Big Bro) may be desirable, especially if the chockstone has fallen out.
Resperator 5.9 G 90'
Start: 10' right of Caveman Cam, at a fistcrack leading to the right side of an overhanging block.
P1 5.9 G: Climb crack to awkward stance below block. Make an awkward move following a crack right around the block to another stance on the upper slab. Climb up and left, following wide cracks, blocks, and steps to a shaky shadbush belay. 90'
Gear: Cams to 3"; 1 ea #5 Camalot; 2 ea #4 Camalot.
❏Variation to Son of Circuitous Shit [route #5, volume 2, page 234].
V1 Grandson of Circuitous Shit 5.8- PG: Once you leave the chimney, exit right via a horizontal crack, then weave up the face to the next horizontal crack. Exit this crack and go right around the arête on to the upper slabs, straddling the arête. Join the normal route to the top.
❏There is a fixed anchor at the top of Flying Friends [route #4, volume 2, page 233].
❏There is a fixed anchor at the top of Shaky Flake [route #35, volume 2, page 238].
❏There is a fixed anchor at the top of Blue Toes [route #19, volume 2, page 236].
❏Variation to Shaky Flake [route #35, volume 2, page 238]:
V1 Flake it Again 5.7+ G ★: Start on the left side of the lower slab about 10' left of the normal start. Climb up a left-leaning crack to a big ledge, then up the arête and finish at the anchor for Shaky Flake.
Butterscotch 5.6 PG 45' ★★
Start: 5' left of the fern filled gully of Sleepwalk [route #1, volume 2, page 232] at a scooped slab leading to a horizontal crack.
P1 5.6 PG: (V1) Friction up the slab (crux) to the first gear at 20'. (V2) Follow an easier vertical crack with good ledges to the top. 45'
V1 5.4 G: Good for when the scooped slab is wet. Go up the fern gully (same as Sleepwalk) to a left-rising crack. Follow this to join the normal route.
V2 5.6 G: From the horizontal, move left to a series of small corners. Up these to a vertical crack in a larger corner. Follow this to a right-rising crack to the top.
Pobrecito 5.8+ G 80' ★★★
Similar in quality and character to Shaky Flake with an easy start and hard finish but is more technical and pumpy. The name is Spanish for "poor little thing".
Start: 20' up and left of Soup Kitchen [route 24, volume 2, page 236], and 10' left of a maple tree, at the uppermost of the short, 8'-tall "rock fingers" at the base.
P1 5.8+ G: Climb up a slabby face left of a V-notch (or through the V-notch) to a moss covered ledge 18' up. Go to the base of a big outside corner then move right 7' to a fingercrack that starts 8' up above overhanging rock. (The topo [volume 2, page 237] has this incorrectly labeled as an off-width.) Layback the crack (#0.4 Camalot) to a juggy horn at the top. Turn right around a corner and traverse the steep face rightwards along a 3" rising ledge to a left-facing corner. Stay low for positive holds to the corner then layback the corner flake to a face and fixed anchor. 80'
Gear: 1 each of C3s; #0.4 - #2 C4s; small wires.
Ghetto 5.7 G 90' ★★
Start: 10' up and left from Soup Kitchen, directly in front of a maple tree at the base of an offwidth notch in a ceiling.
P1 5.7 G: Climb to the second bolt then (V1, V2) go left and up a left-facing corner with a fingercrack to a fixed anchor. 90'
V1 5.7 G: Go straight up the block inside corner and face to the fixed anchor.
V2 5.7 G: Angle right up easier terrain to finish on a highly-featured face and fixed anchor.
Gear: Set of C3s, 1 ea #0.4–#3 C4s, small wires.
The Shack 5.8+ G 100'
Long draws are recommended down low to reduce drag.
Start: 15' left of Skid Row under a large corner with a V-shaped chimney.
● P1 5.8+ G: Climb up the slab either left or right into the "shack" (a chimney-cave feature). Continue up through a burly offwidth V in the roof, then step across the roof to the right. Go across a face angling to the right with crimps into a vertical cleft (some runout, but easy and secure), then onto the left side of the main face. Up this to a fixed anchor shared with Skid Row. 100'
Gravy Train 5.11a G 100' ★★
There is a rope eating crack that can be problematic for rope drag just right of the small triangle-shaped block at the crux; set a directional above to help keep the rope out.
Start: On a small perch next to a small tree at the top of the slope of ferns 10' left of Favela [route #30, volume 2, page 238].
P1 5.11a G: Climb the slab to a steep corner. Go up this (crux, reachy), then continue straight up easier terrain along three left-facing corners with small overlaps and horizontal cracks in the face to the right (the second half of Gunky Route). Climb to a fixed anchor between the anchors for Shantytown and Favela. 100'
Gear: Small to medium cams.
Easy Street 5.4 G 50'
Start: 10' right of Mean Low Blues below a birch tree 10' up.
P1 5.4 G: Go up a short face and into the right-rising, blocky notch-crack to a well-featured face. Up this to a fixed anchor between Mean Low Blues and Shaky Flake. 50'
Shitty Shit Shovel 5.8 TR 30'
The direct route straight up the face to the fixed anchor of Climber's Yodel #7 [route #36, volume 2, page 239]. Has one move of 5.8; otherwise 5.6.
Railroad Donnie 5.10c/d TR 25'
The direct route straight up the face to the fixed anchor of Railroad Dickie [route #38, volume 2, page 239]. Begin just behind the 4-trunked maple tree and go straight up. Expect some holds to break.
This small, southeast-facing knob is located above the Main Face, about 50' back from the top of Time Trials [route #21, volume 2, page 236]. It has mostly short, 45'-tall, easy climbs.
Directions: From the base of Shantyclear, walk up the right-rising ramp to the top of the cliff. Walk the cliffline uphill to a slab, then back into the woods to the base of this knob. The top of this knob is below the campsite [shown on the top on page 237, volume 2].
Nugget Quack 5.2 TR 45'
On the left side of the knob, go up blocks and crack to the top.
Dingle Nugget 5.3 TR 45'
Go up a left-rising crack to a right-rising crack.
So Not a Nugget 5.3 G 45'
A good beginner lead.
Start: In the center of the knob.
P1 5.3 G: Go up knobs to a left-rising crack, then a right-rising crack to a horizontal. (V1) Traverse right to another crack and follow this to the top. 45'
V1 5.3 G: Continue straight up to the top.
Ted Nugget 5.7 TR 45'
Begin at a vertical seam right of So Not a Nugget. Friction straight up.
Red Nugget 5.6 TR 45'
Another face climb right of Ted Nugget. Climb good features straight up to the top.
One Move Nugget 5.9 TR 45'
Begin on the right side of the knob. Make a single hard move to get up a short headwall, then up an easy slab to the top.
This small, low-angle slab is located directly above Little Gem Diner [route #17, volume 2, page 235], just north of the lookout.
Could be a Nugget 5.1 TR 40'
Climb up slab broken by cracks to gain a left-rising crack-flake. Follow this to its end, then scramble to the top.
Definitely Not a Nugget 5.0 TR 40'
Begin as for Could be a Nugget. Climb the right-rising crack to the top.
Slimy Ham 5.11 G 130' ★★★★
Start: 40' right of Redneck on a Rope [route #5, volume 2, page 252] and 30' left of a pillar that forms a left-facing corner with a handcrack, at a left-rising undercling 5' up.
● P1 5.11 G: Climb technical face—an elegant drip line of small patina plates—to a final crux and fixed anchor above a ledge. 60'
◉ P2 5.10a PG: Step left and climb face on good positive edges over an overlap, then straight up. When the patina plates end, step right, up, then left to reach a fixed anchor. 70'
Gear: 1 ea #0.5 Camalot.
Descent: Two rappels with a 60m rope.
Get Off My Lawn (project)
This open project is parallel to, and harder, than Slimy Ham. Hard slab to a line of patina plates. Bolts and gear; ends at a ledge with a fixed anchor shared with Slimy Ham. 60'
Counterbalance (project)
Open project. This is the rightmost of three routes between Redneck on a Rope and Vertebrae [Routes #5 and #6, volume 2, page 252], and is characterized by many hard, thin boulder problems. Go up a handcrack in the left side of a pillar to its top. Make a hard slab move, then thin vertical climbing to a hard finish. 110'
Aspect: Southwest
Height: 50'
Quality: ★★★
Approach: 30 min; moderate
Summary: An impressive, wave-like cliff with a single, spectacular route.
This single wall sits directly above the popular Snow Mountain bouldering area. The wall is only about 50' tall, but it's impressive, rising above a bedrock slab in an increasingly-steep, cresting wave. There is only a single route here, but what a route!
Directions: Park on the west side of the NY 30, 7.5 miles south of Indian Lake (where NY 30 and NY 28 intersect), and 16.5 miles north of Speculator (where NY 8 and NY 30 intersect). This is 0.5 mile south of the Snowy Mountain trailhead, 500' south of a guardrail at a brown highway marker #30 2206 1425 553062,4838042. From the highway marker, follow the well-worn path west to the boulders at 15 min. Locate the Cave Boulder 552305,4838314; it's in the back and furtherest uphill. From the uphill side of this boulder, follow a well-cairned path north—straight uphill to the cliff, 30 min from the road 552272,4838518.
The Gift 5.12d G 40' ★★★★★
Start: On the right side of the bedrock slab below the only vertical crack on the wall.
● P1 5.12d G: Go up the handcrack to where the left and right sides of the crack offset. Kneebar up as high as you can, then commit to the arête and follow this to a horizontal below an offwidth. Squirm up a few more feet to a fixed anchor. 40'
❏P2 of Rodeo [volume 2, page 247] should be ★★★.
Location: Off NY 28N north of North Creek
Aspect: South and southwest
Height: 125'-250'
Quality:
Approach: 1 hr 15 min, easy
Summary: Two alpine cliffs on a ridge and below a mountain top; mostly slab climbing.
Moxham Mountain forms the long, rocky ridgeline visible on the north horizon from the town of North Creek. While much of it is posted, private property, a 2.5 mile public trail leading to the state-owned summit dome was constructed in 2012, providing access to some scenic climbing.
These cliffs are mostly low-angle slabs, well below treeline but with an alpine feel. The area is raw with runouts, dirt, lichen, and loose rock, although this will change with more use. The main attraction here is the alpine environment and panoramic views of meadows and ponds immediately below, and the prominent summits of Gore, Crane, Puffer, and Snowy.
Directions: From the intersection of NY 28 and NY 28N in North Creek, drive north on NY 28N (towards Minerva). At 4.2 miles you can see the impressive slabs of Moxham Dome on the left (this cliff was documented in Mellor's 1986 guidebook, but is sadly on private property). At 7.1 miles turn left onto 14th Road (CR 37). At 8.4 miles bear right at a fork. At 9.0 miles the pavement ends. At 9.2 miles park on the left at the trailhead for Moxham Mountain.
From the trailhead (0 hr 0 min) Follow the yellow-marked trail over a hill, down the other side, across a stream (the outlet of a beaver swamp), then uphill towards the Moxham ridgeline. At 1 hr and roughly 0.5 mile before the summit you will arrive at an open area with a view of the summit. Below is the Lower Ridge area. Continue another 0.5 mile to the Summit Dome area at 1 hr 15 min.
Access: There are many cliffs on private land in this area, Moxham Dome being the most obvious, visible from route NY 28N when driving north out of North Creek. (On the USGS map, this is labeled as Moxham Point.) Just south of Moxham Dome are several other cliffs with extensive climbing—the New New, Cartehena Cliff, Cartoon Cliff, and Sherwood Forest—all on private land. The cliffs described here are on state land near the summit of Moxham Mountain further to the west.
This is the south-facing cliff below the open area with a good view of the summit dome, 0.5 mile before the end of the trail 580439,4845007. Finding the routes from above is difficult; here are some landmarks: a clump of boulders near the middle of the clear area at the top of the cliff; a right-facing corner system 40' (climber's) left of the (climber's) right end of the cliff; an evergreen clump far down the cliff, visible from above and from the base; a boulder pile at the base of the cliff that provides access to a ledge system 45' up.
To reach the bottom of the cliff, follow the trail to where it turns away from the view. Here you will find a break in the cliff that provides a slippery 3rd class descent to the base.
Mud in Yer Eye 5.8 TR 125' ★
From the top, locate the boulder clump. From a position 30' (climber's) right of the boulder clump, rappel from a gear anchor arranged in a horizontal crack a short way down the slope. At the base of the cliff, look for a large, dirty, left-facing corner that leads up left to the evergreen island. Climb the corner through an overhang to a good stance. Make a difficult move through an overlap, go up to another tricky overlap, then climb easier slab to the top.
Yam Jam 5.7 G 125' ★★★
Start: Rappel 50' (climber's) right of the boulder clump. At the base, look for a cleaned vertical crack 15' right of the evergreen island.
P1 5.7 G: Climb crack through two bulges to its end. Move up to another crack line and take it to the top. 125'
Mox Me 5.5 G 125'
This route tops out at the right-facing corner system at the top (climber's) right side of the cliff.
Start: Rappel and locate a right-facing open book that begins 6' up a slab and ends 7' higher at an overhang. Begin 6' to the right on the slab.
P1 5.5 G: Traverse left to the open book and climb up to the overhang. Pass the overhang using a vertical crack that leads to a ledge. Wrestle the shrubbery to get on the ledge, then scramble up to the highest stance, at the base of a right-facing corner. 50'
P2 5.5 G: Up the corner a few feet, then angle right following a right-leaning crack. At a small overhang, traverse right 6' to a left-rising flake. Climb this to a handcrack and follow this to its end. Finish on runout, easy slab. 75'
Upper Hudson Railroad 5.8- G 75' ★★
Start: On the ledge partway up the cliff, at a right-facing corner (which is nearly directly above the boulder scramble access slot) with a birch tree growing in its base. Note that the top of this route lies directly below a lone, scraggly, 10'-tall oak tree east (climber's right) of the right-facing corner used as a landmark.
P1 5.8- G: Step onto and climb the outside edge of the corner. Go up to a pair of crack-seams above the top of the corner. Climb cracks through a bulge, followed by a short slab and a final steeper part before the angle eases toward the top. 75'
Tom's Overhang (project)
This route is a closed project, in the 5.10c range. Begin 10' left of and 20' below a ceiling at the right end of the ledge partway up the cliff. This is a few feet left of the Class 3 access gully. Climb up a right-rising crack in the slab to the overhang, below a wide crack breaking through it. Climb the crack, up a short, steep slab to a big overlap. Climb through this onto easy slab, and scramble to the top of the cliff.
Children at Play 5.5 G 60' ★★
Surprisingly interesting and enjoyable climbing, despite its looks. Cleaned up, this would gain another star.
Start: On the right end of the ledge partway up the cliff, which is the same as the class 3 scramble: a crevice between the slab with the ledge and a large block lying on the slope to its right. Alternatively, begin at a thin vertical crack in the slab 6' left of the crevice.
P1 5.5 G: Straddle the crevice and climb up to the top of the block. Step left onto the main face and go up to the large, stepped, right-facing corner that defines the end of the cliff. Climb up the leftmost (largest) corner, through a short headwall, up a short slab followed by a final steep bit, onto an easy slab to reach the top. 60'
Dog Dish Dilemma 5.8 TR 240'
This route is located in the scruff right of the main Lower Ridge area. It was climbed on toprope by necessity to recover a pet's water bowl that rolled over the edge of the cliff. From the Lower Ridge, follow the hiking trail towards the summit and locate a short spur trail that leads to a nice view, with an almost-manicured juneberry clump sitting alone near the edge. Only the upper 100' is worthwhile climbing. Rappel 70m, then climb the mossy slab onto a choss and sapling-infested dirty ledge. Break through briars onto cleaner, steeper slab. Friction up to a headwall, then move right and gain an intermediate ledge. Reach way left and hand-traverse left 10', stabbing blindly for invisible holds above. Make a tricky stand onto the upper slab and weave up a couple easier overlaps to the top.
This steep-sided, southwest-facing dome sits directly below the summit of Moxham Mountain 580899,4844797, at the end of the hiking trail. The best climbing discovered so far lies about 50' (climber's) left of the end of the trail. Locate a spruce tree positioned just above an obvious notch in the slab; this provides a good anchor for top-belaying Serenity Prayer, or for setting a rappel anchor.
The base of the cliff is really awful, and there is a cliff below you. Rappel access (or top-belaying) is the only reasonable option here.
Serenity Prayer 5.8 G (5.4 R) 215' ★★★★
Originally climbed as a single pitch, but could easily be broken up into 2 or more pitches.
Start: Rappel from the spruce tree mentioned above with a 70m rope to a horizontal crack just below the beginning of the steep section. Build an anchor here, then rappel again (with a 70m rope) to the base of the route. Begin at the low end of a low-angle slab that has a right-facing flake 40' up.
P1 5.8 G (5.4 R): Climb up easily to the right-facing flake 40' up and follow it to the base of the steep section. Move up a right-rising flake to reach an undercling (pink Tricam), then move up, first left, then right to a stance below a bolt. Climb past bolt to an overhang and go through this at the left of two right-rising, diagonal, short cracks. Climb a steep corrugated face to the horizontal below a low-angle slab. Climb up slab to a 5'-high overlap with a vertical crack. Climb up using crack onto easy broken notch leading to the spruce tree. 215'
Gear: Standard rack plus a critical green C3 (or equivalent).
Location: Along the Indian River, north of Indian Lake, accessed from NY 30.
Aspect: South and southeast
Height: 130'
Approach: 5 min, easy
Quality: ★
Summary: Small, broken cliff with a couple moderate—but mostly discontinuous—lines on quality rock.
Indian River Crag is located north of Indian Lake on the Chain Lakes Road, just south of where the Indian River joins the Hudson River. The cliff lacks any great expanse of continuous rock, but there are two interesting features. The first is Bockscar Buttress, a narrow, clean, wave-like buttress above an open, pleasant base area. The second is a sheer, overhanging wall near The Hammer. The remainder of the cliff is blocky, discontinuous, and quite dirty.
The forest around the cliff is swampy talus, and there is running water nearby, so expect bad mosquitos and black flies. The cliff has a very short, easy approach, so there is that.
Many of the routes here are rafter's names for rapids and features in the Hudson River Gorge.
Directions: From the intersection of NY 30 and NY 28 in Indian Lake, drive east on NY 28. At 1.3 miles, turn left onto Chain Lakes Road. (This is a seasonal road—until the second weekend in May it is closed just beyond the Bullhead Pond trailhead.) At 2.7 miles reach a large parking area on the left—the Bullhead Pond Trailhead (561906,4850145; the parking for McGinn Mountain [volume 2, page 281]). At 3.7 miles there is a turn-around pullout on the right; continue another 0.1 mile to a small pull-off on the right, 50' past a culvert, and on top of a small rise 563110,4851206; there is sufficient room for three cars. Directly across the road is a rock ledge, 20' back from the edge of the road. The cliff is straight northwest from this point; to reach it, cross the road, step up onto a smaller rock ledge, and immediately turn left. Walk along a ridge for 30', then bear right (northwest) and follow a herd path over a subtle ridge, down through a mossy talus patch, up past a large white birch tree, across another rocky level section, then up a final steep slope to a wooded bench that slopes downward to the right. The cliff is directly ahead. To reach the High Side or Midship sectors, head diagonally left along a herd path to reach the cliff at a the Bockscar Buttress, an impressive 55'-tall buttress and the location of Bockscar and No Springs Attached 563004,4851370. To access the Low Side sector, turn right and walk 150', then angle toward the cliff across a marshy area 1563112,4851427.
This cliff is left of the scree slope walk-up to MidShip's most prominent buttress. There are no routes here yet.
This is the central portion of the cliff that begins on the left with the Bockscar Buttress, one of the better-looking chunks of rock roughly shaped like a narrow wave, overhanging at the top, and extending rightwards to an arête. Right of this the terrain goes uphill up to a higher, shorter cliff (the "Blue Ledge"), then drops back down to a detached block forming the chimney of Briscoe's Black Hole.
Bockscar 5.9 G 55' ★★
Start: At a vertical crack in a small, right-facing corner at the left side of the Bockscar Buttress.
P1 5.9 G: Climb up crack until it becomes an overhanging offwidth. Reach high and right for a good hold, then another long reach to a horizontal. Traverse right 8' to a vertical crack and follow this through the bulging top of the wave to get to the top. 55'
No Springs Attached 5.10d G 55' ★★★
The best-looking and most obvious line here, and a worthy objective. It tackles the parallel cracks on the right side of the Bockscar Buttress.
Start: Same as Mile-Long.
P1 5.10d G: Stem up face using the wide crack and a small right-facing corner to the left, to a low overhang. Break this via a crack 4' left of the top of the wide crack, then climb up parallel vertical cracks to the point where the face steepens to overhanging. Weave up the overhanging face along the arête using the crack 2' left of it. 55'
Mile-Long 5.6 G 130' ★
Several cruxes of different types on this route, interspersed with good stances. Can be broken into several pitches if rope drag is an issue.
Start: At an 8'-tall hand-to-fist-to-offwidth crack on the right side of the Bockscar Buttress.
P1 5.6 G: Up crack to a ledge, then continue up a thinner crack through an overhang and capstone-like blob to a large ledge. Weave up the face on the other side of the blob using good footholds right of a right-facing corner with a wide crack in it, until the footholds run out. Use the crack in the corner to reach another stance below an overhang. Step left then up and back right to get around this obstacle and into a chimney. Go up the chimney and through an overhang to a good stance above it. Weave up the broken face: first step up left then back right along a right-rising flake, then diagonally up left to another stance and a final step to the top of the cliff. 130'
Gooley Steps 5.8+ G 75' ★★
Start: 20' right of Bockscar Buttress, at a thin crack that goes up to a ledge 12' up, above which is a left-facing corner.
P1 5.8+ G: Climb crack to ledge. Follow left-facing corner to its top, then move right and up along the edge of the face, using good flakes, edges, and occasional cracks. Top out on a sloping ledge, and either belay off a tree or move right to a fixed anchor on a pine tree (top of Otter Slide) at the far end of the ledge. 75'
Otter Slide 5.7 G (5.3 R) 75' ★
Start: At an 8'-tall left-facing corner below the end of a long, right-rising ramp, 35' right of the Bockscar Buttress. There is another, smaller right-rising ramp to right.
P1 5.7 G (5.3 R): Up corner onto ramp. Ascend ramp through a steep overlap with a blocky obstacle, upward to the point where it steepens to a final stance below a steep headwall. Climb a vertical crack on the left wall up to a fixed anchor on a pine tree. 75'
Blue Ledge Out 5.7 PG 55' ★
Start: 150' up and right of Otter Slide, at the top of the slope, at a damp step on the left side of a tree clump that grows against the cliff.
P1 5.7 PG: Climb onto a ledge 6' up, then follow a crack and small right-facing corner through a bulge until it is possible to pull up and right onto a good stance. Continue up good cracks to a short section of easy, unprotected slab at the top. 55'
Blue Ledge In 5.6 PG 55'
Very dirty and unappealing in its present condition.
Start: Below a left-rising ramp, 15' right of Blue Ledge Out, and 15' left of a spruce tree growing tight against a wet section of cliff.
P1 5/6 PG: Make a juggy move to the ramp, then follow it up and left to a right-facing corner. Climb the corner through a bulge and over easy slab to the top. 55'
It is more pleasant to stem up the outer edge of the chimney (as per V1) than use the original start from deep within. This route would be very good if properly cleaned.
Better Than DEET 5.6 PG 60' ★★
Start: Down and right of the Blue Ledge In/Out routes is a chimney formed by a 20'-tall block detached from the main face. Begin inside this chimney.
P1 5.6 G: (V1) Stem up the inside of chimney to the top of the block. Step across to the main face at go up a crack through a bulge. Take a horizontal crack left around a corner, then up slab to the top. 60'
V1 5.6 G: Stem up the left side of the outer edge of the chimney to the top of the block, cross the block, and climb through a vegetated bulge and overhang to the top of the cliff.
This is the right end of the main cliff band, separated from Midship by a scruffy, right-rising ramp that provides easy 5th class access to a ledge 35' up where there is a very large white pine tree—the tree on Indian Head. To the right of this the cliff bends to face southeast and becomes overhanging; there is a very large, fallen tree beneath the sheerest section of rock.
Indian Head 5.6 G 90' ★★
Beware of rope drag should you link both pitches.
Start: At a right-leaning open book that becomes a right-facing corner above an overhang 15' up.
P1 5.5 G: Climb the open book and corner, around the overhang to its right, to a ledge just below the pine tree. Step left and mantle onto the ledge with the pine tree grows. 40'
P2 5.6 G: Go through a narrow notch between large boulders, then traverse left 10' to the right side of a large block with a rectangular, 3'x2' tongue. Step up and right on the face to reach the bottom of a crack, and follow this to the top. 50'
Unnamed (project)
Closed project. This is the semi-cleaned, right-leaning crack which begins as a very thin seam at ground level, 15' left of the left edge of the overhanging sheer face.
Unnamed (project)
Closed project. This is the semi-cleaned, discontinuous crack and blocky features on the left edge of the overhanging, sheer face.
The Hammer 5.9+ G 50' ★★★
Start: Right of a very large, fallen tree, and on the right side of a sheer, overhanging section of rock, at a crack that leads to a flaring, right-rising chimney-corner. A large, unstable block sits just right.
P1 5.9+ G: Go up to a discontinuous crack in a right-facing, right-leaning, slightly overhanging corner. Climb up the corner to an overhang, surmount it, then follow an increasingly better crack to easier ground and a yellow birch tree. 50'
The Pusher 5.10a A0 170' ★★★★
This route [route #5, volume 2, page 269] has been rerouted/improved, cleaned, and extended.
Start: Scramble 4th class to the top of the left-rising ramp of Fistful of Stoppers. From the base of that route, walk left to the left side of a vegetated ledge, below a shallow right-facing corner, the right edge of a massive flake.
● P1 5.10a PG: Climb the corner until it's possible to reach left and clip a bolt on the face. Friction left past another bolt to a stance on the left side of the giant flake. Go straight up to a fixed anchor. 50'
P2 5.9 A0 PG: Go straight up through overlaps to the right of the blueberry bushes. Face-climb past two bolts to gain the crack, then continue on friction using the crack for protection. At the top of the crack, head up and right past a bolt to a stance below a roof. Overcome the roof using one point of aid (bolt, hidden from below) then climb easier face to a fixed anchor below the tree island. 120'
Descent: Rappel with two ropes.
Gear: To #0.75 Camalot, including nuts and RPs.
Fistful of Stoppers 5.10d G 430' ★★★★
This route [route #6, volume 2, page 269] has been straightened and extended and now goes to the top of the cliff. The extension has been named Fistful of Draws, and can be climbed at 5.8 A0 by pulling on a draw.
Start: Locate the left-rising ramp at the start of Meteorite, then scramble up and left to a spruce tree belay. Begin where faint horizontal dike bands extend horizontally to the right from the ramp across. About 25' along these bands is a 12'-tall, shallow, left-facing corner.
P1 5.8 G (5.5 R): Traverse right following thin dikes to the 6'-high, shallow, left-facing corner. Up this corner to its top, then angle up and left to an overlap. Over this to the bottom of a sharp, left-leaning tips crack. Follow this incredible crack for 50' as it gradually widens to hands, to an alcove at the base of a right-arching roof, the Death Block Belay (named for a scary, 8' wide, cantilevered flake held in place by magic). Fixed anchor. 140'
P2 5.8 G: Step left and go straight up the face past an hourglass flake and several horizontals (#3 Camalot) to a slab. Angle up and right (#0.3 Camalot) to an amazing perch with a fixed anchor. 80'
● P3 5.10d G: Step right and go straight up pure friction to a left-rising edge below a ceiling. Traverse left following the left-rising edge to the left edge of the slab. Break through the flap on jugs (5.10d crux, or 5.8 A0), then go straight up the slab to a fixed anchor. 130'
◉ P4 5.8 G: Go up a narrow tongue of rock that breaks through an overlap, then work up and slightly right on incredible waterworn rock to a left-leaning crack (optional #2 Camalot). Cross this and go up the final slab to a shallow dish at the top of the cliff with a fixed anchor. 80'
Gear: For P1: a standard rack to 2"; for P2: 1 ea #3 and #0.3 Camalot; for P4: optional #2 Camalot.
Descent: Rappel 200' to the P2 anchor, then another 200' rappel to the base. Avoid rappelling from the P1 or P3 anchors (difficult pulls).
Cross-Eyed and Painless 5.10a G 390' ★★
Slab climbing is the name of the game here, although there are enough cool features to keep it interesting. If you top out, you can rappel down two stations and climb P3-P4 of Climbing On Very Intricate Dimples, Soul Confusion, and Valer Doharis.
Start: Same as Climbing on Very Intricate Dimples: 30' right of the prominent flake of Deja View at a low slab with a bolt high on the right. As usual at Sugarloaf, getting to the good rock is problematic.
P1 5.10a G: Climb the slab with a smiley-face-shaped ledge down low past the bolt, then past a couple trees, to blunt arête with 2 bolts. Up this (crux) to a crack which is followed to a fixed belay. (The P1 belay of Climbing on Very Intricate Dimples is just to the right.) 100'
P2 5.8 G: Go up the left-leaning crack, then step right onto a slab. Continue up short slabs (mix of bolts and gear) to a tongue of rock that splits two tree islands. Easier clean rock leads to a fixed belay on top of the left tree island. (The P2 anchors of Climbing Very Intricate Dimples and Soul Confusion are to the right.) 100'
P3 5.8+ G ★★★★: Continue up and slightly left on easy rock to a bulge and beautiful dimpled rock. 100'
P4 5.8 G ★★★★: Go straight up to overlap, another slab, another overlap, then trend left over the final two overlaps to the a fixed anchor just below the trees. 90'
Descent: Rappel the route with a 70m rope.
Climbing on Very Intricate Dimples (aka COVID 19) 5.10b G 350' ★★
Start: 30' right of the prominent flake of Deja View [route #13, volume 2, page 253] at a low slab with a high bolt on the right.
P1 5.9 G: Climb the slab and then up a blunt arête to a roof crack. Trend up and right on easier ground to a fixed anchor. 100'
P2 5.8 G: Up easy corners and cracks until even with bolt. Traverse right to tree island under a distinct crack. Climb the crack to the P2 anchor of Soul Confusion. 100'
◉ P3 5.10b G ★★★★: Trend up and left to roof, surmount, and then up the beautiful face. 100'
P4 5.6 G: Climb crack, then slab. Move up and left on gear to right-leaning crack to a fixed anchor. 50'
Descent: Rappel the route with a single 70m rope.
Soul Confusion 5.10c G 440' ★★★
[Located between routes #14 and #15, volume 2, page 273]
Another full-length route with a clean bottom section. Each pitch is slightly longer than 100', but it can be rappelled with a single 60m rope with care (much better with a 70m rope).
Start: Locate a clean slab—one of the rare places where the slab is clean beginning at the ground—between Another Botanical Wonder and Heroes, bisected by a left-facing, vegetated corner. Begin left of the vegetated corner, on top of a dirt cone, at the base of a left-rising crack that splits the slab. 50' up and right is a roof in a left-facing corner.
P1 5.10b G: Go up the left-rising crack a few feet (#1 Camalot), then straight up the slab to the roof in the left-facing corner. Over this (large stopper), then up more slab to a tree-pulling finish, and a fixed anchor just above. 110'
P2 5.9+ G: Climb the slab straight up, then angle left to a right-facing corner. Go up the corner, then step left to a small pedestal ledge. Follow a left-curving horizontal crack to belay ledge. 110'
P3 5.10c G: Step right and climb face to obvious crack which diminishes into a small, curving, right-facing corner. Belay under ceilings. 110'
P4 5.7 G: Climb into corner above belay, then pull spectacularly out onto the slab directly above. Diagonal up left to a line of weaknesses, then back right through the next two overlaps. Go up the final slab to the trees. 110'
Descent: Rappel the route with a single 60m rope. Some of the rappels just make it.
Gear: To 2".
Valar Dohaeris 5.10a G (5.7 R) 360' ★★★
The sister route to Soul Confusion. All belays are fixed, and the route avoids all tree islands.
Start: 25' right of Soul Confusion, scramble up a fern slope to a birch tree.
P1 5.9 G: Climb a slab up and left to a right-leaning crack. Follow the crack to its top, then go straight up the face. Trend left on the slab to a fixed anchor (shared with Soul Confusion). 100'
P2 5.9 G: Follow Soul Confusion up clean face for 15', then straight up. Move right to a crack that leads to a ceiling. Over this to a fixed anchor. 90'
P3 5.9 G: Up right to groove, up stepped corners to fixed anchor. Classic and fun. 90'
P4 10a G: Up and slightly right to bulge and a stand-up crux move. Continue straight up over bulges trending left to a fixed anchor. 80'
Gear: To 2". RPs mandatory for P3.
Descent: Rappel with a single 60m rope.
Dreadnaught 5.8+ G 300'
Start: Same as Valar Dohaeris.
P1 5.8 G: Start as for Valar Dohaeris: up diagonally left to a crack, then up right-leaning crack to its top at a dirt ledge. Cross rightwards onto a clean slab, then up right to blunt arête that leads to flakes. Belay at prominent 1"-2" crack. 105'
P2 5.7 G: Straight up crack, overlap, then up face to bigger overlap. Over this, then up face to a fixed belay (shared with P2 of Valar Dohaeris). 100'
P3 5.8+ G: Up face into shallow groove, then follow variably-sized cracks on right edge of slab to a fixed anchor. 95'
Gear: To 2".
The Dark Side 5.9 G 315' ★★★
Like many routes at Sugarloaf, an unpleasant first pitch leads to good climbing above.
Start: Same as Heroes [route #15, volume 2, page 273].
P1 5.5 G: Make your way up the slab and belay on tree ledge with fixed anchor. (This pitch more-or-less follows P1 of Heroes, but instead of making a 5.8 move right and climbing tree islands, it goes straight up.) 95'
P2 5.9 G: Move left under roof to gain a left-facing corner. Go up the corner and break onto the slab before the corner becomes dirty; stay left of tree island. Go up a crack to a fixed anchor. Watch for rope drag. 100'
P3 5.7 G: Move up and left across slab to a right-facing corner. Step left then follow varying-sized crack to fixed anchor (shared with P3 of Dreadnaught). 120'
Descent: Rappel Valor Dohaeris with a 60m rope.
Gear: Gear to 2".
Gyros 5.8+ G 210'
P1 5.5 G: Climb P1 of The Dark Side to the fixed anchor under roof. 95'
P2 5.8+ G: Go up right into corner, then follow this past fixed pin to a defined crack. Climb the crack halfway, then exit right to a flake system, then to a tree island, then left to the fixed anchor shared with P2 of The Dark Side. 115'
Gear: To 1".
Location: Off NY 28 near North River
Aspect: South
Height: 60'
Quality: ★
Approach: 5 min; easy
Summary:
The Hooper Garnet Mine is an old garnet mine near North River. Within the horseshoe-shaped mine is an orange, pyramid-shaped face. The inside of the mine is flat with small trees and moss, and ringed with talus. Being so flat, the field area holds water in puddles long after a rain. The cliff itself is relatively solid and natural-looking, showing few signs of mining, and the bright-orange rock lends a splash of color to offset the green of the surrounding forests. The face has yielded several quality topropes at a moderate grade. Be aware that you have to build your own anchors. The south-facing wall with the climbing is directly in front of you as you enter the mine.
Access: Parking is on the property of Garnet Hill Lodge (www.garnet-hill.com, 518.251.2444), and it is recommended that you check at the lodge to let them know you'll be parking near the tennis courts and accessing the mine. The proprietors seem happy to allow visitors access from their property. The mine itself is on state property.
Directions: From North Creek (0.0 mile), at the intersection of NY 28 and NY 28N, drive north on NY 28 5.2 miles to 13th Lake Road (CR 78) in North River. Turn left onto 13th Lake Road. At 8.5 miles the pavement ends at a fork; take the left branch signed for Garnet Hill Lodge and Cross Country Ski Center. At 9.6 miles reach another intersection. Bear right for the Cross Country Ski Center. At the Ski Center complex, park at the tennis court which is clearly visible on the right 572083,4839998. On the left side of the tennis courts is a dirt road leading uphill signed for William Blake Pond and Hooper Mine. Follow this 200' to an eroded trail on the right. Follow the eroded trail to an immediate branch; stay left, signed for Hooper Mine, and follow this trail which runs parallel to the dirt road. Just before the trail is about to merge back onto the dirt road, there is a switchback; follow the switchback uphill and, after a few minutes, emerge into the mine. The orange, pyramid-shaped face with the climbing is in front of you as you enter the mine 572378,4839950. The established routes are on the right side of the face, below the tallest section. If you look carefully, you will find a 2"-diameter pipe sticking out of the rock just above ground level that is a useful landmark for locating the routes.
Princess Garnet 5.7 TR 60'
Begin a few feet left of the ground-level pipe, below a left-facing corner 12' up. Climb up to the corner, then up the arête that forms the corner to the top.
Izi Pizi 5.6 TR 60'
Begin at the ground-level pipe and climb up to a ledge, then straight up the face past three left-leaning cracks, staying between the arête of Princess Garnet and the right-leaning crack of Clifford the Big Red Dog.
Clifford the Big Red Dog 5.6 TR 65'
Begin a few feet right of the ground-level pipe. Go up the face to a right-leaning crack. Follow this to the skyline on the right side of the face. Go up a corner, then angle up and left to the top.
[Volume 2, page 278]
With a location next to the now-open Sugarloaf, excellent rock, and being 2 min off the road, this cliff is sure to become more popular.
Riptide 5.8 G 60' ★★★
Start: Left of the three prominent right-facing corners is a buttress split by a right-rising horizontal crack. Begin below the left end of this crack, below a vertical crack in an open book 10' up.
P1 5.8+ G: Go up the handcrack in the open book to the prominent horizontal crack that splits the buttress. Go straight up past two more horizontal cracks to a fixed anchor. 60'
BLF 5.9 G 85' ★★
Start: 5' left of Fritzie's Honor, just left of the low roofs.
P1 5.9 G: (V1) Stick clip, then climb onto the sloping shelf at the base of main right-facing corner of Fritzie's Honor. Go up the corner 10', then break left around the arête at an obvious flake. Climb the face right of the giant precarious pancake flake, then up a crack in a right-facing corner to its top. Move up and right over a bulge to a fixed anchor shared with Fritzie's Honor. 85'
● V1 Pudding Snack 5.11b G ★★★: Excellent and devious. Begin 10' to the left at a giant, three-trunked tree, below a jug-ledge at head height. This is below a shallow, smooth, green-stained open book 20' up. Mantel onto the jug-ledge, then up to a good left-facing flake. Move left into the shallow, green-stained open book and climb to its top. Go up and right around a bulge, then join the main route below the giant precarious pancake flake.
Fritzie's Honor 5.9+ G 85' ★★★
[route #1, volume 2, page 278]
The original route on the face has been cleaned and equipped, and is now an excellent lead.
Start: Locate the right-rising ledge that splits the right end of the cliff in two. Walk up the ledge to the third right-facing corner that begins above a shoulder-high ceiling.
◉ P1 5.9+ G: From the right end of the ceiling, move up onto a left-rising slab. Follow the slab up and left to the corner. Go up the corner to a right-facing, right-rising, stepped overhang. Step left around the corner to another, more shallow corner, and layback up this to the fixed anchor. 85'
Gear: A few cams to 1".
Peach Meat 5.11b G 85' ★★★★
Great face climbing on excellent, naturally clean stone; sustained. And who doesn't love peach meat?
Start: 10' right of the shoulder-high ceiling at the start of Fritzie's Honor [route #1, volume 2, page 278], behind a white birch, at a chest-high, left-leaning fingercrack on a shallow ramp.
● P1 5.11b G: Use the fingercrack to get established on the face, then climb up to the highest of the easy holds. Make a hard boulder move (crux) to stance on the highest of these holds. Move right and climb a shallow open book to its top, then step right again into another shallow open book. Climb jugs to a tombstone flake, then go over this to a headwall. Go up the right side of the headwall (second crux) to a roof. Finish on easier climbing through two roofs. Fixed anchor at the top. 85'
Fruit Cup 5.11a G 85' ★★★
Great moves up clean rock with two distinct cruxes.
Start: 10' right of Peach Meat below a ceiling 10' up that has a small, left-facing offset corner in it.
P1 5.11a G: Stick clip. Go up to the ceiling and reach up to some good holds on the face above. Make a hard move up and left (crux) to a right-facing corner. Follow the corner to its top, then up holds in a green-tinted face (stay just left of a hanging tree). A hard move up and left gains a sloping stance beneath a ceiling. Break the ceiling in the middle (second crux) to reach an orange flake and fixed anchor just above. 85'
Gear: Green Alien, blue TCU, #0.4 Camalot, #1 Camalot, yellow Alien.
Hit Girl 5.11a G 80' ★★
Climbs really cool features, although a bit dirty (as of Aug 2018).
Start: Walk 30' up and right from Fritzie's Honor on the right-rising ledge that divides the right end of the cliff; begin below a right-facing flake that begins 8' up.
P1 5.11a G: Gain the flake and climb to its top. Rail up and left on a good edge, move up to another rail, then go up and right on flakes and jugs. A hard mantel gains a rounded stance below a headwall. Go up the headwall on tiny crimps and smears (crux) to another rounded stance, then up more easily to a fixed anchor. 80'
Gear: A few cams to #0.5 Camalot.
These routes are located on the lower wall—the wall below the right-rising ledge that divides the right end of the cliff.
Clash of the Lichens 5.11b PG 55' ★★
Two consecutive boulder problems on this one. Make sure to clip short on the first bolt to avoid hitting a slab.
Start: Below the right end of a low roof in a bottomless sentry box. This is in the center of some recent rockfall.
P1 5.11a PG: Go up an arête on the left side of the sentry box to the roof. Go up a short, right-facing corner to its top (#3 Camalot goes perfectly in horizontal crack at the top), then up the face to a fixed anchor. 55'
That's What She Said 5.11b G 60' ★★★
Start: 6' right of Clash of the Lichens at an 8'-tall square pillar.
● P1 5.11b G: Gain the top of the pillar and step left into a scoop. Climb up using a series of right-facing flakes. Make an unobvious traverse right using right-facing holds, then up (crux) to a ledge with a fixed anchor. 60'
❏Variation to Gemini [route #13, volume 2, page 284]:
V1 Enterprise 5.7+ G ★★: Climb the first 15' of Gemini to a left-rising crack. Follow this left around the corner to O'Ryan's Belt. This bypasses the crackless crux move of O'Ryan's Belt and slightly eases the difficulty rating for the whole route. One could also use this as an alternate start to Andromeda.
❏The route Aquarius is 20' right of Starline, not Asteroid.
❏The gear description for Cosmic Ray calls for a 0.125 Tricam (the white one). This should be 0.25 (the black one).
Solar Wind 5.7 PG 60' ★★
The first move is difficult and unprotected, and a fall here would continue off the ledge; the belayer should be firmly anchored. It is much easier (and protectable) to traverse in from the base of Cosmic Ray.
Start: 10' right of Cosmic Ray [route #7, volume 2, page 284] at a thin seam that doesn't quite touch down on the ledge.
P1 5.7 PG: Climb the seam, up a small left-facing corner, through a broken, steep section, to a final low-angle face above the end of the seam. Pockets to the right offer good protection for the last moves. 60'
Black Holes Matter 5.10b G (5.6 R) 70' ★★★
Start: Left of O'Ryan's Belt [route #11, volume 2, page 284] at a V-notch in the slab, just left of a tree. This is the same start as Illegal Aliens.
P1 5.10b G (5.6 R): Climb up notch to the steep wall. Move right and up 5', stretching for an invisible hold on the bulge above (a 5' 6" climber can barely reach it using the highest foothold). Climb up through the bulge to a good horizontal, then continue upward as the difficulty eases, to reach a left-rising, right-facing flake. Go up this to its top and run it out straight up to the left side of a block on a shelf. Move left and up to a fixed anchor. 70'
Illegal Aliens 5.10c PG 70' ★★★
This longstanding project was finally led [listed as "Unnamed2", route #10, volume 2, page 284]. It has extremely technical gear, where poor judgement with placements could be disastrous.
Start: 6' right of Starstruck [route #9, volume 2, page 294] at a V-notch in the slab at ground level, (climber's) left of a tree growing against the base of the cliff, and 12' left of Andromeda.
P1 5.10c PG: Climb up V-notch and right-leaning vertical crack to bulge. Climb directly through bulge via tips crack to reach a horizontal. Continue up the face using intermittent vertical seams and sloping horizontals, past a left-rising edge, to a fixed anchor at the top of the cliff. 70'
Gear: Small nuts, medium to large offset brass nuts, a set of standard offset nuts, micro cams, cams to 3/4", and one #9 Hex or similarly sized Tri-Cam (note that cams do not work well in one large pocket).
Ben to the Stars 5.10a G 70' ★★
Another longstanding project was finally led [listed as "Unnamed4", route #14, volume 2, page 284]
Start: 3' left of Quantum Entanglement [route #15, volume 2, page 284], at a small left-rising ramp at ground level.
P1 5.10a G: Step up the ramp and rounded holds to a crack 8' up and 4' right of the large right-facing corner of Gemini. Follow the right-rising crack to its end where it joins with Quantum Entanglement, then climb up good holds on the face to the left. When the angle changes to overhanging, move right onto an arête and go up to a stance under an overhang. Climb through the overhang via a fingercrack in a right-facing corner on the left. 70'
Location: Near Gore Mountain, accessed from NY 8 near Wevertown
Aspect: Southeast
Height: 60'
Quality: ★★★★★
Approach: 30 min, moderate
Summary: Mostly high-end crack and face routes with excellent rock in a remote setting; the premier "steep" climbing location in the park, although Lost Hunters Cliff is now a close second.
This cliff is located in the Siamese Ponds Wilderness area, low on the southernmost slopes of Gore Mountain. Unlike the main cliffs on Gore Mountain, which are located on state land in the ski area managed by ORDA where climbing is mysteriously prohibited, this cliff is located in the adjacent wilderness area and approached from the trail to Second Pond.
There are presently two cliffs: the Main Face and the North of Nowhere Wall. The Main Face is sheer and overhangs by 20°, and as such, none of the routes are easy. The rock is generally good, with some patina features similar to those on Crane Mountain. The North of Nowhere Wall is taller, vertical-to-overhanging with cracks and plated face features. Steep rock is rare in the Adirondack Park, and steep rock with solid holds is even rarer. Comparable cliffs include The Crown, Crime Scene, Spider's Web, The Honey Pot, and Lost Hunters Cliff.
The setting at both walls is idyllic and quiet, and their positions in the open forest give the feeling of being high in the forest canopy.
There are many quality boulders scattered around the forest near the cliff and along the approach. The best collection of giant boulders, however, is near the road 577470,4833429.
Directions: Locate Chatiemac Road (4.3 miles south of the intersection of NY 8 and NY 28, and 1.5 miles north of the post office in Baker's Mills). Drive west on Chatiemac Road for 2.2 miles to the Second Pond Trailhead on the right 577186,4832895.
From the trailhead (0 hr 0 min), follow the trail north past a pond (on the left), then gently uphill. At 10 min, turn right off the trail 576782,4833697 at a 3'-tall pointed boulder on a bearing of 76°. Pick up a good path and follow this across Black Mountain Brook at 13 min, and up to a height of land 577197,4833972 at 20 min. Now in more open forest, continue on the path (following that same bearing) to the cliff 577573,4834208 at 30 min.
The Main Face of Chatiemac 577573,4834208 is the easiest to reach, and has a pleasant open base area. The face overhangs 15', so the base area remains dry in the rain.
Just left of the left end of the cliff is a high-quality boulder with problems from V0 to V9.
To reach the top of the Main Face, go up a broad-sloped gully right of (and around the corner from) Round Two. At the top of the gully, go west away from the cliff until you can drop back down some breaks in the subcliffs to the top of the wall. A bit circuitous.
Pathfinder 5.13 G 30' ★★★
Start: 15' left of Zah Dude below an orange face with a left-facing sidepull.
P1 5.13 G: Go straight up the face to a horizontal break. Shuffle left to an alcove with a fixed anchor. 30'
Zah Dude 5.13b G 60' ★★★★★
The most obvious line at Chatiemac, and was the first route to be completed here. Sustained and intricate. The technical crux is just above the horizontal, and the redpoint crux is the overhanging crack to the anchors. There are some big moves which are harder for shorter climbers. Considered hard for the grade.
Start: On the left side of the face is a sheltered cave. Begin 30' right of the cave below a shallow, right-facing corner with a foot ledge 4' up.
● P1 5.13b G: Go up the corner, then right-leaning seam to a good horizontal crack. (There is an almost-always-wet set of holds to the right that make this section slightly easier, but are not required.) Move up a short, shallow, orange left-facing corner to its top, then punch it up and right past a square hold (crux) in the seam to a stance on the right on an orange, right-rising rail. Move back left and follow a seam–crack straight up to the top of the wall. Fixed anchor. 60'
Socratic Inquiry 5.12d G 60' ★★★★★
Another dramatic, overhanging route with a hard start (5.12) to a good rest, then a sustained headwall topped by a heart-breaker dyno and mantle out of the pool.
Start: 25' right of Zah Dude, on the right side of some boulders below a right-leaning offwidth crack 6' up.
● P1 5.12d G: Climb up the right-leaning crack, then go up and left over an orange shield of rock (first crux) to a right-facing corner below a large roof. Break through the roof and climb parallel cracks up the overhanging headwall to their top. A final dyno (second crux) gains the slopers at the top of the wall. Mantel out to a fixed anchor. 60'
Round Two 5.12b G 45' ★★★★
Climbs a dramatic crack that leans 30° to the right on an overhanging wall. Sequential and pumpy.
Start: At a right-leaning handcrack on the right end of the wall, 50' right of Socratic Inquiry.
● P1 5.12b G: Climb the handcrack to a ledge 10' up. Make a long reach to gain the main crack and follow this to its end. Move up and left through a bulge to a fixed anchor. 45'
Chatiemac Cliff ● Main Face
Nature's Pocket Wall
From the Zah Dude area, walk right past Round Two to the steep slope used to access the top of the cliff. Continue to the right along the base of the cliff to a right-facing, 30° overhanging wall in a boulder-filled alcove. The cliff base is open and pleasant, with a feeling of being high in the forest canopy.
To reach the top of this wall, go up the gully right of Round Two for 20', then follow a rising ledge out right above the wall. There are good trees from which to rappel to the route anchors.
The Get Down 5.11a G 45' ★★★★
Big moves on giant jugs, as if it were set in a gym. This is the best (and only) warmup for this cliff.
Start: 40' left of Nature's Pocket below the steepest section of the wall, on top of the left of three large boulders.
● P1 5.11a G: Go up the steep, black and white rock to the where the wall angle changes. Continue up the face to a roof and fixed anchor just above. 45'
Nature's Pocket 5.11c G 45' ★★★★★
A high-quality line featuring gymnastic opening moves and a deceptively steep upper wall with unique two-finger and fist-sized pockets; incredible rock quality.
Start: At a very overhanging section of rock just left of the 30° overhanging wall, below a smile-shaped incut hold 7' up, and an angular left-facing flake 10' up.
● P1 5.11c G: Stick clip, then make powerful moves up over a bulge (crux) to an incut rail. Move right on the rail, then mantel onto a sloped stance. Continue up the steeper-than-it-looks, brown-colored wall past several right-facing sidepulls and cool pockets to a fixed anchor. 45'
Pushit 5.13a G 45' ★★★★★
One of the best "steep" routes in the park. Good rock and good holds; sustained. This right-facing wall faces northeast and is shaded most of the day. Remains wet in the spring.
Start: On the downhill, left-hand side of the right-facing, 30°-overhanging wall.
● P1 5.13a G: Climb a series of crimps up a sheer wall to a ledge, then to a second ledge. Follow an arching crack to gain a horizontal. Launch up the overhanging face to the top. 45'
Chatiemac Cliff
North of Nowhere Wall
The southeast-facing North of Nowhere Wall is located west of—and uphill from—the Main Face by 500'. The left end of the cliff is 100' tall and has a steep, narrow section of rock with a flat base; most of the routes are clustered in this area. The terrain rises uphill to the right where the cliff diminishes in height, but has promising sections for new, short, hard routes. The obvious, left-leaning, snaking crack Battle of the Blerch is located here.
To access the top, walk right and uphill past Battle of the Blerch. The terrain narrows to a dike-like gully that leads to the slopes above the cliff. The top is thick with vegetation and blowdown, and there are many ledges and gullies, making this a difficult cliff to set topropes.
A good strategy is to lead North of Nowhere. From this anchor you can reach left to the anchors on Magua, Hawkeye and North of Magua, and when lowering, you can swing right to the anchor of 99 Problems.
Directions: At the height of land about 1 min before the Main Face, switchback to the left and walk uphill on a path to this cliff 577458,4834313.
Hawkeye 5.11a G 90' ★★★★
Excellent, varied climbing with interesting plated holds.
Start: 5' left of Magua at a V-notch in the knife-edge-topped boulder below a slab.
● P1 5.11a G: Up the slab to an overlap. Over this then step left to the overhanging wave. Move over the wave (first crux) using several plates and a cool handlebar hold to a stance on a slab. Move right over the next bulge to another stance on a slab, then up the juggy arête to meet Magua below the roof. Follow Magua over the roof (second crux) to a fixed anchor. 90'
Magua 5.12d G 90' ★★★
Start: 5' left of North of Nowhere on top of a knife-edge-topped boulder.
● P1 5.12d G: (V1) Step onto the wall using a good incut jug, then undercling on a slab-ramp up and left under an overhanging wave of rock. About halfway across, go over the wave (crux) to jugs on the lip. Mantel onto the face, then up a short arête onto a slab. Go up and right over a bulge, then straight up the steep face on crimps—there is one 5.11a dynamic move in the middle—to the roof. Pull over the roof on protruding nipples to a fixed anchor just above. 90'
◉ V1 North of Magua 5.10b G ★★★★: This high-quality variation accesses the upper shield of the normal route reducing the overall grade of 5.11a. Start on North of Nowhere and climb to the slab stance above the short handcrack. Move up and left to an arête, then up Magua to the top. Gear: #1 Camalot.
North of Nowhere 5.10b G 90' ★★★★
A really good route in the middle of nowhere. There's a little of everything: overhanging bulges, a moderate crack, a steep face with amazing holds, and a roof.
Start: On the left side the flat area, at a shallow, 6'-tall right-facing corner above a wet patch with a great jug 7' up. This is 15' left of I Got 99 Problems But This Pitch Ain't One, the handcrack in black rock.
P1 5.10b G: Stick clip. Boulder up onto a bulge, then over another bulge to a short handcrack. Up this, then mantel onto a slab. Go up and right to an orange, left-facing open book and climb it to its top. Continue up a steep face with amazing incut plates to a roof. Step left and break the roof at a right-leaning crack. Up the crack to a fixed anchor. 90'
Gear: Cams to #1 Camalot, small to medium nuts.
I Got 99 Problems But This Pitch Ain't One 5.11d G 35' ★★★★
This trad masterpiece ascends the central black crack in the overhanging wall. When the crack narrows, it is flared and lacks good jams; the plates on the left wall, however, make it accessible. Can be toproped after climbing North of Nowhere.
Start: At a handcrack in black rock in the center of the flat area at the base of the cliff.
P1 5.11d PG: Up the handcrack into a flared pod. Follow a dramatic, rounded, overhanging, flared crack straight up (there are some helpful crimp-plates on the left) to a fixed anchor. 35'
Gear: In this order: Camalots #2, #0.3, 0.75, 0.5; green Alien; #6 Stopper; green Alien.
Fault Line 5.13a G 35' ★★★★
This amazing laser-cut tips crack overhangs 10'. A direct start up the seam, although contrived, would be impressive.
Start: On the right side of the flat area at a left-facing, right-leaning corner with an offwidth crack; same as South of Somewhere.
● P1 5.13a G: Stick clip, then stem up 10' between the ramp and the seam. Move left into the seam (crux) and climb it to where it becomes a left-facing edge with some good holds at the top. Fixed anchor just above. 35'
South of Somewhere 5.8 G 70' ★★★
Lots of laybacking on this one, and, despite appearances, only one large piece is required.
Start: Same as Fault Line.
P1 5.8 G: Up the corner to a chockstone at its top. Mantel the chockstone, then follow a handcrack up and left to its top. Make a cool face move onto a slab to access the fixed anchor. 70'
Gear: Single set of cams to #5 Camalot.
Battle of the Blerch 5.10d G 70' ★★★★
Climbs the difficult-to-miss left-leaning, snaking crack on a smooth buttress of rock.
Start: From the North of Nowhere area, follow the cliff base up and right 300' to a smooth buttress of rock. Begin below a left-leaning, snaking handcrack.
P1 5.10d G: Up the crack to its top where it doglegs left and ends. Move left around the blunt arête to a good flake-jug. Make a puzzling traverse left to the base of a wide water groove, then follow this straight up to a fixed anchor. 70'
Gear: To #3 Camalot
Location: Between North River and Indian Lake, accessed from NY 28, north of Starbuck Mountain along the Hudson River.
Aspect: South
Height: 130'
Approach: 3 hr, difficult
Quality:
Summary: Mostly mossy slab with some isolated individual, shorter routes; may hold potential for more with considerable cleaning.
Harris Rift Mountain lies north of Starbuck Mt along the Hudson River. The largest section of rock appear to have much in common with the other cliffs in the region, being broken, dirty and low angle. Exploration has reveal a few gems, though, such as Alpha and Omega described here.
Directions: A direct approach is possible from the parking of Starbuck Mountain [volume 2, page 282], but not recommended. For this approach, park as for Starbuck Mountain, walk northwest following the state land property boundary to the valley separating Starbuck Mountain and Casey Mountain/Gay Mountain, then bushwhack north. The navigation required is demanding.
A more reasonable approach uses the new DEC trail to OK Slip Falls. From Indian Lake (the intersection of NY 28 and NY 30), drive east (towards North Creek) on NY 28 for 7.5 miles to a parking area on the right (south) side of the road 570025,4846956. Walk west (towards Indian Lake) on the road for 0.2 mile to the trail on the north side of the road 569722,4846809.
Follow the blue-marked trail 3 miles to OK Slip Falls 571675,4850116, then follow a heading of 80° for almost a mile to where a moderate slope leads down to a broad, flat bench of land 100' above the Hudson. This is a good camping spot. Walk right (east) along the Hudson for several minutes past old paint blazes and other evidence of private trails, until you reach a stream entering the Hudson River 0573149,4850524. Go 8 min up this stream to a pair of drainages that enter from the left. The first one is drier, less distinct, and easy to miss; this is the way to the Harris Rift Cliffs. The second drainage is less than 300' away and has an unmistakable real stream; this one leads to Greek Crag and the routes Alpha and Omega.
Harris Rift Mountain
Harris Rift Cliffs
Directions: From the first drainage 0573041,4850160, follow this steeply uphill to gain about 400' elevation. The grade eases as the stream peters out at an overgrown boggy section. Skirt this on the left (north) side and the rock of Harris Rift Left comes into view above on the left 573651,4850034. Very little exploration has been done at this cliff. Continue east through a narrowing at a height-of-land where there is a small craggy outcrop on the left. Walk past this and another small bog to the Harris Rift Right up to your left 574113,4849891.
Descent: Walk around the (climber') right end of the cliff.
Fifty is the New Forty 5.7 TR 130'
With considerable de-mossing, this could be a worthwhile lead. For now it's a toprope. Locate the slab near the right end of the cliff. Start just left of the lowest point 0574135,4849882. Angle right to a crack and follow this through the upper half of the face. There is a low friction crux and an upper crux where the crack leads through a bulge. Scramble with care up the vegetated slope above to a white pine tree.
Harris Rift Mountain
Greek Crag
This is a curious narrow fin of rock lying at 2200' on Starbuck Mountain's northern edge. It was located by accident in an attempt to reach Harris Rift Mountain's more visible cliffs.
Directions: From the second drainage 0572997,4850069, climb steeply uphill (easier on right bank) for 30 min. The prominent left-facing corner of Alpha appears on your left 0573496,4849670 just about when the rocky streamed peters out. Omega is about 200' right.
Alpha 5.7 PG 70' ★★
Start: At a prominent left-facing corner just above where the stream disappears.
P1 5.7 PG: Climb the corner until it ends. Exit right (crux) to a wide horizontal. Make a few moves (staying just left of a small spruce tree) to the crest of the formation. 70'
Descent: Scramble down the back of the fin and walk around left end.
Omega 5.10+ TR 40' ★★
200' right of Alpha locate an overhanging handcrack. Climb this to the trees above. Once it goes vertical it becomes wider (and dirtier, but not an issue if you've made it that far). A lead would require doubles to 3" and tape.
Location: Minerva, off the Northwoods Club Road.
Aspect: South
Height: 130'
Approach: 1 hr 45 min, moderate
Quality:
Summary: A remote, brushy cliff overlooking the Hudson River with a couple exploratory routes.
Directions: From North Creek (0.0 mile), at the intersection of NY 28 and NY 28N, drive east on NY 28N. At 9.6 miles turn left onto Northwoods Club Road. At 16.4 miles park at the Blue Ledges Trailhead 571674,4853679. Don't follow the Blue Ledges Trail; instead, bushwhack south. At 0.3 mile skirt a swamp on the left. Continue bushwhacking to Kettle Mountain 572599,4850967.
The cliff is a mix of brushy ledges and angular blocks; most of these are steep-to-overhanging. The rock offers few natural weaknesses, and opportunities for free climbing are few. Descent is easy around the east end.
Timpani 5.8 TR 120'
The route lies under a medium-size birch tree at the cliff edge that is 60' east of the prominent large oak tree above the clifftop. Ascend a series of blocky steps to an overhang in a square recess. Continue past a flake-filled chimney to a ledge with trees, then up a broken right-facing corner to the top.
Rock Hudson 5.5 G 130'
Start: In a large right-facing corner approximately 60' left of the right edge on the cliff.
P1 5.5 G: Climb the left-leaning, 3" crack to a birch tree. From the ledge behind the tree, go right up slabby rock to another corner on the left that leads to a larger ledge and a belay at an oak tree. 20' left of this tree is a corner with a S-shaped crack. Surmount this corner and angle rightwards through some light bushes to the top. 130'
❏The fee for put-in at Clark's Indian Lake Marina [volume 2, page 253] is $8.00, as of 2017.
❏The fee for parking at The Cabins [volume 2, page 258] is $5.00 as of 2020.
❏The hiking trail up Chimney Mountain is now marked with red markers (as opposed to blue, as per the directions on page 258, volume 2). There are still remnants of blue markers here and there.
Chimney Mountain
True Summit Slabs
Windfall 5.7 G 135'
A slab walk interrupted by a handful of fifth class moves; a worthy finish to Sunfall [route #6, volume 2, page 261].
Start: At the tree island atop Sunfall.
P1 5.7 G: Walk up and left along the slab to reach a right-rising corner below some scary looking, very large boulders. Follow this corner to where it dead-ends at a short vertical wall. Up this (crux) to a short right-facing corner on easy slab. Continue to a tree belay. 135'
❏The fee for parking at The Cabins [volume 2, page 262] is $5.00 as of 2020.
Pinnacle Mountain
The Peninsula
Horf 5.8 G 50' ★
Start: On the outer, east-facing wall of the Peninsula are two crack lines; this is the left, and easier, line (Dorf is the other).
P1 5.8 G: Follow the crack system, which jogs right, then back left, to an alcove at the top of the Peninsula. Gear anchor. 50'
Gear: Up to 4".
Descent: You can scramble down the other side into the box canyon behind the Peninsula.
Dorf 5.10a G 50' ★
Short, but has all crack sizes from finger-size to offwidth.
Start: 6' right of Horf; this is the right-hand of two cracklines.
P1 5.10a G: Follow the crack up, which jogs right, then back left, then straight up to a roof. Go left around the roof and up into an alcove at the top of the Peninsula. Gear anchor. 50'
Gear: To 5".
Finding the Rat 5.10a G 30' ★★
Fun, but short.
Start: From the Peninsula, walk right towards the Main Face for 50'. Step up onto some square blocks below a short wall with a right-leaning crack.
P1 5.10a G: Climb the crack to the top. Fixed anchor on the left. 30'
On Slot 5.13b G 100' ★★★★
This is the second crack left of Jug Monkey [route #11, volume 2, page 301]. The first half is bolt-protected face-climbing with hard crimping, sidepulls, and a critical, 4"-high, vertical finger-slot. The second half is a gear-protected crack. Sustained and full value.
Start: Just left of Jug Monkey at the base of a left-rising, blocky staircase-like ledge.
P1 5.13b G: Hand traverse the blocky staircase up and left to its end, then go up a shallow right-facing corner to its top with the eponymous slot. Sustained moves involving sidepulls and crimps (crux) lead to the base of a crack. Follow this finger-to-hand crack straight up (5.11c) past two horizontal breaks to the top of the cliff. Fixed anchor. 100'
Gear: The first half is bolt protected, the second half requires nuts and cams to #1 Camalot. (Specifically, green Alien, #1 Wild Country Rock, #5 Black Diamond Stopper, #0.4 Camalot, #0.3 Camalot, #1 Camalot.)
The Call of Cthulhu 5.13a PG 100' ★★★★
Cthulhu, pronounced "ke-THOO-loo", is an octopus-like monster. This is the first crack left of Jug Monkey [route #11, volume 2, page 301]. It features easy blocky terrain to start, hard laybacking through an overhanging wave, then full-on 5.12 crack climbing that eases to 5.10 near the top. There are several knee bars.
Start: Same as On Slot.
P1 5.13a G: Step up onto the first "step" of the staircase, then go straight up blocky terrain to a tan-colored open book corner. Go up the corner to gain a seam that breaks through an overhanging wave. The crack opens to flared hands; follow this past two horizontal breaks to a fixed anchor at the top. 100'
Gear: The first half is bolt protected, the second half requires nuts and cams to #1 Camalot.
Cannonball 5.12b G 70' ★★★
Sustained face climbing up a seam-crack. Great photos can be had from the top of the mini-cliff that forms the right side of the hallway.
Start: Right of Jug Monkey is a hallway-like chimney formed by a smaller cliff in front of the main face. Begin 15' in the hallway below a crack-seam 15' up.
● P1 5.12b G: Step up and right to an incut jug-rail, then up and right again to a higher jug-rail. Make a boulder move to gain the bottom of the crack-seam (crux) and a flat hold. Face climb following the crack-seam to its top (passing a cool hueco along the way), then up jugs to a ledge with a fixed anchor. 70'
Pinnacle Mountain
Peanut Butter and Jelly Crag
Location: Between NY 30 and NY 10, east of Caroga Lake
Aspect: West
Height: 60'
Quality: ★★★
Approach: 30 min, easy
Summary: A collection of shorter trad lines in a remote location.
Peanut Butter and Jelly Crag is located on the west side of Pinnacle Mountain [volume 2, page 295]. The cliff is on the opposite side of the mountain from the more notable cliff on the east side.
The cliff has a maximum height of about 60' and includes climbs varying in grade and style. Most notable are the twin cracks that run top to bottom in the tallest section of the cliff. Some of the climbs are short—25' to 30'—but what they lack in height they make up for in variety and excitement. A 60m rope and a standard rack are sufficient for all climbs. Doubles of mid-range cams along with a 4" cam can be helpful but not necessary.
You can access to the top of the cliff either from the left or right end, but the right side is the quickest. All the climbs have clip-in anchors at the top. You can lead all the climbs, but you can easily reach the anchors from the top of the cliff if you choose to toprope; a short section of static rope can be helpful.
Directions:
The approach is about 1.1 miles and takes about 30 min. The first 0.8 mile is flat and follows the gorgeous County Line Lake trail, which is an old road. From there the path is marked with cairns.
Park as for Pinnacle Mountain [volume 2, page 295] 0549516,4783982. Follow the County Line Lake trail (blue trail markers) which leaves north out of the parking lot at the sign-in register. The old sign for County Line Lake trail is missing; do not follow the Chase Lake trail, which is signposted (and has red markers), as this takes you to the Main Face on the other side of the mountain.
Follow the County Line Lake trail, initially uphill, then more level alongside a river on your left. At 0.5 mile, cross a small flow with stepping stones 549127,4784424; continue on the main path to some railroad ties. About 780' after the railroad ties, look for a rock cairn on the right 548872,4784921. Leave the trail here on the right and head directly uphill (north-east). Follow cairns through an open hemlock forest to the cliff; the path arrives at the right end 549097,4785134.
Damn Skippy 5.5 PG 20'
The key word being "skip".
Start: Past the end of the cliff, uphill by two hemlock trees growing out of the rock.
P1 5.5 PG: Climb left of the hemlocks up the face to the awkward top-out. Look out for loose rock. 20'
GWC 5.8 G 40' ★★
Named after the famous agriculturalist.
Start: On top of the highest terrace, 6' left of Some Separation May Occur in a smaller open-book.
P1 5.8 G: Climb straight up the blocky face to a large rectangular hole, then up to the ledge. Finish the same as Some Separation May Occur. 40'
Some Separation May Occur 5.7 G 40' ★★
Start: 6' right of GWC in a mossy open-book corner.
P1 5.7 G: Climb straight up the large flaring features, past a large triangular hole, to a ledge. Climb a fingercrack above the ledge to the anchors. 40'
Knights of Jamalot (project)
Open project. In the 5.11 range, and about 25' tall. Start uphill from In a Jiffy and 3' right of Some Separation May Occur, then scramble to the top of some mossy ledges. Make an exposed move out left and straight up the discontinuous finger crack to a right-facing corner, then to the top. Fixed anchor.
In a Jiffy 5.10+ G 40' ★★
Start: Below the cliff-base terraces, 4' right of a large dead birch tree, at a dirty crack 6' left of Lean into the Crunch at the short. You can also skip the dirty start and go uphill via the rock steps and start directly below the bolt.
P1 5.10+ G: Climb the awkward crack to the dirty steps and ledge. Climb straight up the face (bolt) and thin crack to the ledge and then the top. Fixed anchor. 40'
Lean Into the Crunch 5.9 G 45' ★★
Start: 6' right of In a Jiffy at the thin, broken, vertical crack, directly below a 30'-tall blocky pillar.
P1 5.9 G: Climb the crack to the top of the 15'-tall block. Climb the pillar (bolt) to the top. Fixed anchor. 45'
That's My (Raspberry) Jam 5.8 G 40' ★★
Start: 21' right of Lean Into the Crunch and 3' right of a mossy grotto, at a thin, vertical crack on the left side of the 8'-tall block.
P1 5.8 G: Climb straight up the broken crack system, wandering slightly right at the top. Fixed anchor. 40'
Marmalade Crusade 5.10 G 40' ★★★
Start: 12' right of That's My (Raspberry) Jam, 10' left of the dirty gully at a thin, vertical crack. This is directly below the right end of a left-angling crack that begins 15' up.
P1 5.10 G: Climb the vertical crack left of the gully to the top of the short 8'-tall block. Climb the diagonal out left to a vertical finger-sized crack. Follow the crack to the top and the anchor shared with That's my (Raspberry) Jam. 40'
Peanut Butter Gully Climb (aka Peanut Butter Hearts a Flutter) 5.10 PG 50' ★★★
You can avoid the roof crux by traversing along the ledge to That's My (Raspberry) Jam anchor.
Start: Same as Grapes of Wrath.
P1 5.10 PG: Climb the chimney to its top. Move left under the large roof, then break the roof via a diagonal crack to the fixed anchor. 50'
Grapes of Wrath 5.9+ PG 50' ★★★★
Start: 10' right of Marmalade Crusade, below the right side of a tall chimney capped by a roof at the top of the cliff.
P1 5.9+ PG: Climb up to the mouth of the chimney, then move right onto the face (bolt) to the base of a crack. Climb this crack straight up to the flaring chimney. Traverse left across the face and then back right to the anchor. 50'
Eternal Jamnation 5.11b G 60' ★★★
A little mossy at the start, then a difficult, sequency finish.
Start: At the smaller, right-leaning crack, 5' left of Pump Up the Jam and 6' right of Grapes of Wrath.
P1 5.11b G: Climb the discontinuous finger-sized crack (5.10b) to a break. Step right (crossing over Pump Up the Jam) to finish on the flared, shallow crack system on the right (bolt). Fixed anchor. 60'
Pump Up the Jam 5.9+ G 60' ★★★★
The most obvious feature of the crag is this 60' crack that splits the main face.
Start: Below the obvious handcrack in the center of the cliff. There is a narrow fin of rock jammed in the crack 4' up.
P1 5.9+ G: Climb the obvious crack to a break. Step left (crossing over Eternal Jamnation) and climb the left of the two crack systems to the top. Fixed anchor. 60'
Pete R Pan 5.11 G 60' ★★★★
Start: On the featureless, New Jersey-shaped block 5' left of I Don't Think You Aretey for This Jelly and 3' right of Pump Up the Jam, directly behind a tree.
P1 5.11 G: Climb to the top of the block. Move out left (bolt) and back right. Climb the thin face past three bolts to a ledge just below the anchor. Climb the left corner to the top. 60'
I Don't Think You Aretey for This Jelly 5.9+ G 60' ★★★
Start: At a wide, mossy crack on the left side of a pillar, 5' right of the New Jersey-shaped block of Pete R Pan. This is directly below the right side of a right-facing buttress half-way up the cliff.
P1 5.9+ G: Climb an off-width between the pillar and the main face to the top of the pillar. Move onto the arete of the main face past two bolts and onto a low-angle slab. Traverse left to the Pete R Pan anchor. 60'
Team Creamy 5.3 G 25' ★
Start: At a chimney 4' right of I Don't Think You Aretey for This Jelly.
P1 5.3 G: A bouldery start leads to much easier climbing. Climb the arete on the right side of the chimney to the anchors. 25'
Wham Jam Thank You Ma'am 5.7 G 30' ★★
Start: 12' right of Team Creamy at a right-leaning crack that begins in the ground.
P1 5.7 G: Climb the crack to a right-facing corner. Continue up in the corner for a few moves and then exit out left onto the face to make a 12' traverse left along a horizontal crack system. Finish at the Team Creamy anchor. 30'
Arachibutyrophobia 5.10- G 25' ★★
Start: 12' right of Wham Jam Thank You Ma'am at a crack that begins in the ground and goes up into a left-facing corner.
P1 5.10- G: Climb the corner and through the roof (bolt) on its left side. Fixed anchor. 25'
Peanut Butter Jelly Slime 5.10+ G 25' ★★
Often wet.
Start: 6' right of Arachibutyrophobia at a right-leaning seam that begins 5' up.
P1 5.10+ G: Climb straight up to the bolt and finish on the two parallel cracks. Fixed anchor. 25'
Location: South of Piseco Lake just north of Good Luck Mountain, accessed from NY 10.
Aspect: Northwest
Height: 100'
Quality: ★★★
Approach: 35 min, moderate
Summary: Well-developed cliff with many high-quality, single-pitch, crack, face, and chimney routes.
This cliff sits high on the north shoulder of State Brook Mountain. Facing northwest, State Brook fills a need for single-pitch cragging in the shade. It's 100' tall and roughly 300' wide, and consists of a collection of beautiful faces split by deep chimneys, slots, and depressions—an unusual geometry for Adirondack cliffs. The deep slots offer more climbing surface, as some of the routes are nestled on the inside walls of these slots.
The rock is mostly excellent with quartz ribs and sections pink bullet-hard rock reminiscent of Lake Lila and Lost Hunters Cliff. Like most cliffs, though, there are occasional sections of substandard rock too, and the routes are still new and a little dirty.
Every route has a clip-in style fixed anchor for lowering. These are located on the cliff face, and are not accessible from the top except by rappel. Some routes are designed to be stick-clipped.
The area is relatively compact considering the number of routes here (and potential for more). To simplify organization, the cliff has been divided into sections: Left End, Biscuit Buttress, Monsters Wall, and the Right End.
The area has been published in an online mini-guide by Arietta Climbing.
Directions: From the intersection of NY 10 and NY 29A (0.0 mile), drive north on NY 10. At 5.8 miles reach a bridge across the West Branch of the Sacandaga River (this is just past the parking for the Lost Crags). At 6.0 miles reach the parking for Good Luck Mountain on the right. At 7.3 miles there is a driveway on the right with a yellow posted sign; this driveway is the only break in a long wire guiderail, and just before the driveway is a green highway mileage marker that reads 10/2205/1043. Park on the west side of the road on the ample shoulder 536444,4791290. The trail to the cliff begins on the west side of the road directly across from the driveway.
If approaching from the north, from the intersection of NY 10 and NY 8, drive south on NY 10 for 10.1 miles, just past a low, red-colored log cabin on the left. Look for the driveway on the left that breaks a wire guiderail, and park on the right shoulder of the road 536444,4791290.
From the road (0 hr 0 min), follow the trail into the woods. At 4 min reach a vague fork in the trail; stay left and intersect an old snowmobile trail. Cross this and follow (what appears to be) an old roadbed to where it fades, at which point the path veers right and crosses a stream. Follow the trail moderately uphill to the cliff at 35 min. The trail reaches the cliff at its left end 535017,4790832 at the route Bowline with a Blow Job Finish.
The Left End contains the cluster of routes where the approach trail meets the cliff.
Tyler Knows Mr Toad 5.8 PG 25'
Start: 4' left of Only the Toad Knows below a left-hand pod 6' up.
P1 5.8 PG: Go up the face to a fragile, right-facing flake 15' up. Continue to a horizontal, then up a short crack to the top. Reach right to the fixed anchor of Only the Toad Knows. 25'
Only the Toad Knows 5.9 G 25' ★
Start: 45' uphill and left of where the trail meets the cliff, and 15' left of the prominent, left-facing corner-flake high on Berly Arête, below a crack that bisects a horizontal crack 20' up.
P1 5.9 G: Climb the crack to a fixed anchor on the left. 25'
Berly Arête 5.9 PG 50' ★★
Unusual positions and a unique rock rail up high. It ascends the prominent left-facing corner-flake at the left end of the cliff.
Start: 6' downhill and right of the arête, just where the terrain rises to the left, below a face with a bolt 12' up.
P1 5.9 PG: Climb the face, then move left to the arête. Follow the arête to a ledge at its top. Go up the face above to a fixed anchor. 50'
Hollies High Step 5.8 G 70' ★★
The wide crack down low is a little dirty, but the layback crack up high more than makes up for it.
Start: Just left of where the approach trail meets the cliff at a left-facing corner capped by a ceiling 10' up.
P1 5.8 G: Climb the corner through the roof, then follow a crack that widens and snakes up and right into a left-facing open book. There's a fixed anchor on the left wall at the top of the open book. 70'
Three Lions 5.11b G 70' ★★★
A terrific face climb, and one of the best routes here. Originally 5.11a, this has been upgraded due to a broken hold. Formerly named Bowline...
Start: Where the approach trail meets the cliff, 6' right of the left-facing corner of Hollies High Step, and 6' left of The Inverted Englishman.
◉ P1 5.11b G: Go straight up the face past several horizontals to a fixed anchor on a ledge. 70'
Gear: #0.5 Camalot.
The Inverted Englishman 5.7+ G 70' ★★★
Start: Below a crack with a tree 40' up, 6' right of Three Lions, and 3' left of a right-facing corner that goes up to a high roof 50' up (the route The Englishman Direct).
P1 5.7+ G: Climb the crack to the tree. Move past the tree on the right. Step right and climb the face left of a flared slot in a roof (The Englishman Direct joins in here) to a ledge. Walk left 12' to a fixed anchor shared with Three Lions. 70'
The Englishman Direct 5.7+ G 80'
Start: 3' right of The Inverted Englishman below a right-facing corner that begins 7' up.
P1 5.7+ G: Climb up into the corner and follow this to a roof 50' up. Break the roof at the flared slot (join The Inverted Englishman here), then up a face to a ledge. Walk left 12' to a fixed anchor shared with Three Lions. 80'
The Perverted Polishman 5.8 G 70' ★★
Start: Just right of The Englishman Direct.
P1 5.8 G: Go up blocks, then up into a left-facing corner (this corner opposes the right-facing corner of The Englishman Direct forming a stem box). Go up the corner to a roof. Break this on the right via a right-leaning wide crack. Follow this up and right, then left, then straight up to a fixed anchor. 70'
Tombstone Arête 5.10- G 50' ★★
Start: Below the obvious tombstone-shaped block.
P1 5.10- G: Climb a gully, then move up the arête on the side of the tombstone to its top. Move right into a chimney/offwidth and climb large features to a fixed anchor at the top. 50'
The Bear Den 5.5 G 60' ★★
Start: In the gully behind the large tombstone-shaped block.
P1 5.5 G: Go up the gully, then move right onto the face. Go up to an undercling in a roof, then left to a fixed anchor at the top. 60'
Gear: To #4 Camalot.
The Priest 5.10 PG 80' ★★★★
Start: 15' left of a prominent, deep, bottom-to-top chimney and 15' right of a deep depression (centered on the buttress, in fact).
P1 5.10 PG: Climb up a right-leaning crack to a ledge, then straight up to a roof. Break the roof on its right side following the same crack system up into some orange rock capped by a large roof. Move right and break this roof at an obvious crack. Just above is a fixed anchor on the left wall. 80'
Jennelle and the Terrible Horrible No Good Very Bad Day 5.11 PG 80' ★★
Start: Right of The Priest is a deep, bottom-to-top chimney. Begin on the left wall of the chimney below a large roof.
P1 5.11 PG: Climb up the left wall and break the roof on the left via a crack. Follow the crack to its top, then step right go up a yellow-orange face to a very large roof at the top of the cliff. Break this at a thin crack (about 5' right of where The Priest breaks the roof) and continue to a fixed anchor. 80'
This is the buttress defined on its left by the prominent, deep, bottom-to-top chimney, and on its right side by a deep chimney-gully with log terracing at its base.
The Success of Sully's Bride 5.7+ PG 90' ★★★
Unusual (for the Adirondacks, anyway) climbing up a wide chimney. Great position and stemming. Add a #1 Camalot to make the route G.
Start: Below the right side of the prominent, deep, bottom-to-top chimney that defines the left side of the Biscuit Buttress.
● P1 5.7+ PG: Climb the right-side inside wall of the chimney up through the slot to a fixed anchor. Stay on the outside of the chockstones. 90'
Batman has it in for Robin 5.11 PG 90' ★★
Start: Same as The Success of Sully's Bride.
P1 5.11 PG: Move up and right onto the face right of the chimney. Up the face to a ledge, then up orange rock to a large roof. Bypass the roof on the left (joining for a moment The Success of Sully's Bride), then move up and right to the arête, around this to the outside face, then up to a fixed anchor shared with Sully's Belay. 90'
Sully's Belay 5.11b PG 90'
Somewhat dirty down low and some poor rock in the orange section. The holds above the roof are good, though.
Start: At a vertical crack 10' right of the prominent, deep, bottom-to-top chimney.
P1 5.11b PG: Go up the vertical crack, then up the orange face (same as for Batman has it in for Robin). Move up and right into a hanging left-facing corner in the roof. Break the roof on good holds, then go straight up to a fixed anchor shared with Batman has it in for Robin. 90'
Butter My Biscuit 5.8 G 90' ★★
Despite following a wide crack, this is more of a face climb.
Start: 12' right of Sully's Belay below a wide, full-height crack with a chockstone at the bottom.
● P1 5.8 G: Go up past the chockstone to a ledge, then up the wide crack to the top. The route finishes straight up to a fixed anchor, but it's also possible to finish at the Sully's Belay anchor. 90'
Uncle Hal Direct 5.10 G 70' ★★★
Start: 10' right of Butter My Biscuit, and 10' left of Uncle Hal's Arête, at a chest-high horizontal crack that goes into the right-rising slope.
P1 5.10 G: Climb up the face to a horizontal crack 12' up, then up a short crack to a ledge. Continue up a short left-facing corner and climb this to where it angles left, then up the face (bolts) to a double-tiered roof. Step right and go up a right-facing corner to the arête and join Uncle Hal's Arête to a fixed anchor. 70'
Uncle Hal's Arête 5.8 PG 70' ★
Start: On a small ledge on the left side of the entrance to the deep chimney-gully that defines the right side of the Biscuit Buttress.
P1 5.8 PG: Climb up into a right-arching corner. From its top, step right and go up the inside wall of the chimney-gully to a high fixed anchor above the arête. 70'
Big Bro 5.8 PG 60' ★
Start: Go up the log terraces in the chimney-gully to the top of the dirt cone. Begin on the left wall below a roof 10' up.
Climb up the face to the roof, over this, then up the face (stemming as necessary) to a fixed anchor. 60'
This is the tall wall that begins at the log-terraced chimney-gully and extends rightwards to a right-rising, stepped roof system. Just right of this is another deep chimney-slot. The crack and face climbing here is excellent, although the routes are still new and somewhat mossy.
Sully's Success 5.6 G 60' ★★★
Start: The same stance as Big Bro, except facing the right wall.
P1 5.6 G: Climb face to roof, then step right around the roof and follow a crack and flake system to a fixed anchor at the top of the wall. 60'
Scare Factory 5.11a G 80' ★★★
Quality climbing with an out-of-character crux move near the top. You can avoid this by moving left to finish on Sully's Success (making the overall grade 5.10a).
Start: At a large white birch tree on the right side of the mouth of a chimney-gully that defines the right side of the Biscuit Buttress.
P1 5.11a G: Step right onto the outside face of the cliff and climb a good crack to its top, then up the face past a horizontal crack to a ledge (shared with Sully's Success). Move up and right to a right-leaning crack; up this a few feet, then move left onto the face (crux) and climb this to a horizontal break. Shuffle right, then up to a fixed anchor. 80'
Gear: 1 ea #0.3, #0.4, and #2 Camalots; green Alien.
Monsters Inc. 5.10c PG 90' ★
Presently dirty; three stars otherwise.
Start: Downhill and right of Scare Factory at a flared crack that begins 8' up.
P1 5.10c PG: Go up the flared crack (crux move down low) to a V-slot, step right to the next crack and climb this discontinuous system straight up the face to a fixed anchor. 90'
Wally 5.10b G 90' ★★★★
Excellent face and crack climbing, with a short section of exceptional pink rock in the middle. A little dirty.
Start: 6' right of Monsters Inc. at a crack that begins at the ground.
P1 5.10b G: Up the crack to a horizontal break. Move up and right 6', then up thin cracks and face with quartz ribs to pretty pink rock and a jug. At the tiny overlap, follow an easier crack straight up to a fixed anchor. 90'
Gary Goes Home Crying 5.9 PG 90' ★
Start: At a right-facing corner that leads to a wide crack, 15' right of Wally.
P1 5.9 PG: Climb the arête of the corner to gain the crack. Follow the crack as it widens to a chimney, then into a right-facing corner to a roof. Follow parallel crack on the right side of the roof to a fixed anchor at the top. 90'
The Far Side 5.9+ PG 90' ★
Start: 12' right of Gary Goes Home Crying is a large, protruding nose of rock low on the cliff. Begin below the left side of the nose.
P1 5.9+ PG: Go up the left side of the nose to a ledge on top of the nose. Diagonal up and left on a face to reach a thin crack. Follow this straight up to its top. Finish up the parallel cracks of Gary Goes Home Crying. 90'
Bipolar Express (aka Don's Long Climb) 5.10c PG 90' ★
A bit dirty, and not as good as it looks from below. Watch for rope drag in the corner at the start.
Start: Below the right side of the protruding nose of rock low on the cliff.
P1 5.10b PG: Go up the right-facing corner of the nose to a narrow ledge on the left wall. Hand traverse left along the ledge to the outside face of the nose. Go left 6' and climb a thin crack system up the full height of the cliff. 90'
Lost Boys 5.11b/c G 90' ★★★★
One of the best of its grade in the Southern Adirondacks with two cruxes and a beautiful crack.
Start: Right of Bipolar Express below a right-rising, stepped roof that defines the right side of the Monsters Wall.
P1 5.11b/c G: Climb straight up face to a right-facing corner in the roof. Clip a bolt, go up to an obvious hand jam (first crux), then up to a V-groove (second bolt) to a stance. Traverse right a few feet to gain a fingercrack; up this (5.9) to a position at a tiny left-facing corner. Make hard moves up the smooth face using a crack-seam. Finish up a beautiful, featured, moderate face (5.7) to a fixed anchor. 90'
Gear: Small rack from small wires to a #2 Camalot.
Welcome to State Brook 5.10 G 100' ★★
Start: 20' right of Bipolar Express on the right side of two, stacked, refrigerator-sized blocks.
P1 5.10 G: Go up to the top of the blocks, then traverse right under an overlap to a crack system. Follow this up into a large right-facing corner capped by a roof. Climb the corner to the roof, then traverse left 4' around the corner to a small tree. Follow a right-leaning, snaking crack to the top and fixed anchor. 100'
This section of cliff begins in the deep Mr Poopers chimney-slot, and extends all the way to the right end of the cliff.
Mr Poopers 5.11 PG 50' ★★
Start: On the left wall just inside the entrance to the chimney-slot that defines the right end of the Monsters Wall.
P1 5.11 PG: Go up the overhanging wall to the left side of a large block hanging over the slot. 50'
Mr Poopers Backside 5.8 PG 50' ★
Start: Deeper into the chimney-slot that defines the right end of the Monsters Wall, 12' up and right of Mr Poopers below a crack on the left wall.
P1 5.8 PG: Up the crack, then stem up the chimney. Step left and climb the face up to the right side of the large block hanging over the slot. 50'
Thing 1 5.9 PG 50' ★★★
Start: To the right of the Mr Poopers chimney-slot are a number of huge blocks stacked 30' high. Begin on the right side of the chimney-slot opening below a chimney in the blocks 10' up.
P1 5.9 PG: Go up into the chimney, then climb the left rib of the block forming the chimney to its top. Up an orange face past the left end of an overlap. Continue up and right to a fixed anchor. 50'
Snake in the Crack 5.6 PG 50'
Start: Same as Thing 1.
P1 5.6 PG: Go up into the chimney formed by the blocks, then up and right to the top of the stacked blocks. Go up a left-facing open book to a crack. Follow this up and right, then back left to a fixed anchor shared with Thing 1. 50'
Thing 2 (aka Girls Have More Fun) 5.10 PG 50' ★
Start: Same as Thing 1.
P1 5.10 PG: Go up the outside face of the stacked blocks past several horizontals to the top of the stacked blocks. Join Snake in the Crack to the top. 50'
Dysphemism 5.8 PG 30' ★
Start: 30' right of the Mr Poopers chimney-slot is another deep depression capped by roofs, and right of this is another buttress. Begin on the left side of this buttress at a thin crack.
P1 5.8 PG: (V1) Up the thin crack to two horizontals, move right 5', then climb a crack past a V-groove to a fixed anchor that straddles a crack below a pine tree. 30'
V1 5.10+ TR: Go directly up the face below the crack.
Evil Twin 5.8 G 20' ★
Start: Below an obvious, short, crack that begins 12' up. This is just left of a low roof, 36' right of the deep depression marking the start of Dysphemism, and just before the cliff diminishes to rubble.
P1 5.8 G: Climb to, then straight up the crack to a fixed anchor. 20'
❏The trail to the cliffs and summit is now an official DEC trail. The pullout for the parking is marked "Good Luck Lake, Dexter Lake, Potter Homestead", as described in the guidebook [volume 2, page 323]. Across the road from the parking are two trails, one is unmarked, and the other (and correct one) is newly signposted "Ferris Lake Wild Forest, Good Luck Cliffs Trailhead". The turnoff before the second sizeable bridge is also marked with a sign for "Good Luck Cliffs".
❏V1 (J.J.'s) of Talking Heads [volume 2, page 324] should be ★.
The Lost Crags ● Lost Hunters Cliff
Trailside Wall
This is the broken, discontinuous wall off to the right, just after the steepest section of the approach to the Main Face of Lost Hunters. It is well before the Welcome Wall, which sits directly below the Main Face.
Directions: Just after the steepest section of the approach, cut right and walk uphill about 150' to reach the base of the wall. The routes are located near a shallow, square-sided alcove that runs the height of the cliff, just left of a section of cliff capped by large chossy overhangs.
Target Practice 5.13a G 50' ★★★★
This route overhangs 15' and is much harder for shorter climbers.
Start: 20' left of Pocket Pucker and 5' left of an arete that forms the left side of the alcove.
● P1 5.13a G: Climb the face (first crux) to a horizontal break below a roof. There is a ledge on the right just below the horizontal break for an optional rest. Dyno over the roof to a lone hueco (second crux), (V1) then step right and climb a right-facing, left-leaning ramp its top. Move left to a ledge, then up a final headwall to a fixed anchor. 50'
V1 5.13b G: Go straight up the face to the ledge for an extra pump.
Pocket Pucker 5.9 G 40' ★★
Start: Locate a deep, full-height V-chimney in the cliff. The right wall of the V-chimney forms an arête, and just right of this is a line of unusual pockets at head height. Begin at the leftmost pocket near the arête.
● P1 5.9 G: Move up the face to a deep pocket, then up and right to another deep pocket next to a shallow, left-facing, left leaning corner. Go up this corner to a horizontal break, then up some blocks. Continue up the face to a left-rising lip; follow this to a fixed anchor at the top. 40'
The Lost Crags ● Lost Hunters Cliff
Welcome Wall
This is the small cliff mentioned on the approach to the Main Face of Lost Hunters Cliff [volume 2, page 315]: "As the path rises, you can see short cliffbands on the right. Eventually you'll find a distinctive 40'-wide, 30'-high clean face with two prominent horizontals." The cliff is actually a little taller, and sits about 50' right of the trail, clearly visible on the approach to the Main Face.
Welcome to Lost Hunters 5.11c G 35' ★★
Short and crimpy with excellent rock. A good warmup.
Start: In the center of the wall below a short vertical seam 12' up.
● P1 5.11c G: Stick clip. Boulder up to the seam, then make a hard move to better holds and a horizontal crack. Finish up a short handcrack to a fixed anchor. 35'
The Lost Crags ● Lost Hunters Cliff
Main Face
❏Buck Fever [route #16, volume 2, page 318] has been upgraded to 5.12c.
❏Terapia [route #5, volume 2, page 316] is hard for the grade, perhaps more like 12c.
❏The Weasel Climb [route #7, volume 2, page 316] is ●. A better description is as follows:
Start: 18' left of Sitting Duck, just right of an arête, in a corner system that gets more obvious higher up. This is right of, and just around the corner from Trigger Finger.
● P1 5.9 G: Up the face using decent holds to a ledge. Step right, then go up and right over a bulge. Move up left to a stepped ceiling. Over this at a thin seam, then work up the face just right of the arête to a fixed anchor. 50'
The Recluse 5.12a G 40' ★★★
Shorter than the other routes on this wall, but bouldery with big moves in the upper half. Named for a tattoo shop in Arietta that has a giant spider on its roof.
Start: 10' left of Luxury Lining and 2' right of another left-leading crack.
● P1 5.12a G: Climb a face on a narrow black panel to a right-facing corner. Step right and go up another right-facing feature to a good flag jug. Move left onto the face and make long moves straight to the top. Fixed anchor. 40'
Just Another Pretty Face (aka Preservation) 5.13a G 80' ★★★★
Formerly a toprope named Preservation [route #14, volume 2, page 318], this route has been resurrected and equipped. It's not quite as difficult as Elusive Trophy. It has few rests, and is far more difficult than the reported grade of 5.12b.
Start: Right of Father Knows Best on top of a pointed boulder, below flake that forms a shallow, right-facing, right-leaning corner.
● P1 5.13a G: Stick clip. Climb the flake to its top, then diagonal up left 10' to a rail, then a big move up and right (crux). Continue straight up the technical face above to a fixed anchor shared with Father Knows Best. 80'
In Pursuit of Happiness 5.13a G 80' ★★★★
Another amazing testpiece with a bouldery start, then sustained, long moves between good crimps.
Start: Same as Lost Hunters Crack [route #15, volume 2, page 318].
● P1 5.13a G: Stick clip. Go 10' up Lost Hunters Crack to the first jug. Move right into a steep scoop, then up to an A-shaped notch in the ceiling. Continue straight up the super-sustained, gently-overhanging face to a fixed anchor. 80'
Straight Outta Lockdown 5.13a G 80' ★★★★★
This route has a pleasant crack followed by a typical Lost Hunters-style crimpfest. The boulder problem at the top is a real heartbreaker.
Start: Same as Buck Fever.
● P1 5.13a G: Climb Buck Fever to the roof (about 5.10d to here) at the third bolt. Follow a beautiful right-leaning crack to its end; rest here, then launch up the crimpy face to a right-facing left-leaning ramp. Face climb up this, then step right to a pair of stacked, shallow, right-facing corners; slap up these (crux) to reach a horizontal break. Go up the final headwall using the arête to the left to a fixed anchor. 80'
Life of Try (aka Hair Trigger) 5.12b G 70' ★★★★
This is a reconfiguration of the toprope route Hair Trigger [route #17, volume 2, page 318]. It adds more spectacular climbing on an arête rather than the chossy corner of the normal route.
Start: Right side of the cliff, below the arête left of Hair Trigger. Just right of Hair Trigger is a swampy area.
● P1 5.12b G: Stick clip. Go up the arête using holds on the left wall (first crux) to a flake-jug level with a roof on the right. Step right and climb the shallow right-facing corner system of Hair Trigger (second crux) to a tips crack, and up a juggy finish to stand on a small buttress. Fixed anchor on overhanging wall on the left. 70'
Babe Ruthless 5.10+ R 45' ★★
An alternative start to Left Field [route #2, volume 2, page 320].
Start: Downhill and left of the Left Field, at the far left end of the belay ledge, beneath an obvious orange scar 25' up. This is 8' left of Who's On First (another alternative first pitch to Left Field), and 23' left of Left Field.
P1 5.10+ R: Climb the face straight up to the orange scar, then up through a roof (crux). Continue up cracks and slab to a ledge left of the Left Field P1 anchor. 45'
Gear: Mostly small gear to #1 Camalot.
Who's On First 5.9 R 40' ★
Another alternative start to Left Field [route #2, volume 2, page 320].
Start: 15' downhill and left of Left Field, just right of an obvious orange scar 25' up.
P1 5.9 R: Up an unprotected slab to a small ledge. Continue up a seam and face right of the orange scar to a small roof. Over this on fingerlocks (crux), then up a crack and slab to the P1 anchor of Left Field. 40'
Gear: Mostly small gear to #1 Camalot.
❏Courtney Marie's Boobies [route #10, volume 2, page 311] now has a fixed anchor.
❏Crimps are for Pimps [route #11, volume 2, page 311] now has a fixed anchor.
❏The route Expiration 66 [route 3, volume 2, page 309] is now ●.
❏The route CB Love Grannys [route 4, volume 2, page 309] is now ●.
❏The route Ten B [route 5, volume 2, page 309] is now ●.
❏The route Freckles and No Lipstick [route 6, volume 2, page 311] is now ●.
❏The route The Keyhole [route 9, volume 2, page 311] is now ●.
❏he route Spelunking Midget [route 8, volume 2, page 311] has been shortened to Spelunking.
Dixie Normus 5.10b G 80' ★★★★
This is now a completely independent, high-quality route [route #15, volume 2, page 312].
Start: On a ledge 6' left of Wide Crack.
P1 5.10b G: Climb straight up (three bolts) over a small overhang to gain the fingercracks above. Follow these discontinuous cracks straight up the face to a fixed anchor at the top. 80'
Gear: Mostly finger-sized cams; take multiples of #0.3 and #0.4 Camalots. Optional #4 Camalot.
It's Ten, Eh? 5.10a G 170' ★★★
Start: From The Black Wall, walk left past a 200'-high, wide face to a left-facing corner at its far end; the route is on the right wall of the left-facing corner. Begin at the base of this corner, the same as the winter route Dark Times.
P1 5.2 G: Diagonal stair-step up into the corner, then walk right to belay at tree. 90'
P2 5.10a G: Start in crack up to the right of a large, left-facing wall. GO up a left-facing corner (crux) with thin fingercrack and few face holds. Work up through a shallow chimney that turns into a short offwidth finish. Use small ledges on right corner to a shallow V-groove that angles left to top ledge with rap anchor at large pine tree. 80'
Gear: 2 ea C4s #1-#3; 2 ea C3s #0-#2 C3s; 1 ea C4s #0.4, #0.5, #0.75; 1 ea C3s #000 & #00; optional small to medium nuts and a #4 C4.
Great White North 5.10b PG 190' ★★
Engaging face, corner and crack climbing. A four-star route if cleaner.
Start: From The Black Wall, walk left about 2 min to a dirty, left-facing corner with a vegetated ledge 20' up and left. Begin in the crack just right of the dirty corner.
P1 5.10b PG: Go up the discontinuous cracks until your feet are in an obvious horizontal. Trend up and left into the corner (about 20' above the ledge) and then go up and right back onto the face and follow left-leaning cracks until they join the corner. Follow the corner to a comfortable belay ledge and fixed anchor. 110'
P2 5.8 PG: Climb heavily featured, albeit dirty rock up the obvious corner to a roof. Exit to the right, then up to a ledge. Step left to right-rising cracks and follow these to a fixed anchor. 80'
Acracknophobia 5.10 G 65' ★★★
Named for the frog-sized spiders removed during the first ascent that made for an exciting ground-up lead. P1 is very good, and P2 is not recommended. [Between routes #1 and #2, volume 2, pages 333-334]
Start: On a car-sized boulder at base of obvious dihedral, 50' left of the Black Wall, on the ledge described for Sketchy Shit Suck [volume 2, page 334].
P1 5.10 G: Climb the wide crack in the corner (fixed gear alleviates the need for large cams). Stem and jam on progressively steeper rock to fixed anchor. 65'
Lake Pleasant Quarry
Toy Story Wall
The Lake Pleasant Quarry has been overhauled, and many of the lines reworked. Grades have been adjusted and variations modified. Bring a stick clip. Here's the new documentation.
Barrel of Monkeys 5.3 G 35' ★
A good introduction to the area.
Start: 25' left of Sarge at a left-facing corner just right of a large, dirty chimney-crack.
P1 5.3 G: Up low-angled, highly-featured rock to a large ledge, then angle right to a fixed anchor. 35'
Sarge 5.7+ G 42' ★★
The fixed anchor is accessible from the top; use a short rappel to avoid unstable rock.
Start: Near the left end of the cliff is an orange nose near the top. Begin just right of the nose, 55' left of Bullseye and 10' left of Buzz, below a horizontal crack 8' up.
P1 5.7+ G: (V1) Climb up two small vertical cracks to the left of a smooth face. Continue up thin seams to a ledge with a fixed anchor. 42'
Stinky Pete 5.11a G 42' ★★★
Start: Between Buzz and Sarge below a blank face with a bolt.
P1 5.11a G: Stick clip. Climb a blank face past the first bolt (the small left-arching crack on the left is in, but not the main crack of Sarge). Continue up the face on balancy moves with tiny holds to the fixed anchor of Sarge. 42'
Buzz 5.6+ G 40' ★★★
Start: At a face just right of a left-facing corner that arches left into a small ceiling.
P1 5.6+ G: (V1) Go directly up the face, staying out of the left-arching corner, to a ledge at mid-height. Continue up a thin, broken crack to a fixed anchor. 40'
Star Command 5.9+ G 35' ★★★
A quality trad climb.
Start: 6' left of To Infinity and Beyond.
● P1 5.9+ G: Work up the face half-way between Buzz and To Infinity and Beyond. Finish to the anchor of To Infinity and Beyond. 35'
Gear: 1 ea Camalots #0.4 to #1.
To Infinity and Beyond! 5.9 G 35' ★★★★
Despite appearances of being thin and crimpy, this is a fun climb that has a lot more available than meets the eye.
Start: 6' right of Buzz at a black face with shattered rock.
● P1 5.9 G: Stick clip. Climb the black face to a good horizontal, then follow a straight-up seam to a fixed anchor. 35'
Wheezy 5.10b G 35' ★★★★
Sustained.
Start: Just right of To Infinity and Beyond!
● P1 5.10b G: Reach up to a juggy, blocky flake then up the smooth rock face past a bolt using crimps and underclings (avoid side pulling any of the cracks and corners to the right and left on Woody or To Infinity and Beyond!). Climb up to the right side of the face stemming on small footholds to reach for high two-finger crimp, then a horizontal crack. Finish right at a fixed anchor shared Woody. 35'
Woody 5.7 PG 35' ★★
Perhaps the most obvious crack at the cliff. There is no fixed anchor; use "woody" (trees) for toprope anchors. Beware of large, loose, unstable rock at the bottom overhang, and loose blocks at the top ledge area. When setting up as a toprope, there is a bolt around the corner from the main face to serve as a directional to keep the belay end of the rope out of a crack.
Start: 5' right of To Infinity and Beyond! and at the left end of a low ceiling 4' up with some lighter-colored unstable blocks in it.
P1 5.7 PG: Climb straight up black rock to a left-leaning orange seam that becomes a right-facing corner, then up to a ledge. 35'
Squeaky Toy Aliens 5.7 G 35' ★★★
Use caution with the large unstable blocks at the overhang.
Start: At the right side of large hanging blocks.
P1 5.7 G: Go up the hanging blocks, then straight up using horizontal cracks to finish on a large ledge at a fixed anchor around the corner of the face. 35'
Unnamed (project)
Open project. Stick clip bolt of Emperor Zurg. Begin 6' left of Emperor Zurg and climb face between Squeeky Toy Aliens and Emperor Zurg.
Emperor Zurg 5.9+ G 37' ★★★★
The fixed anchor is easily accessible from the top.
Start: On the right end of the low ceiling 4' up at a thin seam in black rock.
P1 5.9+ G: (V1) Up the seam in the smooth face to a ledge in a small right-facing corner. Work up and left for 4', then straight up the orange face to a fixed anchor. 37'
V1 The 5.12 TR: Start just right of Squeaky Toy Aliens in the center of the low ceiling 4' up. Climb over the ceiling, then up the smooth face to a second ceiling. Over this, then up to the Emperor Zurg fixed anchor.
Rex 5.8 G 35' ★★★
The fixed anchor is easily accessible from the top.
Start: Same as Emperor Zurg.
P1 5.8 G: Step up and right onto a black face with good incut, crimpy holds. Up the face to a ledge, then over a ceiling and onto an orange face. Continue up some overlapping blocks to a fixed anchor. 35'
I Am Not a Toy! 5.10a G 30' ★★★
The fixed anchor is easily accessible from the top.
Start: 10' right of Rex at a 5'-wide ceiling 4' up in black rock.
● P1 5.10a G: Stick clip the first bolt of Bullseye. Go up the black face, then over a small ceiling to a fixed anchor. 30'
Bullseye 5.7+ G 30' ★★
The first route here, but recently resurrected and rebolted.
Start: 5' right of I Am Not a Toy, and just right of a 5'-wide ceiling 4' up, 40' from the right end of the cliff.
● P1 5.7+ G: Up past a ledge on the right to a ceiling (bolt), then up past a V-shaped pod to the top. 30'
Tour Guide Barbie 5.7 G 28' ★
The fixed anchor is easily accessible from the top.
Start: Same as Bullseye.
P1 5.7 G: Climb up and right through shattered rock to a horizontal crack, then to a vertical seam that leads to a fixed anchor. 28'
Psycho Sid 5.7 G 25' ★
The fixed anchor is easily accessible from the top.
Start: 25' from the right end of the cliff at the 4th crack from the right end of the cliff, and the first crack right of Bullseye.
P1 5.7 G: Up the crack to a good ledge, step right and follow a seam to a fixed anchor. 25'
Mutant Toy 5.6 G 20'
The fixed anchor is easily accessible from the top.
Start: At the second crack (which is more of a seam) from the right end of the cliff, and 15' from the right end of the cliff.
P1 5.6 G: Up the thin crack past horizontals to a ledge, then past a small alcove to a fixed anchor. 20'
Mr Potato Head 5.6 G 16'
The fixed anchor is easily accessible from the top.
Start: 6' from the right end of the cliff.
P1 5.6 G: (V1) Up a face with thin holds in a seam to an 8"-wide vertical slot with a fixed anchor just above. 16'
V1 Mrs. Potato Head TR: Begin further right at a large blocky crack near the right end of the crag.
Location: South of Piseco Lake just north of Good Luck Mountain, accessed from NY 10.
Aspect: Southwest
Height: 100'
Approach: 35 min, moderate
Quality: ★★★
Summary: Tall, overhanging cliff with two high-quality routes.
This cliff sits on the southeast shoulder of State Brook Mountain directly above the boulders (described in the 2015 edition of Adirondack Park Bouldering, page 96). The rock is dramatically steep with large roofs. It is, however, extremely chossy with surface flakes that come off when you brush against them, feet that crumble, and hollow sections that require care for protection. Once properly cleaned and equipped, the climbing is excellent. There are presently two routes with room for several more.
Directions: Park on NY 10, 0.6 mile north of the Good Luck Mountain trailhead [volume 2, page 323]. There is no pullout, but there is adequate space to get your car off the road just north of a guardrail on the west side 537000,4790155. This is just north of a wide, open, marshy meadow on the west side of the road. From the parking, walk west uphill to an obvious snowmobile trail. Turn left and follow the snowmobile trail, at first parallel to the road, then veering away from the road to the southwest. At 10 min, turn right off the trail 536628,4789842 and follow a seasonal stream and fern-filled valley due west through relatively open forest, roughly paralleling State Brook in the valley below. At 20 min, begin contouring northwest and uphill in a sub-drainage until you arrive at large boulders 535703,4789835. Just past the largest boulders, turn right (north) and walk uphill to the cliff at 35 min 535647,4789984.
Hells Yeah! 5.12a G 95' ★★★
Great climbing with exposed positions and a couple jam-rests.
Start: Near the left side of the cliff, below an obvious crack that begins 12' up. There is a large, ominous-looking nose of rock just right of the crack 45' up.
● P1 5.12a G: Stick clip, then go up a slab into a large left-facing corner. Reach right to gain the crack, and climb it (first crux low in the crack) to the roof, just left of the large nose. Break left through the roof (second crux), then up the steep face to a final pumpy exit onto a slab with fixed anchor just above. 95'
Choss Boss 5.12d G 110' ★★★
A hard crux at the roof, then sustained and pumpy edging up an overhanging wall reminiscent of Raging Raven at Pitchoff Chimney Cliff.
Start: 25' uphill and left from the low point on the cliff, below the large, ominous-looking nose of rock 45' up.
● P1 5.12d G: Move easily up and right onto the wall to gain a right-leaning seam. Follow this to a jug under the roof. Make a devious move to a rail at the lip, then power up to a rest stance. Move right onto the face, then follow right-rising edges to another reasonable shake on the right. Move back left and up the prow to a final big reach to a jug and a fixed anchor on the right. 110'
❏Porcupine Prelude [route #2, volume 2, page 304] is ● with a stick clip.
❏Pandora's Box [route #7, volume 2, page 305] is ● with a stick clip.
Location: East of NY 30 south of Wells.
Aspect: Southwest
Height: 100'
Approach: 50 min, moderate
Quality:
Summary: A long cliff with a few exploratory routes.
This mountain lies between NY 30 and Pumpkin Hollow Road near the town of Wells. The summit ridge is a long, sinuous affair that wraps around a boggy woods as it rises from the Sacandaga River valley to the west. The developed climbing (so far) is on the eastern half of the cliff. The leftmost route is Sunrise Arête, and right of this is a thickly-vegetated talus pile. The Bullwinkle Buttress is (climber's) right of this broken area, identified by a 15'-tall, 20'-wide detached block 20' up, on top of a dirty slab. A ceiling with a compelling crack (a project called Bullwinkle's Butt Crack) is 50' above the right end of this block.
Directions: From the Post Office in Wells, go south on NY 30. At 4.3 miles, turn left onto Pumpkin Hollow Road. At 5.4 miles, park on the side of the road next to state land, just uphill from private property that has been clear-cut 560396,4801668. Walk northwest, gently downhill, and stay within sight of the clear-cut property to your left. At the bottom of the valley are a pair of streams that join; cross these, then (still keeping the clear-cut within sight to your left), go moderately uphill to the end of the private property 559928,4802248. From here the cliff is due west. Continue uphill (west) and angle slightly leftward to a wooded bench with a couple large boulders beside a logging road. Turn left on the logging road and follow it until it drops down toward a rocky drainage. Cut off to the right, going uphill slightly. Once within sight of the cliffs, stay below them and contour to reach the easternmost established lines 558951,4802227. The continuation of the cliff to the west 558441,4802484 has some climbs, but they are not yet reported.
Sunrise Arête 5.5 PG 135' ★
Finds a moderate way up this formation, with an interesting variation at the top.
Start: Left of the Bullwinkle Buttress is a thickly-vegetated talus pile. On the (climber's) left side of this, follow a faint herd path for 10', then walk up and right to a brushy ledge with a V-groove formed by two small, ground-level corners that slant away from each other.
P1 5.5 PG: Climb up the V-groove, move right along a ramp under a slanting overhang, then make a tricky move up a left-leaning crack below a bulge. Step up—first right, then left—along a ramp. Move up through a bulge onto a low-angle slab; climb it up and right 10', then back left following holds to a stance between a large boulder and the main face. (V1) Escape left by scrambling 20' to a mossy groove that leads to the top. 135'
V1 5.7 G ★★: Climb up the face via a thin crack to a stance with a left-rising V-trough to the left. Step up the trough a few feet, then make an exposed move right along a right-rising flake and crack to another stance below a final overhang. Climb around its right edge and directly up to the high point of the buttress.
Bullwinkle's Butt Rest 5.6 R 145'
Start: At a dirty slab below a fist crack near the left end of a 20'-wide, 15'-tall detached block perched on a ledge 20' up.
P1 5.5 G: Go up the slab to the fist crack and climb it to the top of the block. Use a left-facing flake to get established on the main face, then foot traverse 6' left along a horizontal crack to a vertical crack. Climb up this to a ledge with a fixed anchor on a tree (possible belay). Traverse right 20', step up onto a bulging face and traverse further to a short, bottomless, left-facing corner. Climb up the corner and continue right, setting a gear anchor as close as possible to the arête to the right. 80'
P2 5.6 R: Step right, around the arête, and make a poorly-protected traverse to another corner. Reach right to a good crack and climb it, first to a stance, then further to the top of a detached pillar. Step left onto the main face and either scramble left to a large pine tree or continue up a wide crevice in a slab to the top of the cliff. 65'
Unnamed 5.8 G 60'
Start: At a dirty slab below the right edge of a 20'-wide, 15'-tall detached block perched on a ledge 20' up.
P1 5.8 G: Climb up dirty slab to the block, then up the face of the block 6' left of its right side. Move through a bulge in the main face using horizontal edges and cracks to easier slab to reach a fixed anchor on a tree. 60'
Directions: As of fall 2021, there is a new approach from the east that avoids the river crossing. If the river is crossable, then using the boards to cross is by far the preferred option. The issue is that if you don't know whether the river is crossable, and it indeed proves uncrossable, it takes about 40 min to drive to the north parking, which is about the same time as it takes to reach either parking from Lowville. You should weigh this with using a canoe above the dam, which is a really easy backup should the river prove uncrossable (but of course, you need a canoe). For the East Approach, from Lowville (0.0 mile, the intersection of NY 26 and River St.), drive north on NY 26. At 0.5 mile, turn right on Bostwick St. At 1.1 miles turn left onto NY 812 / Indian River Road. Follow this through Croghan and at 10.8 miles, turn right onto CR 10 /Belfort Road. Follow this past the Belfort Dam to a T-intersection at 14.4 miles. Turn right onto Long Pond Road. Follow this to a T where it joins Jay Cox Flats at 14.9 miles. Bear right onto the combined road. At 16.5 miles, Long Pond Road goes left; you go straight onto Fish Creek Road. Follow this for some distance. At 21 miles, bear left to stay on Fish Creek Road (straight ahead looks like the better road). At 23 miles, there is a clearing with a dirt road going right. Continue past the clearing, over a culvert and deep ravine, and turn right onto a lesser dirt road signed "Eagle Canyon Road"; there is also an orange sign high on a tree that reads "13-04-00" 484325,4862652. Drive a few hundred yards to a grassy clearing with a "Trailhead" sign and room for many vehicles 484239,4862429. Follow the flat-ish path (red markers) to the cliff, about 15 min.
❏Promiscuous Girl [route #30, volume 2, page 379] is ●.
❏The Eagle Has Landed [route #23, volume 2, page 373] is ●.
❏Prey Tell [route #33, volume 2, page 379] is ●.
❏El Supremo [route #17, volume 2, page 372] is ●. Stick clip.
❏Ravenous [route #25, volume 2, page 375] is ●.
❏Variation to Seventeen [route #35, volume 2, page 379]:
V1 5.7 G ★★★★: With this variation, Seventeen becomes a 4-star route. At the top of the open book (at the small tree), work up and left to the blocky arête. Go up the exposed arête and mantle up to the left end of a ledge. Continue up the "thin crack, right-facing corner, square ceiling, etc." of the normal route.
❏Hooker Heels and Crimp Pimps [route #13, page 371, volume 2] is 5.11d, not 5.11a as stated.
❏Good Housekeeping [route #20, page 373, volume 2] is ★.
Grumpy Raccoon 5.9 G 40' ★
A short but enjoyable pitch.
Start: Same as for Ranger Rick [route #1, volume 2, page 366].
P1 5.9 G: Start as for Ranger Rick, but where that route works right, go straight up the face, then up a broken crack system (V1) to a heartbreaker crux at the top. Fixed anchor. 40'
Gear: To 3/4"
V1 Grump Ranger 5.8 G: Avoids the crux. Work right near the top and continue on Ranger Rick. A good escape should you pump out before the top.
No Fun at Camp, No Sex at Breakfast 5.13a G 60' ★★★★
Much more difficult than the original grade of 5.12c. High-quality moves, excellent (but somewhat sharp) rock, and two vicious cruxes.
Start: 4' right of Red Book [route #3, volume 2, page 366] at an overhanging red face.
● P1 5.13a G: Move up to a rail, then finger traverse 8' right on good holds, then up to a good jug rest. Make a powerful boulder problem up a seam to a horizontal and a bad shake. Power through another rugged boulder problem to some good horizontal holds, traverse a few feet right, then follow a finger- and hand-crack to a fixed anchor. 60'
Go to Bread 5.10d G 60' ★★★
Start: On the face right of Naked Truth [route #6, volume 2, page 367].
● P1 5.10d G: Go up the thin, off-vertical face, moving rightwards to a horizontal crack. There is a fixed anchor just above. 60'
Call Ya Motha 5.11b G 65' ★★★
Continuous with a high crux before the anchor.
Start: 10' left of Fast and Loose in a dirty crack.
● P1 5.11b G: Up the crack, then mantel a ledge. Work up increasingly steep terrain with good holds. Get one final shake at the top and tackle a crimpy crux to a fixed anchor. 65'
Fast and Loose 5.11c G 75' ★★★
Start: Same as Papa Don't Preach [route #16, volume 2, page 371]: 40' right of Easy Ramp and 30' left of the boulder under Eagle Buttress in a right-facing corner underneath a section of blocky overhanging rock 10' up. There is a large roof 70' above the start.
P1 5.11c G: Go up the dirty corner and follow big edges up and right across a face. Make a hard move to gain jugs out left. Campus through the roof and up the face to a fixed anchor. 75'
Gear: Cams to #0.75; quickdraws.
Let the Wild Rumpus Start 5.12c G 75' ★★★★★
One of the best 5.12c's in the park, in the same class as Hourglass (Body Shop) or Buck Fever (Lost Hunter's Cliff). Immaculate, yellowish stone, very similar in appearance to a New River Gorge route.
Start: 10' right of Fast and Loose and 10' left of the toe of the arête (which is left of the giant boulder under Eagle Buttress), on a narrow face with a tan water streak just right of a 10'-high right-facing corner.
● P1 5.12c G: Go up the easy face to a ledge on the right (behind a birch tree that's growing up against the cliff). Journey up through rounded waves of sculpted rock to a jug under the right side of a large roof. Move up and left through a break in the roof to a fixed anchor. 75'
Reverse Kill 5.12b G 85' ★★★
A good line, but inconsistent with a hard start ● and a moderate ending (trad).
Start: On the toe of the arête to the left of the boulder under Eagle Buttress, 10' right of Let the Wild Rumpus Start.
P1 5.12b G: Cruise up an easy start to a stance below a face. Navigate a series of corners, underclings, and crimps to a good ledge. From the ledge, climb 50' of 5.9 hand- and finger-crack to a wild chimney finish. Fixed anchor. Wave to the swimmers as they gawk at your prominence. 85'
Dark Lunch 5.12b G 85' ★★★★
Start: Start just left of the large right-facing corner that is 20' left of the enormous boulder beneath the main roof.
P1 5.12b G: Go up easy jugs to a stance just left of the corner with small but solid gear. Navigate up a powerful series of corners and roof cracks with intermittent rests. Once at the first bolt, enjoy a wild and airy traverse to gain the prominent arête. Climb the arête past two bolts and romp up to a fixed anchor at the lip. 85'
Gear: Standard rack to #2 Camalot.
Queer Eye for the Straight Line 5.12b G 60' ★★★
Start: Same as The Eagle Has Landed [route #23, volume 2, page 373].
● P1 5.12b G: Climb the first section of The Eagle Has Landed. At the prominent 3" horizontal, continue straight up following a crack/seam to a roof (the right side of the same as The Eagle Has Landed), then through this on sidepulls and slopey crimps to the fixed anchor shared with The Eagle Has Landed. 60'
We Want No Loss Nor Gain of Life 5.12d G (5.10 R) 80' ★★★★
Start: Same as Ravenous [route #25, volume 2, page 375].
P1 5.12d G (5.10 R): Climb the first few moves of Ravenous to a ledge. Ravenous goes up the corner; you go right through a short crux to a stance for gear above. Follow the arête—and face just to its left—past overlaps to a perfect jug in a horizontal break. Continue left and up through a roof crack to a fixed anchor. 80'
Gear: Gear to 3/4".
Three Raccoons in a Patagonia Fleece 5.12a G 90' ★★★
A good lower section, followed by a dirty and easier top section.
Start: Between The Tasp [route #32, volume 2, page 379] and Prey Tell [route #33, volume 2, page 379] below an overhanging orange face.
● P1 5.12a G: Stick clip. Begin on easy terrain, then step left and work up through an orange bulge (crux) to a secure shake. Additional powerful moves lead to easier terrain. Romp up incut edges to a tricky move to gain a short finger crack. Up this, then easier ground to a fixed anchor. 90'
Hot n' Stanky 5.10b PG 100' ★★
A contender for the longest pitch at Eagle Falls with great views and varied climbing.
Start: 10' left of Seventeen [route #35, volume 2, page 379].
P1 5.10b PG: Up the face (bolts) to a small roof 20' up. Choose either the corner to the left (easier) or the roof (harder). Follow a series of strong sidepulls to a jug and mediocre gear. Gain a ledge, then press through an easy (but runout) section, then more bolts and gear to a stance below a roof. Traverse left around the roof and move into a high, right-facing corner with a fixed anchor. 100'
Gear: #0.75 to #2 Camalots.
Perky Andrea 5.10b G 90' ★★
Start: 15' right of Seventeen [route #35, volume 2, page 379].
● P1 5.10b G: Climb a shallow corner, then past some overlaps to a stance. Make a tricky slab move, then straight up to the top. 90'
The Hydrofax 5.12b G 95' ★★★
A super exposed pitch. When lowering, stay attached to the belayer's rope and clip into one of the fixed draws; otherwise you'll lower right into the raging river. Use extended draws to avoid rope drag.
Start: 75' downhill and left of Class Five [route 38, volume 2, page 381], just above the water.
● P1 5.12b G: Go through a choss band to bigger holds. Continue up to a loose block, then traverse right to a left-facing corner, and climb this to the massive roof. Make delicate moves to the right, then power through with gymnastic moves. Work left on crimps, then go straight up to a fixed anchor at the top of the cliff. 95'
Sammy-Jo Traceyville 5.9 G 50' ★★
The bottom is chossy, but the top is quality.
Start: 20' right of Class Five [Route 38, volume 2, page 381] below a fist-sized roof crack.
P1 5.9 G: Climb over loose blocks to a stance under the roof. Work out to the arête, then over the lip of the roof and into a wide crack in a right-facing corner. A final crux layback leads to the top of the cliff and a tree anchor. 50'
Gear: To 4" (no small gear needed).
Oral in the Dark 5.10d G (5.10a R) 50' ★★
An exposed and unlikely line up a clean imposing face, possibly easier for taller climbers.
Start: 15' right of Sammy-Jo Traceyville at a crack
P1 5.10d G (5.10a R): Up crack to a large grassy ledge. Work up from the ledge on positive holds following an intermittent crack. Make a steep runout to reach a horizontal crack. Continue up to a stance with tricky pro, then go up and right to a fixed anchor. 50'
Gear: Standard rack with an emphasis on small stoppers.
Trap 'Em 5.10a G 50' ★★
Start: On the arête 10' right of Oral in the Dark and 25' left of Stacked [route #39, volume 2, page 382].
● P1 5.10a G: (V1) Up the arête to a ledge. Continue up horizontal edges and jugs to a ledge with a fixed anchor. 50'
V1 5.8+ G: Begin in the corner to the right and join the main route after the initial crux.
Cracked 5.9 G 65' ★★
Start: 10' right of Stacked [route #39, volume 2, page 382] in an open book corner with a crack in the left wall.
P1 5.9 G: Up the corner for 15', then move left into the crack proper and follow this to the top. Tree anchor 15' back from the edge. 65'
The Waiting Line 5.7 G 75' ★
Still dirty and chossy.
Start: 50' right of Stacked [route #39, volume 2, page 382] below a blocky arête.
P1 5.7 G: Go 10' up the arête to a ledge below a roof. Go over the roof using a crack on the left to a stance under a larger roof. Go over this roof on jugs, then up an open book corner with a large fin on the right. Tree anchor. 75'
Fifty Shades of Awesome 5.10c G 40' ★★★
One of the better routes here. Big moves between good holds with excellent rock.
Start: 20' right of Eyes on the Prize [Route 4, volume 2, page 355], and 8' right of a maple tree growing up against the face, below a dike of black knobby rock 7' up.
◉ P1 5.10c G: Up the face (crux) to some good edges, then move right to left-facing flakes. Up these (#2 Camalot), then up some right-rising horizontal edges to a fixed anchor. 40'
Gear: #2 Camalot.
Scion 5.6 PG (5.3 R) 185'
If cleaned this route would warrant 3 stars. Until then, bring a wire brush and whisk broom. Both pitches have a 5.6 crux, as well as run-out easier sections.
Start: At a right-facing corner that becomes a left-facing corner at an overhang at chest height, 30' right of a boulder cave, and 9' right of Branches [route #5, volume 2, page 358].
P1 5.6 PG (5.3 R): Climb up the corner to an overhang. Go past this on the right, then climb a short, right-rising crack to reach a thin right-facing flake. Follow the flake to where it fades, between two other right-facing flakes. Use these to get a bit higher, then traverse up and left to a thank-God knob in a right-leaning crack. Follow this crack to its end, then follow good jugs to an easy slab. Belay at a fixed rappel anchor at the top of the slab. 85'
P2 5.6 PG (5.3 R): Climb up the exposed, steep slab on good knobs. Make a low-angle run-out to an inverted V-corner with a steep headwall on the left (the crux of Branches is 20' left). Follow a right-rising crack, reach for good holds and continue up and right to reach a thin, vertical crack. Take this to its end, where a thin, right-rising flake begins. Climb up the flake a move, then traverse left to a thank-God flake on the slab. Run it out from the top of that flake, then move left to good holds to reach a ledge right of Branches. 100'
Gear: Double set of cams from 0.25" through 0.5".
Directions: As of 2017, the North Lake Extension used to access the parking for Ice Cave Mountain [volume 2, page 351] is blocked about 1 mile before the parking by a washed-out bridge here 506991,4822816. You can park at the campsite before the closure, which adds about 30 min of road walking each way. Oddly enough, this bridge was replaced in 2014, but it didn't last long! Construction of a more robust bridge is expected to be completed in the fall of 2019.
One note about the North Lake Extension: this road is seasonal, and doesn't open until after "mud season", whenever that is (sometime in May, but definitely by Memorial Day). For spring climbing, get in there as early as you can to avoid black flies. You can check the road status with the DEC Herkimer office 315.866.6330, and ask for the administrative ranger for the North Lake/Atwell area (in 2018, this is Ranger Robert Coscomb 315.942.6949, cell 315.235.5374).
There has also been considerable logging in Ice Cave Valley. This doesn't change the directions, but the logging road described as "not maintained" has been very much maintained (minus one small culvert that hasn't been replaced yet). A mountain bike really takes the sting out of this approach, reducing 1 hr of tedious road walking to about 10 min.
The "ICM" paint on the boulder that marks the start of the herd path [volume 2, page 351] has completely faded away. There are three very large, open, field-like logging headers that you pass on the dirt road; the start of this herd path is 200' beyond the third (and largest) one, at a small stream crossing 509615,4824731. It is well marked with flagging and cairns, and the trail is obvious and easy to follow.
On the approach—but still relatively close to the Fissure Face—you may come across Barbara's Boulder [volume 2, page 353] 509771,4825367. This impressive, 50'-tall boulder sits just downhill on the north side of the ridge, and on top of a small cliff. There is also a collection of large boulders in the valley just before the final uphill approach to the Raven Wall.
Scarecrow 5.12d G 60' ★★★★
This old toprope route has been equipped and led, and is much more difficult than the guidebook grade 5.12a. It is reportedly excellent with great stone and protection, and now stands as the most difficult route in the Old Forge region. Also, along with Debaser at Devils Washdish, it is one of the most difficult-to-reach hard routes in the park.
Start: Towards the left end of the cliff, look for the largest unbroken section of vertical rock with a horizontal break halfway up. Begin 10' from the left side of the face, at a left-leaning seam.
● P1 5.12d G: Stick clip! The crux is below the first protection. Climb the left-leaning seam with super techy laybacks to the horizontal break. Rest up here, then punch it up the face with good crimps and water grooves to the top. Fixed anchor. 60'
Once They Moved Like the Wind 5.9 PG 150' ★★★
[Right of route #6, volume 2, page 389]
The climb has excellent finger locks in deep cracks and is surprisingly better than it appears. With some traffic and a bit of cleaning, this line would be as good as Do Me a Solid.
Start: Twelve feet right of Hart Pump at an obvious, diagonal crack.
P1 5.9 PG: Up the easy crack to a wide section and bush, which you pass on good holds. Continue in a right-rising line to another bush. Climb a short bulge (or move easily left to join the upper crack of Hart Pump, making the overall grade 5.8-) and up to a rippled pink face with a tips crack just to its right. Go up the face (crux), using the widening crack and superb locks. Join Hart Pump a few feet below the top. 150'
❏P1 of Lunatic Hares [volume 2, page 395] should be ★★.
❏V1 of Lunatic Hares [volume 2, page 395] should be ★★★.
❏V2 of Lunatic Hares [volume 2, page 395] should be ★★.
❏As of 2017, the phone number listed for The Emporium Marina [volume 2, page 394] no longer works. The status of this marina is unknown.
Applied Geometry 5.9+ TR 100' ★★★
A nice mix of face, flake and crack climbing. Begin 20' left of the Leaning Tower (the large block described in the guidebook [volume 2, page 394]) in a low flat spot between boulders, just left of a prominent right-facing corner. Climb up the steep face just left of an arête to a ledge. Stand on little pillars and move up then left on thin holds to a curving, left-facing corner and another ledge. Make an unusual move off the left end of the ledge into a short right-facing corner (crux). After a few moves up the corner, reach right to a downward pointing knob. Above this, follow a series of flakes leading up to a pair of cracks. Start in the left crack then traverse to the right crack to top out below a spruce tree anchor.
The Shark's Fin 5.6 G 35' ★★
Start: 20' left of Chew It Like Your Mean It at an obvious offwidth corner.
P1 5.6 G: Layback/jam the corner for 20'. Pull over to some fun climbing to scrambling up to a spruce tree. 35'
Gear: 1 ea Camalot #4, #3, #2. There is ample opportunity for larger gear (a #5 Camalot is probably ideal).
Chew It Like You Mean It 5.9 TR 70' ★★★
Begin 12' left of Paddle Matt, Paddle at a small depression in the cliff. Trend left up to two large, dirty flakes 12' up. Go over these to lower angled clean face climbing (crux) to a two foot ledge, then straight up another 12' of steep rock to lower angle slabs and a large spruce. Excellent climb.
Paddle Matt, Paddle 5.7 G 60' ★
Start: 8' left of Six Pack where a small triangular block leans against the cliff, below an 8'-tall bulge.
P1 5.7 G: Mantel on to bulge, continue up and trend slightly left past small horizontals (gear). Use hidden buckets to pull a bulge (crux). Finish on low-angle slabs to large spruce tree. 60'
Six Pack 5.6+ PG 60' ★★
Fun climb for the grade, although the chossy corner could use some cleaning.
Start: 30' left of the giant flake described in the start of Lost Horizon [route #1, volume 2, page 394] at a small overhang near the ground.
P1 5.6+ PG: Start with a boulder move to reach a 10" ledge 7' up. Continue straight up the face past a good 2" and 3" horizontal (gear) into a slightly chossy left-facing corner. Up this over a small overhang and finish up the low-angle slabs to large spruce tree shared with Paddle Matt, Paddle. 60'
Paddler's Delight 5.6 G 40' ★★
Start: 10 feet right of Lunatic Hares, in front of a rectangular block along the trail.
P1 5.6 G: Pull onto the ledge beneath a curving crack and follow it up towards a dirty corner. Trend left at a small tree to reach a fist crack. Follow the crack to meet Lunatic Hares for the 5.8- finish. 40'
Gear: To 4".
Location: Off NY 30 between Tupper Lake and Long Lake.
Aspect: Southeast
Height: 100'
Quality: ★★
Approach: 30 min, moderate.
Summary: Several quality crack routes on a cliff directly below a popular summit.
This cliff sits directly below the pretty summit cliff of Goodman Mountain. The rock is an off-vertical face and slab split by right-slanting cracks. The gem is Let's See Action, and shares an anchor with the other two routes which are good leads, but can also be toproped from this anchor.
At present, the routes are climbable, but need additional cleaning to make them really good.
Directions: From Tupper Lake (where NY 3 and NY 30 split), drive on NY 30 towards Long Lake for 9.2 miles to the Goodman Mountain Trailhead on the left 537136,4884826, also signed for the Horseshoe Lake Wild Forest.
Follow the paved (!) trail (red markers) for about 10 min. Turn 90° left off the trail 537794,4885314 and bushwhack uphill on a bearing of 353° to the cliff 537551,4885567, reached at 30 min. The bushwhack is slightly disorienting, as you're not going straight up the fall line; rather, you are going uphill and left.
Another option is to follow the trail to the summit (1.6 miles), walk south to the top of the cliff, then meander down either side to the base of the cliff. It's longer, but navigation is easier.
Let's See Action 5.8 G 100' ★★★
Start: At the height of the terrain at a left-slanting crack. (Most of the cracks on this cliff slant right, so this one is special.)
P1 5.8 G: Follow the left-slanting crack for 15', then move right to the more prominent right-slanting crack. Follow this to its end, then move up to a tiny ledge with a shared fixed anchor. 100'
Freedom Summer 5.10b G 80' ★★
Start: 15' down and right of Let's See Action at a right-slanting, wide crack in a right-leaning, right-facing corner.
P1 5.10b G: Follow the wide crack, which narrows to tips (crux), to its end at an arête. Go up the arête (one 5.10a move) to a tiny ledge with a shared fixed anchor. 80'
Gear: In this order: Camalots #2, #1, #3, #2, #1; green Alien, 0.3 Camalot.
Civil Right 5.10a G 80' ★★
Start: 5' right of Freedom Summer at a right-leaning seam.
P1 5.10a G: Go up the seam and slab (hidden pocket) to where the seam widens to a handcrack. Follow this up and right (5.9) to its end at an arête. Go up the arête (crux) to join the Freedom Summer arête, and climb this to the shared fixed anchor. 80'
Gear: To #3 Camalot.
Crakaphobic 5.7 TR 45'
[Right of route #1, volume 2, page 397] On the right side of the cliff, and just left of the hiking trail is a blunt arête with a crack on its right side. On the left side of the arête is a prominent, right-facing corner with a wide crack that runs the full height of the cliff. Go up the crack on the right side of the arête to a horizontal crack at its top. Step left to a ledge in the prominent, right-facing corner. Ascend the wide crack and face to its left to the top. 45'
Egg! 5.6 G 35' ★
[between routes #7 and #8, volume 2, page 401]
Start: At twin cracks 12' right of Trundle Bundle, just right of a left-facing, mossy corner.
P1 5.6 G: Follow cracks and face past a large ledge to a tree with a fixed anchor. 35'
Twin Rises 5.9 TR 60' ★★
Begin 100' right of Trundle Bundle [route #7, volume 2, page 401] at a shallow, left-facing V-groove in the center of a tall, vertical face. Funky moves off the ground lead to jugs above. Stay left of a tree, then step right and climb crimps to a crack system. Up this to a ledge at the top.
❏The Lee Road Truck Trail (aka Tamarack Trail, aka "Secondary 78") [volume 2, page 493] is no longer suitable for 2WD vehicles due to a washout at the start of the road. This adds about 1 mile of road walking each direction.
Paul and Tom's Morning Show 5.10+ G 110' ★★★
[Between routes #14 and #15, volume 2, page 412]
This route breaks the wonderfully exposed headwall to the right of the Azurite arête with views of the main wall and the valley below. Awaits a clean lead.
Start: 40' right of Azurite on a large ledge with an overhang at eye level.
P1 5.10+ G: Climb around the overhang then straight up weaving left and right through a series of flakes and thin edges to a roof. Around the roof on the left, then straight up a series of finger- and hand-cracks to a spectacular finish onto a ledge. 110'
Chasing The Scream 5.12b G 70' ★★★★★
[Between routes #14 and #15, volume 2, page 412]
One of the best trad pitches of its grade in the park that ascends a holy-shit-where-did-that-come-from feature. The gear opportunities are plentiful and straight-forward, that is if you have the strength to stop and place it.
Start: At a 6'-tall, 10"-deep right-rising ramp which is 20' right of the large block/flake that leans against the cliff.
P1 5.12b G: Move up onto the ramp, then up the obvious fingercrack. As the crack jogs left, go straight up (bolt) past flakes to a ledge. 70'
Gear: Up to #1 Camalot, plus a single #3.
Location: Off NY 458 north of Santa Clara.
Aspect: Southwest
Height: 120'
Quality: ★
Approach: 30 min, easy.
Summary: A small cliff with several easy routes directly below a popular hiking summit.
This cliff is located in a section of the Santa Clara Tract north of Santa Clara. The routes are accessed by rappel from the summit.
Directions: Locate the intersection of NY 458 and an unmarked dirt road that provides access to The Pinnacle 544511,4942423. This intersection is 1.0 mile south of Santa Clara (the intersection of NY 458, Center Street, and South River Road) and 9.8 miles north of the intersection of NY 30 and NY 458. Follow the dirt road to a yellow gate, then to a second yellow gate. At the Y intersection, go left and drive to a parking area at the end of the road 543673,4944136. Search around for the red-marked trail and the sign-in register. Follow the trail for 0.6 mile to the summit of The Pinnacle.
Santa Clara Traction 5.6 G 120' ★★
Start: Locate the fixed anchor at the top of the route, about 50' down and (skier's) left of the picnic table on the summit. A 70m rope will get you down from this anchor to a ledge where the route begins. (The cliff continues down another 80' to the base, but is quite mossy and unattractive.)
P1 5.6 G: Climb straight up following cracks and bolts. 120'
Gear: To 3".
Directpicnissima (TR) 5.5 PROTECTION 70'
This route is located directly below the picnic table. Scramble down about 80' feet to get to the top. A lack of cracks here make anchoring difficult. Rappel down to a nice ledge and follow layback and jam cracks back up.
Ringneck 5.6 PG 60'
Start: The hiking trail makes two sharp switchback turns to the right. At the second of these, there's a long rock face in front of you that runs downhill. Walk about 100' along the base to a clean, 1"-wide, vertical crack that leads through a small overlap 10' up.
P1 5.6 PG: Climb the crack to gain the slab above. Angle rightwards into the trees. 60'
Three Easy Pieces 5.7 G 18'
Start: The hiking trail makes two sharp switchback turns to the right. Just past the second switchback, there is a large rock outcrop off to the right on the uphill side of the trail. There are some highball boulders and short topropes. Near the left end of this formation is an 18'-tall handcrack.
P1 5.7 G: Climb the handcrack. 18'
❏Variation to GK's First BJ [route #2, volume 2, page 406]:
V1 H's First V 5.10d TR: After the first two bolts of the normal route, go straight up to the roof. Move over this on the left side, then up and right to the fixed anchor.
SLU'zers 5.3+ G 40'
Start: At a right-facing corner 4' right of Sport Climbing is Neither [route #1, volume 2, page 406].
P1 5.3+ G: Climb up a series of ledges along the right-facing corner to the dominant overhanging ledge to right of two mossy vertical cracks. Continue to the left of the obvious horizontal crack to the top. 40'
Torpedo 5.11b/c TR 40' ★
Begin under the arête left of Where Frenchmen Dare [route #12, volume 2, page 407], just right of Up your Bum, below an undercling jug. Go straight up to a square overhang on the arête. Break this on the left following a left-leaning crack to a horizontal break (Arette I'm Spooked crosses here). Continue straight up the short face to the top.
Arette I'm Spooked 5.6 G 50' ★★
A good line for the wall. Watch that you don't get your rope stuck in the crack once you move around the arête.
Start: Just right of Where Frenchman Dare [route #12, volume 2, page 407] below a small arête.
P1 5.6 G: Go straight up the small arête, then follow a left-angling, broken crack to the large arête. Go leftward around this following the underside of an overlap. Join Up Your Bum to a fixed anchor. 50'
❏The entire Silver Lake area seen some serious logging over the last several years. Keep this in mind when following the directions in the book, and if it's your first time, use a GPS. (There are many options for mapping/GPS apps on modern smartphones.)
❏Variation to Evil Twin [route #7, volume 2, page 487]:
V1 5.9 G ★★★: Begin directly below the open book and boulder up into the book. Cleaner and better than the original start, and better for the second too. A better descent is to head up and right onto a large terrace, then rappel from the Rasberry Beret anchor.
Humility 5.11b G 55' ★★★
Start: About 200' right of Last Grasp [route #1, volume 2, page 486] and 150' left of Wildflower (to the right) below a prominent orange streak on the left end of the cliff, and just right of a very large roof 15' up.
● P1 5.11 G: Start using the boulder at the base and gain a ledge (there is an optional finger-sized cam to protect the moves to the first bolt). Delicate and strenuous moves weave up the face in a crescent shape, finishing on an obvious ledge on the arête. Fixed anchor. 55'
Unnamed (project)
Closed project. This project climbs the obvious, overhanging, black open book 35' left of Wildflower. Some 5.11 down low and up top.
Yield 5.10b G 75' ★
Climbs Wildflower through the traverse, then continues leftwards. This climb was put in to get an anchor
established below the fierce headwall for possible lines up it.
Start: Same as Wildflower.
P1 5.10b G: Follow Wildflower through the traverse. Continue traversing left another 8' to a stance on a small prow. Step up onto a perfectly clean slab (this slab forms an apron below the impressively steep wall above). Climb the slab (5.7) up and left to a fixed anchor at the base of the steep upper wall. 75'
Gear: #0.5 Camelot for start.
Descent: Lowering from this climb will shorten the life of your rope. One alternative is to rappel off the other end of the rope using your belayer as counterweight.
Wildflower 5.10b G 60' ★★★
A nice change of pace from the cracks and corners. Climbs edges on a vertical wall down low, has a balance traverse on slopers, and finishes with mantels/presses. The P2 overhanging corner above is a closed project.
Start: 30' left of Swamp Song. The route follows a somewhat-vague groove feature; there is a severely overhanging open book 60' up.
◉ P1 5.10b G: Mantel (#0.5 Camelot) onto a sloping stance. Step up to the wall and face climb with unusual handholds and small feet to a small overlap. Make a balance traverse left 5' using sloping holds to a stance. Climb up (optional purple C3) to a series of mantels and presses. Finally, climb around a large—but stable—block on it's right and up to a fixed anchor. 60'
Gear: #0.5 Camelot for start and optional purple C3 after the traverse.
Descent: Lowering from this climb will shorten the life of your rope. One alternative is to rappel off the other end of the rope using your belayer as counterweight.
Swamp Song 5.9 G 100' ★★★
This is an obvious, left-slanting crack with a looming squeeze section up high. May have been climbed before, as several old pieces of cord were found around a cedar.
Start: At the far right of the Born to Run Amphitheater, and 10' left of the obvious 1'-wide dike
rock chimney.
P1 5.9 G: Climb the left-slanting crack past several sections that are more difficult than they appear. Up high the crack widens from hands to a squeeze chimney. There is a key red C3 in a horizontal off left that protects the moves into and up the chimney. Fixed anchor at the top of the chimney. 100'
Gear: Standard rack with doubles #1 through #4 Camelot. 1 ea #5, #6, and red C3.
No Spring Chickens 5.10d PG 95' ★★★★
Excellent climbing up a naturally clean brown face. Good climbing the whole way.
Start: About 150' right of Born to Run [route #2, volume 2, page 486], and 15' right of a left-angling dike feature, just right of a right-facing corner on the clean brown face.
P1 5.10d PG: Climb up the face, then move right into a groove. Climb up to where the wall steepens, then make difficult moves up and left onto a ramp. Climb to a fixed anchor on the left. 95'
V1 Brooder Box 5.11 TR: Climb directly up the right-facing corner to the anchor. Cool stemming and palming up the blank corner. (As a lead, this is a closed project).
Gear: #1 Camelot, black Totem, blue/black Alien offset, small stoppers.
Tom Strong 5.9 PG 130' ★★★
Named in honor of Tom Wright, an Adirondack local who died in a climbing accident in Boulder Canyon, Colorado in 2020. The initial handcrack is excellent and probably harder for small hands. The second pitch has good moves for the first half, but is otherwise not recommended.
Start: 50' left of Rico's Roughnecks [route #4, volume 2, page 487] at a 30'-high, perfect handcrack.
P1 5.9 G: Jam the steep crack until it ends. Angle up and right along a ramp to a ledge with a fixed anchor. 60'
P2 5.9 PG: Make a boulder move off the belay (crux) to gain a hollow flake. Good moves follow the flake up and right to its end. Climb a dirty chimney to a sloping cedar terrace. Rappel from the cedar with a single 60m to the ground. 70'
Gear: Single rack to #3 Camelot, and an extra #2 Camalot.
Ugly Twin 5.9 G 45'
Not recommended in its current condition; would get a star if cleaned. Climbs the rappel line of Tom Strong.
Start: 40' right of Tom Strong and 20' left of Rico's Roughnecks at an obvious, dirty, shallow, left-facing corner.
P1 5.9 G: Climb the corner to a roof. Traverse left 5' and break the roof. Continue easily to the P1 fixed anchor of Tom Strong. 45'
Gear: Standard rack to #1 Camelot.
Buzzards' Beards 5.10+ G 75' ★★★
Start: 3' right of Little Sister [route #6, volume 2, page 487] below a right-facing, right-arching corner.
P1 5.10+ G: Climb up to an undercling flake (crux) and make a couple hard moves to gain the corner. Follow the corner out the arch to a good stance on a ledge. Move up and left past a mail slot into a left-facing corner that gradually eases in angle. Merge into Little Sister: go past 2 bolts to a brushy ledge and a fixed anchor. 75'
Gear: To #0.75 Camalot; doubles in the finger sizes.
Just Can't Get Enough 5.10a G 65' ★★★
A quality route with a variety of challenges. Probably 5.10+ if you avoid the obvious and tempting cedar when moving left.
Start: At a low flake 15' right of Evil Twin [route #7, volume 2, page 487].
● P1 5.10a G: Mantle above the low flake, then drift up and left. Face climb to a a shallow, right-facing corner. Move left here (crux), then up and right to a sloping ledge and a fixed anchor. 65'
Raspberry Beret 5.11 PG 85'
A beautiful flake that is Spider's-Web quality. Beware—the first 20' is hollow.
Start: 20' right of Just Can't Get Enough and 10' left of Dirty Uncle [route #8, volume 2, page 488], at the obvious, black, right-facing flake that curves spectacularly up and right.
P1 5.11 PG: Excellent hands and fists (5.9) lead 50' up the flake to where it ends. Make a hard step straight right, then angle under small roofs (some spooky rock) and into a groove. Follow the groove easily to a fixed anchor on the left. 85'
Gear: Camalots red C3 through #4; small and medium nuts; an extra #3.5 Camalot; two extra #3 Camalots.
Into the Groove 5.9- G 85' ★★
A good warmup. Harder if you're tall.
Start: 5' right of Raspberry Beret.
P1 5.9- G: Climb up and right to the start of an obvious groove. Follow the groove past an interesting crux mantle to a fixed anchor shared with Raspberry Beret. 85'
Gear: Standard rack to #1 Camelot.
Andrew 5.10+ G 75' ★★★★★
Climbs a cool feature on beautiful rock; great moves on a Spider's-Web-quality trad pitch.
Start: About 40' right and downhill from Dirty Uncle [route #8, volume 2, page 488], at a 15'-high slab below a left- facing, arching feature that begins 60' up.
P1 5.10+ G: Up the slab to a stance where the wall steepens. Move up into a steep groove and follow it past difficult sections between good rests. The groove ends at the left-facing arching feature. Fingers, then hands lead past beautiful orange lichen and some hard pulls on flakes. Fixed anchor. 75'
Gear: Doubles to #2 Camalot and a red C3.
Backwoods Ballet 5.10a G 55' ★★★
Ascends a beautiful open book corner with continuous stemming and edging.
Start: Walk around the corner from Andrew 50' at a left-facing corner tucked in a nook.
P1 5.10a G: Up the corner to a fixed anchor on the right wall. 55'
Gear: Standard rack from small TCUs to #0.3 Camalot.
Disposition 5.10 PG 70' ★★★★
Some thin moves above good small pro, with a sting in the tail for good measure. Multiple cruxes with good rests between. Much harder at the second bolt for shorter climbers. Looks 5.8 from the ground.
Start: Walk around the corner from Andrew, then go another 200' right along the wall. Look for a bolt 15' up on a clean black slab, just right of a short, right-facing corner.
P1 5.10 PG: Climb easily to the first bolt, then past it with difficulty up and left to the corner. Climb the corner to its end, then up into the seam/tips crack. Follow the crack past some tenuous moves and rests to a fixed anchor. 70'
Gear: Standard rack to #2 Camelot, C3s, small wires, extra #1 Camalot may be helpful.
Unnamed (project)
Open project. In the hard 5.11 range. Begin as for Wide Eyed and Hopeful, but continue straight up the apron to a steep wall on the left with some flake systems. Climb the naturally clean wall past two crux sections, and finish on the good trad corner of Wide Eyed and Hopeful.
Wide Eyed and Hopeful 5.9+ A2+ 90' ★★★
A mini-Odyssey up a beautiful and naturally clean piece of stone. The aid section is short, but committing above a ledge with a string of body weight shallow knife blades, C3s, and brass.
Start: 40' right Disposition. There is a low angle apron–slab just above with a massive roof
system looming 90' up.
P1 5.9+ A2+: Cruise up to the apron, and angle right to the base of a beautiful, white, open book with an intermittent knife blade seam. Aid up the open book, and make a committing transition to free climbing at its top, angle left to good pro. Make a cramped traverse straight left for 10', then work up into a left-facing corner. Climb to the top of the corner, then traverse straight left (#3 Camelot for second) to the Disposition anchor. 90'
Gear: Standard rack to #3 Camalot; knife blades; a medium lost arrow; small C3�s and TCUs; brass nuts. Double ropes useful.
Backwoods Brawl 5.11- G 85' ★★★
A bit of a scuffle. Really good if you like off-width slots.
Start: 100' right from Disposition at a mini cave/alcove with a slot just above. There is an unusual intersection of rock types down low with a band of fractured dike rock, some pegmatite with coarse crystals and then the more typical perfect pink Mud Pond granite.
P1 5.11- G: Climb into the slot and work your way past it. Above is good, easier corner climbing with a few thoughtful sections along the way. Fixed anchor on the left at a good ledge. 85'
Gear: Single rack to #6 Camelot; a few extra small/medium cams for the start.
This cliff is mentioned in Adirondack Rock [volume 2, page 485] and is accessed from the top of Silver Lake Mountain.
Directions: An alternative approach begins as for the Hydrogen Wall. At roughly the same distance in as the turn off to Mud Pond Cliff, look for a good skidder road heading left and up. Follow this road to its end, and enter the hardwoods. Go roughly straight uphill and work through some low, broken rock bands. Keep going up and slightly right until you can make out some chossy rock bands through the trees. Don't go all the way to the rock; instead go hard right until you can go up through some moss covered talus to the cliff. 25 min.
Descent: Walk (skier's) right from the open summit to a steep, easy dirt gully; go down this.
Something Silly 5.1 G 65'
Start: Walk left from the roofed, center section of the wall, around the corner, and up the steep narrow dirt gully. The gully ends at a short rock face; begin here.
P1 5.1 G: Climb the face to a sloping ledge. Move right and climb a crack past a cedar to the top. 65'
Gasoline (project)
Open project. This is located in the central, roofed section of cliff, the most imposing section. Begin below a hanging, right-facing, corner capped by a tiered ceiling. Climb up to the corner and through the ceiling. Traverse left to a right-leaning crack and follow it to the top.
Copperhead Road 5.8 G 110' ★★★
Well worth the walk; three distinct sections, each good.
Start: Walk right from the main wall, past a large wedged block 15' up. Go around the corner to the right-hand buttress and locate a distinct vertical dike peppered with square-cut holds. Begin just right of the dike, at the right side of a pillar.
P1 5.8 G: Jam and layback to the top of the pillar (5.8, #4 Camelot). Step across and climb up the dike and a crack on the left wall. The left crack thins and become hollow as it ends on the arête; climb the dike a few feet higher to get pro (piton; back it up with a small stopper), then step down and around (exciting) to a stance on the arête. Climb the arête and face past another piton. Go up a short slab (runout) to a belay at a cedar. 110'
Descent: Rappel from cedar with a single 70m rope.
Gear: Single cams from purple C3 to #4 Camelot; small to medium stoppers; second #2 Camelot.
Hillbilly Highway 5.7- G 120' ★
Nice climbing on clean, grippy rock, marred slightly by an unappealing finish.
Start: 20' right of Copperhead Road at the rightmost of two left-leaning, right-facing flake–ramps.
P1 5.7- G: Climb the flake–ramp past a bulge (crux) to a small ledge with a little cedar. Follow a left-leaning crack to the top of the dike. 3rd class up to a relatively flat area with several cedars and a pine. 120'
Descent: Rappel from a cedar with a single 70m rope.
Gear: Single cams from grey C3 to #0.5 Camelot; small to medium stoppers.
Uncomfortably Numb 5.10b PG 90' ★★★
Climbs the face and arête just to the right of P1 of I See You. A committing bottom leads to technical moves up the arête with nice position.
Start: 5' right of I See You below a short, left-angling crack that begins 20' up.
P1 5.10b PG: Boulder up to the crack and pro. Make committing moves up and right to a stance on top of a spike. Climb the excellent arête to an easier finish. Trad anchor (#3 and #4 Camalot). 90'
Gear: TCUs blue thru orange and medium nuts for the crack. Optional #0.5 and #0.75 Camelot for the
finish.
Descent: Build a trad anchor, then continue up I See You. Alternatively, traverse easily 15' right and rappel from the tree at the top of No More Fears.
No More Fears 5.10a G 90'
Closed project. Makes a good alternative start to I See You.
Start: 20' right of I See You [route #19, volume 2, page 445] in a shallow left-facing corner.
P1 5.10a G: Up the left-facing corner for 20', then step right on a slab into another left-facing corner. Up this (crux, small brass offset helpful) to a ledge. Continue up cracks to an arête; move left around this to a handcrack. Follow this to a large ledge and tree belay. 90'
❏Variation to Blockus [route #3, volume 2, page 446]:
V1 5.10 G: Begin as for What Every Lichen Knows and climb the initial chimney to the large block. Traverse left under the block using a horizontal squeeze chimney to gain the normal route at the offwidth.
Forever Young 5.10c G 90' ★★★★★
Ascends the straight-up crack on the orange-colored left wall of the huge corner. Superb, with a great photo opportunity from the anchor of What Every Lichen Knows.
Start: A few feet left of Blockus, on the right side of a slab at the base of the huge corner.
P1 5.10c G: Up the low-angle slab to ledge. A few more slab moves gain a left-leaning, slabby open book, then to another ledge. Climb the obvious cracks to a fixed anchor above. 90'
Pan's Protege 5.8 G 90' ★★
There is a very obvious offwidth crack in the back of the huge corner between Forever Young and Happy Thoughts and Chalk Dust [route #4, volume 2, page 446].
Start: Same as Forever Young at the base of the slab.
P1 5.8 G: Go up the slab and trend right into the terraced corner. Pass these terraces (if going left on the second terrace, beware of your rope in the crack) and continue up to the base of the wall. Stem and jam up the corner to a ledge to the right. Move up the left-facing corner, then work up and left into the handcrack on the face (crux). Follow this to the top; fixed anchor. 90'
Gear: Standard rack plus a single Camalot #3 and #4.
What Every Lichen Knows 5.10b G 65' ★★★★
Start: At a 5'-wide stem-box below the right side of the Blockus formation. (This is the same start as Happy Thoughts and Chalk Dust [route #4, volume 2, page 446].)
P1 5.10b G: Climb up the stem-box to a large chockstone. Exit right around a roof and then hand and finger jam up the right-facing corner formed by the massive Blockus formation. Fixed anchor shared with Blockus and Happy Thoughts and Chalk Dust. 65'
Breakfast Can Wait 5.9 G 50' ★★★
Start: 10' left of Supertime [route #5, volume 2, page 447]. (These two routes are parallel and now share a fixed anchor on the ledge.)
P1 5.9 G: Make a step up to gain a crack. Up this until it peters out, then make a few moves up and right to switch cracks. Follow the crack to the ledge with a fixed anchor. 50'
Unemployment Line 5.12b G 80' ★★★
Start: 20' right of Suppertime [route #5, volume 2, page 447] at a set of slopers 3' up. This is below and right of a prominent seam/fingercrack which does not quite reach the ground.
P1 5.12b G: Stick clip. Step up onto the slopers and make hard face moves up and left to gain the seam. Climb the seam until it is possible to move right into a fingercrack and climb this to a ledge at the end of the Devil's Lunchbox traverse. Follow Devil's Lunchbox to the fixed anchor. 80'
Devil's Lunchbox 5.9+ G 90' ★★
Start: 40' right of Suppertime below the left of two V-grooves.
P1 5.9 PG: Make a hard move off the ground to gain the V-groove and follow this to its end. Traverse left to a ledge and a short, acute, right-facing corner. Climb the corner, then step left to a nice flake system to the fixed anchor. 90'
Sound and Fury 5.12a G 90' ★★★★
Start: Below a right-facing corner, just right of a 15'-tall, orange finger of rock 10' up, and 20' left of a grungy, often-wet depression.
◉ P1 5.12a G: Go up a shallow depression, then move left into the corner. Up the corner (small nuts) until it is possible to step right to a right-facing flake. Climb the flake to a right-facing corner, then up a short slab to a horizontal break (0.4 Camalot). Up right on good holds then back left to a tricky series of moves to a ledge. A short, easy handcrack in a corner (optional #2 Camalot) leads to a fixed anchor. 90'
Gear: Small nuts, #0.4 Camalot, and an optional #2 Camalot.
Finger Lock'n Good 5.10c G 110' ★★★★
A long-time project previously documented as Finger Lickin' Good.
Start: At the fixed anchor between Tales of Weakness and the base of this crack. There is a clean 5.6 pitch which leads to this anchor from Window Box Ledge [this ledge is labeled "A" in the photo diagram on page 450, volume 2].
P1 5.10c G: Step right and climb easy slab to a short left-facing corner. Up the corner and into the obvious right-leaning fingercrack. Follow this past a devious crux to a pin where the crack becomes vertical. Continue up to a large cedar and follow a hand crack (5.7) to the top. 110'
Gear: Standard rack with small nuts.
The Wheelchair Ramp 5.9- PG 100' ★★★
Start: 55' left of the vegetated gully and 40' left of Famous From The Pain at a right-arching flake that rises directly from the ground and becomes a prominent right-facing corner.
P1 (5.9- PG): Climb the flake (or the face to the right) to the corner. Climb the corner using the intermittent crack to a ledge at its top. 100'
Descent: Rap or lower with single 60m rope.
Gear: To 1" plus Tricams and RP's. The protection is good where you need it, but not straight forward, and some placements are critical for keeping the route PG; if you miss key gear, the route becomes R.
Famous From the Pain 5.11a G 290' ★★★★★
Start: Left of Crackus Interuptus [route #19, page 452, volume 2] and 15' left of the vegetated gully just left of where the lower approach trail meets the cliff. This is below a clean-cut right-facing corner 30' up that leads to a massive roof.
P1 5.9 G: Climb face and thin cracks to the excellent right-facing corner (V1). Layback to its top, then jam right under the roof for 25' and break the roof at a handcrack. Follow the crack to its top and face climb up and left to a fixed anchor. 130'
P2 5.11a G: Climb easy face right to a stance below a clean left-facing corner guarded by a roof. Climb over the roof and up the corner (V2) and thin cracks to a stance below the next roof. Climb out the roof via twin handcracks and follow these to a fixed anchor on the right. 100'
P3 5.10a G: Climb the clean face between grungy opposing corners. 60'
V1 Thin Privilege 5.10c G ★★★★: A good pitch as a route itself or as a harder first pitch to the regular route. Instead of stepping right into the corner, head straight up through a bulge. Climb face and thin cracks just to the left of the arête to a stance below a left-facing corner. Up the corner (run out but easy), clip a directional bolt and walk right to a belay. Gear to 1" plus a #2 Camalot.
V2 Painkiller 5.9 G ★★★★: Not as excellent as the regular P2 but it does drop the overall route grade from 5.11a to 5.10a. From the top of the corner traverse right across the slab to a bolt. Continue right around an arête, then up to and through the roof via the hand- and fist-crack which becomes an offwidth corner. At a cedar traverse 10' left to the standard P2 belay. Careful rope management is required to reduce rope drag. Gear to 4".
Descent: Rap with a single 70m rope.
Gear: Standard rack to #3 Camalot.
❏The route Tooth & Nail [route #7, volume 2, page 455] is more like 5.10c/d.
❏P1 of Silver Flake [route #9, volume 2, page 456] has been cleaned to climbable condition.
Start: On the right side of the tree-filled depression in a left-facing corner.
P1 5.6 PG: Climb the corner to a belay at an obvious crack (#4 Camalot).
Present Tense 5.9 G 60' ★★
Nice face climbing on clean rock after the initial corner.
Start: 40' left and uphill from Quercus Rubra, beneath a left-facing corner with an overhang 40' up.
● P1 5.9 G: Climb 6' up the corner, then diagonal up and left across the face until below the left end of the overhang. Climb the overhang and short left-facing corner (crux) to a good stance. Increasingly easy climbing leads to a great 3rd class slab and a fixed anchor (shared with Bruised Orange) 60'
Bruised Orange 5.7 G 60' ★★★
Well-protected corner, face, and arête climbing.
Start: Same as Present Tense.
● P1 5.7 G: Climb the left-facing corner for 15' until an obvious pull around the corner. Climb up the face to a slab with a fixed anchor (shared with Present Tense). 60'
Quercus Rubra 5.9+ G (5.4 X) 225' ★★★
Two nice (and very different) pitches of climbing that will improve with additional cleaning of the final slab.
Start: 150' left of red, black & blue, past the brushy depression of Silver Flake [route #9, volume 2, page 456], and past some low ceilings. Begin below a face at a waist-high shelf that makes a great bench to shoe up on. There is a small left-facing flake 10' above that.
● P1 5.9+ G: Climb the face past a crux mantel onto the flake. Continue up and slightly left, past a bulge to enter a narrow, black water groove. Go over a final small bulge to a fixed anchor. Harder if short. 75'
P2 5.9+ G (5.4 X): Go up and right over blocks (5.4 X) to a left-facing corner. Jam up the corner, then move left to a cool "handlebar" hold. Go up the face past some finger pods to the base of a short, wide, crack-like groove. Move up groove to a stance out left (a #5, then #3 Camelots helpful). Step right onto a narrow slab and climb to a fixed anchor. A great and varied pitch that has lots of 5.8 in the middle sections. 150'
Gear: Standard rack from small TCUs through to #5 Camalot. Double up on the #2 and #3 Camalots. Aliens work well in the finger pods of P2.
Descent: Two rappels (130', then 70'). Alternatively, walk (climber's) right; easy 15 min.
Wasted Reprise 5.10b PG 105' ★★★★
Excellent crack climbing with a splitter offwidth in the upper section.
Start: Climb P1 of Silver Flake [route #9, volume 2, page 456] and continue another 30' uphill on grassy terrain in the depression to a fixed anchor at the beginning of a left-arching crack–flake on the right wall. Above is a large nose-like feature, the right side of which forms an offwidth crack.
P1 5.10b PG: Awkward moves off the belay gain the crack. Jam and layback (5.10a G) to a slab. Go up the slab to the base of the offwidth. Go up this 7" crack which gradually opens to 12" at the top; there's a hidden crack on the inside that takes #0.4 to #2 Camalots, plus a #3 for a directional at the top. Exit right at the top of the crack and climb the right wall to a fixed anchor (shared with Do the Evolution). 105'
Descent: Two rappels with a 60m rope.
Do the Evolution 5.10b PG 125' ★★★★
Harder if short.
Start: At the P1 belay of Silver Flake [route #9, volume 2, page 456]. Gear anchor in the crack (#4 Camelot).
P1 5.10b PG: Climb the first 20' of the Silver Flake crack (#2 and #3 Camalots). When the crack goes right, exit left onto the face and climb up and left (5.9) to the base of a short open book. Go up the open book (crux) to a stance. Follow shallow ramps and flakes up and onto a slab (5.9). Climb the slab past a series of shallow slashing cracks and angle left when the angle eases to a fixed anchor (shared with Wasted Reprise) 125'
Gear: Cams from blue to red Metolious (extra blue and yellow) plus small to medium stoppers.
Descent: Two rappels with a 60m rope (using the starting anchor of Wasted Reprise)
red, black & blue 5.11b G (5.7 R) 185' ★★★★★
This is a superb, quick-to-dry, two-pitch route. P1 is similar the upper section of Adirondack Iron featuring several thin sections on perfect, clean, water-worn stone. (A couple holds have broken on this pitch, adding some difficulty.) P2 has great variety with an awkward-leaning ramp, thin fingers in a corner, a short traverse, and a final face crux on the same perfect rock.
Start: Right of Silver Flake [route #9, volume 2, page 456] is a left-rising horizontal crack 12' up. Begin just left of a large maple tree growing up against the cliff, at a chocolate-colored, undulating slab with bolts.
P1 5.11b G: (V1) Boulder up to the horizontal crack (#0.75 Camalot), then go up clean, black rock to an overlap (first crux). Pull over the overlap, and go up to the base of the attractive (and steeper) upper slab. Climb on top of a hollow flake and up onto the slab. Increasingly difficult moves lead to a final hard move (second crux) to reach a bucket. Finish up a vertical crack (small to medium cams) to fixed anchor shared with Silver Flake. 95'
P2 5.10c G (5.7 R): Go up and right (5.7 R) to a narrow, right-rising ramp. Awkward moves up the ramp (5.9, unobvious but bomber keyhole medium nut along the way) lead a good stance at the base of a left-facing open book. Climb the open book (5.9+) to jugs at its top, then move left and onto a ledge. Traverse left onto a clean, black headwall. Up this to where the angle eases, then run out (5.7 R) to a fixed anchor on a small ledge. 90'
V1 5.7 G: Start 20' to the right and climb the horizontal crack to the stance below 1st bolt. Works well for shorter climbers.
Gear: For P1: #0.75, small to medium nuts, finger-sized and smaller cams for the anchor; for P2: #0.4, small to medium nuts.
Descent: Rappel the route with a single 60m rope.
Clampdown 5.10 G 115' ★★★★
Great climbing on a naturally clean slab, face, and arête.
Start: Same as red, black & blue.
P1 5.10 G: Boulder up to the horizontal crack (#0.75 Camalot), then go up clean, black rock for 5 bolts. Leave red, black & blue here—Traverse straight right (no hands, good feet) for 15' to a stance below a crimpy face. Up the face to a mantle, then go up and right (#1 Camalot) to the top of a pointed flake. Climb an arête and face past a few tricky sections (blue TCU) to a fixed anchor just below the P3 traverse of Silver Flake. 115'
Descent: Rappel 115' to the ground.
Gear: Camalots #0.5, #0.75, #1; blue TCU; optional large stopper. Double ropes recommended for leader, and appreciated by follower.
Knocked Up 5.13a G 50' ★★★★★
A cool traverse and thin crack with three separate boulder problems, each progressively more difficult and separated by rests. Those with large fingers may find the crux more difficult.
Start: 2' right of Abracadabra [route #13, volume 2, page 458] at a sculpted, black, chest-high, left-facing corner with a good jug at its top.
● P1 5.13a G: Go up to the jug, then boulder up small crimps (V4) to a rail. Hand-traverse right 20' following the rail to its end. Move right and make a hard move up (V5) to a crack in right-rising ramp, then up to the base of a tips crack that breaks a bulge. Rest up. Tackle the crack, easy at first, then past a nails-hard crux (V7) where the crack pinches down. Once past this, follow the easier crack as it leans left, then make a slab move left to a fixed anchor shard with P1 of Abracadabra. 50'
Objects In Motion 5.10b A0 165' ★★★★
Start: At a large oak with slings on the ledge at the top of P1 of Sinner Repent [route #16, volume 2, page 458]. Climb this route, or P1 of Connecticut Yankee [route #17, volume 2, page 458], or approach via rappel.
P1 5.10b A0 PG: Climb up the face to a dike. Hand-traverse a few moves right then mantel onto the dike and a good stance. Use two points of aid gain the left-facing corner and climb to its top, Step right to a good ledge with a fixed anchor. 70'
P2 5.10a G: Step back left and climb up to a hollow flake-corner, then go straight up as the angle eases to a short handcrack in a bulge. Climb the handcrack (shared with Sinner Repent) to its top and make a bizarre mantel (crux), then follow cracks to the top. 95'
Descent: Three rappels with a 70m rope.
DiMaggio (project)
This open project begins partway up Connecticut Yankee [route #16, volume 2, page 458] where the flake becomes an overhang. Move right at the end of the overhang and onto a right-rising ramp. Climb this to its end (5.9). For the next pitch, traverse right on friction towards Adirondack Iron, then traverse up and left to reach a crack-groove. At its top, weave up and left through bulges to the top of Connecticut Yankee.
Adirondack Iron 5.10b PG 250' ★★★★
This route is the first to break the beautiful, sheer, streaked wall right of Connecticut Yankee. P2 is especially good.
Start: At an obvious right-leaning groove 30' right of Connecticut Yankee [route #16, volume 2, page 458].
P1 5.9- PG: Climb the groove, which becomes a right-facing corner, past a couple of steep sections to it's top. Mantle onto the excellent ledge, then walk 20' left to a fixed anchor. 100'
◉ P2 5.10b PG: Climb easy terrain up and left to the top of a pillar. Climb up and right to a run-out on easier terrain and then straight up as the wall steepens, aiming for a crack at the skyline. The short crack provides a wild and fitting finish (mandatory #1 Camalot placement). Fixed anchor. 150'
Gear: P1 requires a standard rack to #4 Camalot. P2 requires a #1 Camalot.
Descent: Rappel with a single 70m rope.
Origins Reconsidered 5.10+ G 120' ★★★★
Start: At the top of P1 of Adirondack Iron. Build an anchor directly where P1 of Adirondack Iron reaches the ledge (Camalots #0.75 to #2, nuts).
P1 5.10+ G: Climb straight above the belay to a sloping ledge at the base of opposing dihedrals. Go to the top of the right-leaning corner and make a hard exit to a stance. Mantle past a bolt, and cruise up and left to the obvious crack. Up the crack past a few sections of thin-hands jamming (steeper and harder than it looks from below) to its top, then up twin summit cracks through a small roof. 120'
Descent: A single rap with two 60m ropes. Alternatively, rap with a single 70m to the ledge, then walk left to the P1 fixed anchor on Adirondack Iron and rappel from there.
Gear: Single cams from blue TCU to #2 Camelot, med and large nuts, plus an extra #0.75 and #1 Camalot.
Wiessner Route 5.4 G 60' ★★
Easiest route at the cliff. Unique with many holds at different angles.
Start: 100' right Adirondack Iron at a 16"-wide dike intrusion.
P1 5.4 G: Go up the dike intrusion to the tree ledge. Walk right to the descent gully. 60'
Aspect: South
Height: 300'
Quality: ★★
Approach: 30 min, moderate
This is the wall uphill and left of Tsunami Wall [volume 2, page 461] and downhill and right of the Summit Cliff [volume 2, page 447].
The most obvious features are the large dirt gully which separates the Backwater Wall from Tsunami Wall (the route Dirty Gully [route #1, volume 2, page 461] is here) and, to its left, an appealing steep slab bordered by tree-filled chimneys and split by two parallel thin cracks: High Voltage and Storm Surge.
Directions: Follow the approach to Summit Cliff to where the skid path makes a sharp left at 25 min. Step over a large fallen tree (cairn) and head straight into the woods. Contour for 3 min to the base of the wall. Walk right 1 min following the base of the cliff to the established routes 594808,4929821. Alternately, you can approach from the Tsunami Wall by walking left past Dirty Gully.
High Voltage 5.11a G 110' ★★★★
Start: On the left side of the steep slab at a short left-facing corner.
P1 5.11a G: Climb the corner and thin seam (#00 TCU or black Alien critical) to a dike ledge. Step easily up and right to another seam which gradually widens to an intermittent tips crack. Climb this as it becomes a left-facing corner to a fixed anchor shared with P1 of Storm Surge. 110'
Gear: 1 ea black–yellow Aliens, Metolius #00; 2 ea Metolius #0, #1; small nuts and RPs.
Storm Surge 5.10b PG 260' ★★★
Start: 50' left of Dirty Gully at a shallow crack on the right side of the steep slab.
P1 5.10b PG: Go straight up thin seams and face holds to a friction step right which leads to a small roof. Traverse left under the roof until it becomes a left-facing corner. Make thin face moves (#4 BD stopper) to gain a fingercrack and follow this to a belay. 110'
P2 5.9+ PG: Climb the crack above the belay to its end, then up the face following the line of least resistance. Eventually step left to a low-angle crack and follow it to a headwall. Traverse right beneath the headwall and break through via a crack on the right (optional belay). At the top of this crack, friction left to the base of an appealing fingercrack (visible on the skyline from the P1 belay). Climb this to its top at a fixed anchor. 150'
Descent: Rappel with 2 ropes. You can rappel/lower from P1 with a single 70m rope.
Gear: P1: to #0.75 Camalot with extra TCU's; P2: standard rack to 3".
Silver Lake ● Potter Mountain Cliff
Upper East Side
❏Pox [route #26, volume 2, page 484] is now ● and has a fixed anchor after the hard climbing. 80'
Silver Lake ● Potter Mountain Cliff
The Ghetto
❏Leroy Brown [route #21, volume 2, page 482] has been freed. Excellent gear, and ★★★★★.
Start: 10' right of the aid start, just right of the bulging arête and below where the crack angles up and right.
P1 5.11d G: Boulder up and right to a shallow right-facing corner which leads to the diagonal crack. Climb the crack to a ledge with a fixed anchor. 50'
Gear: 2 ea 0.5"–2.0"; an optional #5 Camalot. The first free ascent used a stick to place a #11 BD stopper that protects the initial section.
Silver Lake ● Potter Mountain Cliff
Shangri La
❏P1 of Three B's [route #2, volume 2, page 472] is hard for the grade, more like 5.10c.
Little Max 5.9- G 145' ★
The first pitch was previously climbed and named Litter's Runt, and the second pitch added later by another party. This route is a good way to access Belly Button Ledge.
Start: Same as Groovitational Pull [route #11, volume 2, page 478].
P1 5.9- G: Climb up to the left-leaning crack of Groovitational Pull, then follow this up and left to its end. Ascend a slabby face (crux) to easier terrain. Continue up and left to the large oak tree at the top of P1 of Stop Making Sense. 75'
● P2 5.8 G: Face climb following bolts, at first to the right, then back left to finish directly above. Fixed anchor. 70'
Ebb and Flow 5.10b G 140' ★★★
Follows the excellent black water streak between Positive Latitude and Where the Wild Things Are. Be aware that this water streak is often...watery, especially early season.
Start: At an offwidth crack 15' right of Where the Wild Things Are [route #12, volume 2, page 478].
◉ P1 5.10b G: Climb the offwidth (5.6) through some bushes to a bushy ledge. (Alternatively, climb the first section of Where the Wild Things Are to the same ledge.) Follow Where the Wild Things Are up the crimpy headwall to where that route breaks right. Instead of traversing right, continue straight up and follow a black streak on excellent wavy water-carved features and nubs to the ledge with a fixed anchor shared with P1 of Positive Latitude. The last 15' is an easy runout on good holds; bring a #0.75 Camalot if you want to protect it. 140'
Gear: If you climb the offwidth, bring either a 4"-5" cam (or 0.5"-1" cam), and a 0.5"-2" cam for a horizontal above the offwidth; the easy runout at the end of the pitch takes an optional #0.75 Camalot.
Vilde Chaya�I'll Eat You Up 5.11- G 150' ★★★
Start: 50' right of Where the Wild Things Are [route #12, volume 2, page 478] below a right-facing corner 15' up. This is 15' right of the 3rd class ramp that goes up and left across Where the Wild Things Are and Groovitational Pull.
P1 5.8 G: Go up a slab with a 1" crack to a stance between a right-facing corner (on your left) and a detached flake (on your right). Up the corner to good jugs. Continue up another right-facing corner to a 6"-deep ledge. Follow this ledge up and left for 10' to a gear anchor. 80'
● P2 5.11- G: Go up the face, sometimes desperate, to a fixed anchor. 70'
Tailwinds 5.10 G 290' ★★★★
P1 has varied climbing, and is one of the first to dry in this section of cliff. P2 is similar to its neighbors to the right.
Start: 20' left of Positive Latitude [route #13, volume 2, page 478], at the base of a shallow, left-rising "staircase"-flake.
P1 5.10 G: Up the staircase flake and over a shallow, right-facing, right-arching flake (5.9+). Above are three discontinuous, short, right-facing corners; work up to a stance at the top of the highest corner. Step right and climb a steep face (5.10), then cruise easy terrain to the fixed anchor of Positive Latitude. 155'
◉ P2 5.9- G: Climb straight up to a stance on top of a flake, below an overlap that becomes a right-facing, right-arching flake. Climb the flake for several moves, then step left onto the face. Climb a perfect stretch of sustained dimples until the angle eases. Run out up and left, past a small bulge to a fixed anchor at the base of the Hermitage (this feature is mentioned in the description of Where the Wild Things Are). 135'
Gear: P1: small nuts, yellow alien, Camalots .5 thru 2. P2: #2 Camalot for start.
Descent: Two rappels with two 60m ropes.
Shamrock 5.10a G 140' ★★★★
Climbs through the right-arching overlap left of the larger right-arching overlap of Every Inch Counts [route #14, volume 2, page 480]. It's every bit as good as its neighbors.
Start: On the smile-shaped ledge at a fixed anchor 20' left of the left-facing corner of Every Inch Counts.
● P1 5.10a G: Climb the beautiful dimpled face past the arching overlap (crux) to a fixed anchor. The difficulty eases after the last bolt, where it's runout to the anchor. 140'
Bulletproof Backpack 5.10+ TR 90' ★★★
Good crispy climbing on naturally clean rock. If equipped, this would make an excellent and independent start to Scary Potter Traverse [route #16, volume 2, page 481]. Begin 15' left of Honeybadger. Climb the clean slab up and right to a stance where the wall steepens. A few moves up the steeper section, then traverse up and left to a stance below a steep face with micro crimps. Climb the crimpy face (5.10+) to below an overlap, traverse straight right (crux), then move up into the shallow corner on Honeybadger. Finish on Honeybadger.
The Pandemic 5.11a G 110' ★★★
Good climbing with a steep face crux followed by sustained Potter-style dimple pulling.
Start: 100' right of Honeybadger [route #17, volume 2, page 481] are some clean slabs above left-rising terrain. Traverse out right on the lower of these slabs, then up to a tree island tucked in a left-facing corner that arches left into a roof that extends horizontally all the way to mid-height on Honeybadger. Begin below a narrow, downward-hanging spike 6' up.
◉ P1 5.11a G: Go up past the spike and follow a flake system (5.7) to its top. Step right onto a slab, then climb a steep wall (crux) to where the angle lessens. Continue up, then leftwards across a face to a fixed anchor. 110'
Gear: Two finger-size cams for the start.
Silver Lake
Little Potter Mountain
Aspect: Southwest
Height: 40'
Approach: 20 min, easy
Quality: ★★
Summary: Short, vertical cliff with several high-quality sport routes.
This short cliff is located just below the summit of Little Potter Mountain, very close to the logging road used to approach Potter Mountain. The cliff is complex and broken, but has one attractive, vertical wall that features coarse, grippy rock. This wall is located near the top of the complex jumble, requiring some weaving around on grassy ledges to reach the base.
Once at the base of the wall, you can reach the top by walking 50' left along the base, then scrambling up a 4th class chimney. Once on top, you can (with care) reach the anchor of The Little Climb That Could, and easily walk to the anchor of Batmantel.
Directions: Park as for Potter Mountain [volume 2, page 471]. Begin the approach as for Potter Mountain. At the logging clearing described as the "hub for many smaller roads," continue on the grassy logging road for 4 min. Before the grassy road goes steeply uphill, and just past the clearings where you can glimpse the cliff uphill to your right, turn right at a cairn 596039,4929670. Follow a path uphill for 5 min through open forest to the cliff. Weave left and right on ledges to reach a black-colored, vertical wall 596126,4929670.
The Little Route That Couldn't Even 5.10a G 40' ★★
A good warm up for the other routes at the cliff.
Start: 5' left of The Little Route That Could at a quartzy hole below a small ledge.
● P1 5.10a G: From the ledge, make a move to a good rail, then make some moves right (crux) to a juggy left-facing flake. Follow the flake to its end using a couple holds out right, then trend up/left to the fixed anchor. 40'
The Little Climb That Could 5.11c G 40' ★★★
Good moves in a small package; if only it were longer! With care, you can reach the anchor from the top.
Start: 50' right of the left side of the cliff, and 5' right of a head-high, quartzy hole, below a right-leaning, right-facing flake in black rock.
● P1 5.11c G: Follow the flake to its top. Move right, then back left (crux) to a jug at the top of the cliff. Fixed anchor. 40'
Batmantel 5.11b G 50' ★★★
The name says it all, but the bat is probably long gone.
Start: 15' right of The Little Climb That Could at a flat-topped boulder/bench.
● P1 5.11b G: Step up to a ledge, then up past parallel seams to a mantel move onto a ledge. Up an easy right-facing flake to its top, then snag the rounded lip of the ledge. Mantel this (crux) onto a large comfy ledge. Fixed anchor on the wall at the back of the ledge. 50'
Directions: Climbers have been using a new option. [This option adds to the three described in volume 2, pages 469–470]. Option 4: From the Jutting Block Wall [mentioned in the approach to the Outback Slab, volume 2, page 468], go up the steep slope on its left side to the Outback Slab (40 min from the trailhead to here). Go left along the base of the Outback Slab, then along the top of Midway Cliff. When you come to van-sized bounders, go right and uphill to El Niño Presents (55 min). To reach Trillium, continue up and left along the base of the cliff (1 hr).
Silver Lake ● Wayback Cliff
Mr Peabody Area
This is the section of cliff described in the guidebook with the route Mr. Peabody 594922,4929939.
Trillium 5.10- G 330' ★★★★
The lower slab is one of the most attractive features on Wayback Cliff. P2 has great climbing and position on obvious black buttress above and right of the Mr. Peabody [route #1, volume 2, page 470] slab.
Start: At the extreme lowest point of the clean and narrow Mr. Peabody slab, and very shallow twin cracks.
P1 5.7 PG: Climb directly up the slab to a bolt 40' up. Go up and slightly right to a hidden slot (0.5 Camalot), then up and slightly left to a shallow pocket (red Alien). Run up easy slab to a second bolt where the angle steepens. Face climb up and right (V1) past a short steeper section, then up low-angle slab (V2) to the lower of two pine trees. There is a fixed sling and quick link here for protection for both leader and follower. Down climb along the left-facing wall and over secure blocks. Step left (skiers) around the corner to a flat 5'x5' belay corral with a fixed anchor. A cool place to be. 190'
P2 5.10- G: Climb the offwidth and left-face for 15' to a stance, then up twin cracks (5.8) to a large ledge. Go up a shallow dihedral (5.9) past three bolts. Face moves (5.9+ ) lead to cracks and a bulge; over this (hidden bucket) to a stance. Go over another bulge to a crack and low-angle terrain. Cruise up to a steeper, clean, black face with two bolts. Climb the thin face (crux) up and left to a shallow crack. Up the crack and arête to a fixed anchor. Great moves and position on this pitch. 140'
V1 5.9- PG: Face climb up and left from the second bolt past a small, hollow overlap. Angle up and right to rejoin the regular route.
V2 5.6 G: Move straight right after the crux to the blocks in the corner. R for the follower.
Gear: P1: 0.5 Camalot, red Alien; P2: green C3, single cams from blue Alien to 0.75 Camelot, an extra finger sized cam, small/medium nuts.
Descent: Two rappels from fixed anchors, both require two 60M ropes.
Silver Lake ● Wayback Cliff
Begonias Wall
This section of Wayback is 10 mins left of Trillium.
Directions: From Trillium, travel is tough closest to the cliff; it's best to walk into hardwoods away from cliff. This also improves the view of the cracks before you reach the cliff base 594587,4930056.
Unnamed (project)
Open project. Begin 20' left of Scarlet Begonias at a cave. Boulder to left edge of Scarlet Begonias' ledge. Climb the nice corner above.
Scarlet Begonias 5.9 PG 95' ★★
Start: At a small left-facing corner that leads to a ledge with a tree 20' up. Above the ledge is a short chimney with a flake/handcrack above.
P1 5.9 PG: Climb the corner (a little dirty) to the ledge. Chimney, jam, and layback (crux) the steep section above the ledge. Traverse right 10' and climb an excellent low-angle fist crack. Step left at the top of the crack to a fixed anchor at a good ledge. 95'
Gear: Singles blue TCU to #0.5 Camalot; #5 Camalot; doubles #0.75 to #4 Camalot.
Too Cool to Bluff (project)
Open project. Start on Scarlet Begonias. At 15' traverse up and right to a grass ledge. Climb the obvious, 6"-wide, featureless crack above. Finish on the Scarlet Begonias' fist crack. In the 5.11 range.
Too Pat to Open (project)
Open project. Follow Too Cool to Bluff to the grass ledge. Build a belay at the far right edge of the ledge. Climb the excellent left-facing corner above.
Unnamed (project)
Open project. Begin 25' right of Scarlet Begonias at a narrow, right-angling slab. Climb the slab until it ends at an orange, left-facing corner. Climb the corner, then undercling around a roof and into an offwidth.
The Welch Wall is a separate cliff downhill and right of Wayback 595031,4929921. It is named for Tad Welch who pioneered the early routes at Silver Lake.
The Route that Eats Its Young 5.12b G 140' ★★★★
A burly testpiece of traditional climbing.
Start: Locate a large, flat, downsloping boulder 40' uphill and right of the cliffs prow and 50' left of a huge open book. Begin at a vertical crack with a hand slot 7' up; this is 15' uphill and right of a right-leaning, snaking, wide crack. (The two cracks intersect 20' up.)
P1 5.12b G: Step off the boulder and climb the difficult vertical crack to a jug, then up to a right-rising wide crack. There's a good sit-down rest here. Up a short right-facing corner, over a small roof, then up a crimpy face (first crux) to a big reach left to another right-rising wide crack. Follow this crack up and right (burly fist and wide hands) until you can break left over an unlikely bulge (second crux) to a crimp rail. Follow this leftwards to a slab, then up more easily to a fixed anchor. 90'
P2 5.10c G: Move up and right over a bulge to a shallow seam. Follow this straight up to a ledge, then through a bulge to a fixed anchor. 50'
Descent: Rappel from the top anchor with a single 70m rope, or make two short rappels.
Gear: To #4 Camalot.
El Niño Presents 5.9 G 65' ★★★
Nice jamming in a narrow dihedral.
Start: On the lower right-hand section of the Wayback Cliff, look for hanging opposing corners capped by a roof 60' up. Begin 50' left of this feature, and 20' left of an octopus-like yellow birch growing out of the cliff, at a block leaning against the cliff below an attractive, narrow corner above.
P1 5.9 G: Climb to the top of the block, then continue up the corner to the top. Step right (#4 Camelot) onto a ledge with a fixed anchor. 65'
Gear: Single set cams from yellow Alien to #4 Camelot, hexes.
Mad Season (project)
Open project. Climbs through an amazing octopus-like yellow birch, and has a 6"-wide offwidth crux. Begin 20' right of El Niño Presents below the octopus-like yellow birch, at a shallow right-facing corner with a thin crack. There is a 6"-wide crack 3' to the right. Hard moves (5.10) off the ground lead to and through the tree. Continue up the corner to a ledge. Climb the offwidth crack above (#6 Camalots) to the ledge. Step left to the fixed anchor on El Niño Presents. Reported in the 5.10 range, and 65'.
Imperfect Wave 5.9 R 190' ★★
Takes a wandering path to a belay below the right hand end of the wave-like upper wall. An ugly start gives way to high-quality face and slab climbing on the black rock above.
Start: 150' left of flag-pins, Lies, and bibles, at a short and usually-wet right-facing corner. This corner is in an alcove formed by a massive (40' wide by 25' tall) boulder that almost touches the main cliff (which marks the start of the winter route Tsunami Slab).
P1 5.9 R: Climb the wet corner and make an exit onto a grassy ledge at its top. Traverse right 10' to a hidden bolt (crucial for the 2nd). Climb up and right to a shallow right-facing corner (visible from the ground). At the top of the corner, angle easily up and right to a clean black streak with a bolt. Climb straight up to a stance at the base of a steeper black wall. Face climb directly up until just below a brushy dike. Step right and climb up black rock next to the dike. Eventually the dike gets clean and angles up and right. Climb the stair-step dike up and right to a fixed anchor 25' below the right-hand edge of the wave-like upper wall. 190'
Gear: #1 and #3 Camalots for the initial corner. A green Alien can be placed just below the brushy dike.
Happy Purple Socks 5.10b G 190' ★★★
Start: 35' left of flag-pins, Lies, and bibles below the arête formed by the left-hand hanging corner.
P1 5.10b G: Face climb until below an overhang and step right into the corner. Up the corner a few feet, then swing back left to a stance at the base of the arête. Sustained arête pinching on perfect black rock leads to the top of the arête. Angle up and left and go over a bulge and onto a slab with a thin crack. Climb cracks and clean slab to a fixed anchor. 190'
Gear: #0.75 Camalot, Aliens black thru yellow, small/medium nuts.
Indian Summer 5.9 TR 170' ★
Begin 30' left of flag-pins, Lies, and bibles below the right-facing corner. Climb the corner past some suspect blocks to its top, then up a chimney. Exit right to the White Trash @1600 fixed anchor.
White Trash @1600 5.9+ PG 170' ★★★
Start: 20' left of flag-pins, Lies, and bibles, and 15' right of opposing hanging corners.
P1 5.9+ PG: Up easy face to a stance below an arête formed by the right-hand hanging corner. Climb the arête and face, then mantel to a stance on a grass ledge. Angle up and left over left-facing corners. Step left over a small overhang, and angle left across a slab to a horizontal quartz band. Climb over the overhang formed by the quartz band, then go up and left past a black slab to a fixed anchor. 170'
Gear: 1 ea #2 Camalot; small wires for the corners above the grass ledge.
flag-pins, Lies, and bibles 5.10c G 185' ★★★★
High quality, but beware of the sometimes-fragile square-cut black dike rock holds.
Start: Left of the brushy gully that divides the Tsunami Slab from the Midway Cliff, 20' below an overhang that becomes a left-facing flake.
◉ P1 5.10c G: Face climb up to the overhang and climb the excellent flake to its top. Weave up the face above, aiming for a short, shallow, left-facing corner. Climb the corner and continue up the clean slab above—steep and thin, then gradually easing. Fixed anchor. 185'
Gear: Optional green Alien.
Ladybug 5.10 G 115' ★★
Slightly more difficult—but less sustained—than 80 Grit. Quality, well-protected slab climbing
Start: Same as Schadenfreude [route #3, volume 2, page 466], which is 10' left of 80 Grit directly below a black streak on a clean slab.
P1 5.10 G: Climb the black streak (crux) and step over the brushy right-rising crack onto a featured slab. Climb the middle slab to another weakness, then onto a third, steeper slab section. Up this and through a small overlap. Fixed anchor. 115'
Gear: Small to med cams and small nuts.
80 Grit 5.10 G 90' ★★★
Start: 30' left of Hangover Corner [route #6, volume 2, page 466] and 10' right of LadyBug/Shadenfreude just left of a tree-filled gully.
P1 5.10 G: Go straight up the slab (crux) to a brushy crack, then past this on an easier slab (blue TCU). Angle right to some bushes at the base of a narrow slab (V1). Move onto the slab (critical blue TCU), then up this to a fixed anchor. 90'
V1 5.8 G: The original line continued 5' further right, up flakes, then back left.
Loaded for Bear 5.9+ PG (5.8 R) 410' ★★★
This is a free version of the former toprope route Static Cling [route #5, volume 2, page 466], and extends that route to the top of the cliff.
Start: 5' left of Hangover Corner [route #6, volume 2, page 466] at a clean, brown slab.
P1 5.9+ PG (5.8 R): Climb the slab, avoiding the crack to the right. (V1) Make a long runout straight up the slab to lower-angle terrain and flakes. Step left and climb through an overhang (this feature is mentioned as V1 of After the Bash; good cams here). Run it out over easy ground up and right to a belay at the base of a chimney. Belay off smallish oak backed up with cams (#2 Camalot works). 160'
P2 5.6 PG: A connector pitch. Climb the chimney, and step right when possible. Climb past a left-facing flake-block, then up easy slab to a fixed anchor below a steeper black wall. 60'
P3 5.9+ PG: Make hard and committing moves off the belay. Climb a thin crack (Aliens) and opposing shallow grooves to a stance. Run out over easy ground to where the angle steepens. Go up the excellent slab to a left-leaning crack (medium cams, possible belay). Climb the crack and step right at its end to an easy friction finish. Belay from a cedar with a fixed anchor. 190'
V1 5.8 PG: At the last bolt, traverse left to some flakes (gear). Climb up, rejoining the normal route at the
overhang. This variation joins up with Fearless Leader, but avoids the runout on the normal route.
Descent: Two rappels with two 60m ropes leads to the big ledge at the top of Hangover Corner. Walk off (climbers) right and around to the start (easy, 5 min).
Gear: Aliens blue thru red; Camalots #0.5-#3; red C3; Tri-Cams black and pink.
Right Turn 5.8- PG 165' ★★★
This route provides a cleaner finish to After the Bash [route #8, volume 2, page 466].
Start: At a fixed anchor partway up P3 of After the Bash, at a ledge in a corner above the "hole" mentioned in that route's description.
P1 5.8- PG: Face climb straight up (grey Alien) to a stance at the base of a brown slab. Climb the clean sustained slab to where the angle lessens. Run out straight up easy friction to a short right-facing corner (good cams). Climb the corner and angle right to join the finishing crack of Loaded for Bear. Finish up that route. 165'
Descent: Rappel Loaded for Bear.
❏As of Aug 2020, the last bolt on Lurch [route #1, volume 2, page 468] is missing its nut.
❏Variation to Uncle Fester [route #5, volume 2, page 469]:
V1 Pickle in the Sickle 5.6 PG: From the P1 anchor (shared with Gomez), go right and follow a crack in a right-facing, right-leaning corner for 20' until the slab steepens. Traverse left out of the corner for 20' to the sickle-shaped ledge (the P2 anchor of Uncle Fester).
Polychrome 5.10c G 215' ★★★★
A beautiful slab and thin face route that ascends through four separate and distinct colors of rock, the pink section of which is particularly good.
Start: 32' left of Bimathalon [route #2, volume 2, page 468] and 8' right of Lurch [route #1, volume 2, page 468] below a naturally-clean brown slab.
P1 5.10c G: Go up the brown slab to a horizontal break. Step right and go up a green face to a small dike. Traverse right to a perfect pink slab. Up this (thin and sustained) to its top, then continue straight up to a clean black streak to join P2 of Morticia to the shared fixed anchor. 215'
Descent: Rappel with a single 70m rope to P1 of Lurch, then to the ground.
Location: 20 miles north of the village of Saranac Lake, accessed from NY 3 north of Bloomingdale
Aspect: Southwest
Height: 200'
Quality:
Approach: 2 hr, difficult.
Summary: Remote, low-angle, moderate, super-grippy slab and some steeper cracks.
Loon Lake Mountain has a fire tower and is one of many summits labeled on the USGS map as "Loon Lake Mountains", roughly 20 miles north of Saranac Lake. In 2013, the trail to the fire tower opened. The views from the summit are spectacular.
There are presently four separate cliffs located on a smaller summit 0.75 mile east of the fire tower. The West Crag offers worthwhile routes, as does Easter Island. The rock is generally clean and extremely grippy and coarse with excellent protection. A 60m rope and gear to 3" should suffice. Small Tricams also prove useful.
Access: Parts of the yellow-marked trail and the cliffs are on the Kushaqua Tract owned by Lyme Timber. The tract is covered by conservation easement that allows public recreation, much like the Black Brook Tract that includes Silver Lake.
Directions: From Bloomingdale, take NY 3 north approximately 9.5 miles to the intersection on the left with CR 26 (formerly CR 99, also known as Port Kent–Hopkinton Turnpike, also labeled Merrill Road). On the right is the Alder Brook Park Road. Turn left onto CR 26 and drive 7.8 miles to the Loon Lake Mountain Trailhead on the left 569630,4936969.
From here, follow the yellow-marked trail towards the summit of Loon Lake Mountain and the fire tower.
Bushwhacking is required to reach the cliffs. The lower slopes are mostly open hardwood, and the going is easy compared to off-trail travel in the High Peaks. That changes once you enter the conifers around 2800' elevation, and travel along the ridge top is a scratchy, claustrophobic affair. A GPS is especially useful, as it is possible to pass within 50' of the rock without seeing it.
You can see this crag from the fire tower, and observe the routes with binoculars. However, don't approach from there. This area has the most worthwhile routes.
Directions: Follow the yellow-marked trail for 1.9 miles to the first bridge. Follow the stream uphill, bearing left at any forks. Shortly after the stream ends you will reach a mossy cliff barrier. Bypass this either at the left or right ends, or up a convenient gully that splits the barrier 0568504,4934587. The cliff is just a few minutes past the cliffband 0568613,4934545. Allow an hour from the bridge.
Descent: Walk around the south end.
Loonar Ecstasy 5.7 G 50' ★★
Start: Below the left of two obvious cracks.
P1 5.7 G: Climb the crack to its end, then traverse 8' left (V1) to a crack near the arête. 50'
V1 5.9 PG: Climb the blank face directly above the crack.
Starry Skies 5.6 G 50' ★★
Start: Below the right of two obvious cracks.
P1 5.6 G: Climb the crack past a bush at mid-height to a striking fingercrack finish. 50'
A vegetated gully runs up the left part of the slab; all routes are right of this gully. The first two routes start just right of the gully. Reach these via a leftward ramp 50' left of the lowest point of the slab.
Directions: From West Crag, walk on a bearing of 250° for 0.25 mile to reach the open ledge at the top of the slab 0568215,4934328. Descend on (skier's) right to reach the base. If you approach from below, leave the yellow trail at the second bridge and follow the stream uphill to the saddle between the two summits of Loon Lake Mountain. From there, a heading of 140° leads through pleasant, open woods to the base of the slab 0568189,4934285.
Central Rib 5.5 PG 80'
Start: At the base of a slab just right of a gully that runs up the left side of the slab. Reach these via a leftward ramp 50' left of the lowest point on the slab.
P1 5.5. PG: Climb easy slab up and slightly left to reach a prominent right-facing corner–rib. Step left out onto the crest of this near its top. Belay from a large spruce tree. 80'
Little Black Corner 5.5 G 160'
Start: Same as Central Rib.
P1 5.5 G: Angle slightly right to a black, right-facing corner, then up a black streak. Pass the 4' x 6' boulder perched at the top of the slab on the right, then climb a series of easy ledges to the top. 160'
Waiting for Lefty 5.6 PG 190' ★
Start: At the lowest point of the slab below the left of two cracks 5' apart, just right of a tree that touches the face.
P1 5.6 PG: Climb the crack to an open face. Angle left when convenient past a line of bushes onto the right edge of the larger open slab. Go straight up, through vegetation about 20' right of the perched boulder. Climb easy ledges to the top (same as Little Black Corner). 190'
The Tao of Alces 5.6 G 200' ★
Start: 4' right of Waiting for Lefty, below the right of two cracks 5' apart.
P1 5.6 G: Climb the crack for 20', then angle right to the edge of the face. Follow a narrow series of slabby steps up and left to a belay at a 5"-diameter spruce tree. 100'
P2 5.4 G: Move left onto the open slab (cross Waiting for Lefty) and climb a left-angling flake to pass 8' right of the perched boulder. Climb easy ledges to the top. 100'
Directions: Follow approach to The Slab. Walk east through open woods, past a large square boulder. After 300' you come to a pretty, fern-filled clearing. Continue to the east end of this and you will see the sheer face of the Ramp Wall to your left 568335,4934217.
Moss No Mas 5.4 G 70' ★
Start: At the left end of the wall below a slabby face.
P1 5.4 G: Climb the left-facing corner at its right edge until you can step left to a large ledge. Finish up a short crack. 70'
Ramp It Up 5.4 G 70' ★
Start: At the left end of the wall.
P1 5.4 G: Climb the sidewalk-width, right-rising ramp. The final, thrilling moves step out from the ramp onto the front face. Belay at the balsam tree a few steps into the woods. 70'
Amp It Up 5.9 TR 40' ★★
Begin on a bench 5' up and 30' right of Ramp It Up. Climb a few moves up broken rock until you can step left to a prominent hand- and finger-crack. Follow this to the top at the balsam tree shared with Ramp It Up.
Scamper 5.8 TR 50'
Start as for Amp It Up and take the right-hand V-groove. There is some suspect rock along the way.
Dude, Where's My Car...Keys? 5.7 G 60'
Start: 40' right of Amp It Up at the right end of the higher base ledge. 8' to the right is a maple tree growing 4" from the cliff.
P1 5.7 G: Climb a featured face to a pair of vertical cracks. Mantel past three ledge to the top. 60'
This dirty, 60'-tall slab faces east and lies directly under the summit of the East Peak of Loon Lake Mountain 0568741,4934601. It is not visible from the fire tower. Descend via rappel or a steep scramble down the (climber's) right side.
Jungle Love 5.5 PG 50'
Start: 50' left of Pulling Back the Blanket a pair of diagonal cracks forms a vague X on the face.
P1 5.5 PG: Climb to the upper left end of the X. Pull on branches to reach the top. 50'
Pulling Back the Blanket 5.4 PG 60'
Start: At the right center of the slab.
P1 5.4 PG: Follow a series of scoops and weaknesses to the top. 60'
This rock is the highest open rock seen from the fire tower. From that vantage point it appears as a flat ledge. The routes are hidden from view in the trees below 0568673,4934549. Descend around the (climber's) left side.
Loon-a-Tick 5.5 G 25'
Start: At a short chimney at the left end of the face.
P1 5.5 G: Climb the inside corner that starts 3' right of the chimney. 25'
Of Moose and Men 5.7 G 45' ★
Start: Below the left end of a large platform 10' up.
P1 5.7 G: Boulder onto the platform (V1). Step right to a left-facing corner. At its top, step right to a stance then follow a crack in low-angle rock to the top. 45'
V1 5.8 G: Climb to the platform via a handcrack directly below the corner.
Loon Lake Mountains
Easter Island
This enjoyable, moderate face is not visible from the fire tower; it can be seen on clear days from the shore of Osgood Pond 10 miles away. There are numerous ledges and small crags on the south slope of the peak with a variety of features: tips cracks up overhanging faces, handcracks bisecting small blocky ledges, and a wall that appears to host an ice formation in the winter (aka, the Ice Route Wall). The gem is an 80'-tall crag laced with clean cracks and corners named Easter Island. As with other crags on this hill, the rock is textured and grippy. When viewed from the left, the cliff resembles the stone heads on Rapa Nui (aka Easter Island), hence the name.
Directions: From The Slab, contour east staying below the 2900' elevation to avoid the dreaded conifers. As you encounter each small ledge, stay below them. The base of Easter Island is about 0.25 mile from The Slab 0568633,4934305.
Jungle Gym 5.6 PG 70' ★
Start: Left end of the wall.
P1 5.6 PG: Climb a right-facing corner formed by seven stacked blocks. Exit left near the top. 70'
Joyride 5.5 PG 70' ★
Start: At a large, low-angle, left-facing corner that is near the left end of the face. There is a 30'-tall tower of seven stacked blocks just to the left (Jungle Gym).
P1 5.5 PG: Climb the corner straight up to the woods above. 70'
Unnamed (project)
Closed project. Climb vertical grooves between Joyride and Easter Island to a brushy ledge. Work to a higher ledge then climb the outside left edge until you can pull the overhang at the prominent crack on its right edge.
Easter Island 5.8+ PG 85' ★★
Start: 20' right of Joyride below a 2" crack 20' up.
P1 5.8+ PG: Follow open book corners to a slab just below the top. Move right to a cleaner exit into the woods above. 85'
Gear: To 3".
Moai 5.9 TR 85' ★
Great moves. Begin in the steep open book corner just right of Easter Island. Climb the corner, stay right of Easter Island until the last few moves. Looks to be poorly protected.
See-Ya Later Orange Traitor 5.8+ G 80' ★
Start: At a left-angling crack midway between Moai and Rapa Nui.
P1 5.8+ G: Climb the crack past a low crux. When the crack ends, wander up to the tree island. 80'
Rapa Nui 5.7 PG 80' ★★
Well protected after the start.
Start: 30' right of Moai below a pair of left-leaning cracks 2' apart, with a grapefruit-sized block 10' up. This is just left of a small balsam tree.
P1 5.7 PG: Climb the cracks past a bulge 15' up, then up to the woods. 80'
Gear: To 3".
What Do I Do With These Hexes? 5.8 G 85' ★
Start: Immediately right of a small balsam tree of Rapa Nui.
P1 5.8 G: Mantel a ledge 15' up (first crux), step left, then work back right over a bulge (second crux). 85'
Loon Lake Mountains ● Easter Island
Upper Tier
This cliff is 40' above Easter Island, and about 100' left. The left section is blank and overhanging. The central section contains several extreme possibilities. The right end has an attractive handcrack that leads past a few sizeable ledges to a tree-pulling topout (visible from the top of Jungle Gym); this is the route Continuously Entertaining.
Directions: From the Ice Route Wall, scramble up and right.
Continuously Entertaining 5.6 G 60'
Start: At the handcrack on the right side of the wall.
P1 5.6 G: Climb the crack past several ledges. Rap sling on a tree to the right. 60'
Loon Lake Mountains
Northwest Peak
On the opposite side of the fire tower peak is another satellite peak. There is a small, southwest-facing cliff at the 3000' foot elevation with one route (so far) and potential for more.
Directions: Follow the yellow-marked hiking trail for approximately 2.5 miles, past 3 bridges. After a prolonged, straight, steep section, the trail swings to the south. Leave the trail at this turn and contour roughly due west. In 15 min you come to the low saddle between the fire tower peak and the Northwest Peak. The saddle is a bit wet with thick moss underfoot. The spruce trees are tight and pose a challenge to forward progress, but once you start up the slope of the side peak, the woods open up again 566484,4934798.
Windy Six 5.6 G 50'
Start: The major feature of the cliff is the laser-cut vertical face. Locate a crack in lower-angled, light-colored rock, 80' right of the sheer face.
P1 5.6 G: Climb the crack to the top. 50'
Gear: To 1".
Descent: Walk down through open forest to the (climber's) right.
❏As of 2012, there is a new, official parking area and trailhead for Catamount Mountain [volume 2, page 433], just to the east of the old parking. The new location is 589167,4921688. The approach trail is also now marked with official DEC markers.
Rubber Ducky 5.6 G 65'
Start: At the far left of the wall below a 15'-tall featureless slab that leads to a shelf.
P1 5.6 G: Climb the slab to gain the shelf. Walk left to a right-facing corner which leads to some permanently attached chock stones. Follow a small, stony crack system up and right for 20' to a ledge. Move right, then follow small features up a spicy, unprotected exit to a cedar tree at the top. 65'
Gear: To 3".
Location: 1.0 mile south of CR 60 in Onchiota NY, on Big Haystack Mountain
Aspect: Southwest
Height: 120'
Quality:
Approach: 40 min, moderate
Summary: Small cliff with a few lines that share a common, frustrating theme: moderate climbing with a distinct, much harder crux section.
Directions: At the five-way intersection in the center of Onchiota, drive east on CR 60 (Gabriels-Onchiota Road) for 1.0 mile to the Six Nations Iroquois Cultural Center. Park on the shoulder just past the Cultural Center and near a dirt road on the right with a metal gate 571227,4927414. (Don't use the parking lot of the Cultural Center or block the dirt road.) Walk toward the gate and over a stream, then follow a fence to the right into the forest. When it ends, bushwhack southeast. Once you're a few minutes away from the stream, the forest becomes more open and pleasant. Reach the cliff at 40 min 572506,4926893.
Access: The gated property on the approach is Paul Smiths College land which is open to the public. The cliff is located on state land.
Descent: For all routes, rappel with a 70m rope or walk down easily through the woods to climber's right.
Mohawk 5.7 A1 120'
This is the standout line of the cliff, but it's debatable whether the line would justify the effort needed to free the crux or to bolt the runout slab that leads up to it. A few scruffy moves are needed to reach the pine tree at the base of the friction slab that comprises the lower half of the route. From the pine tree, climb up and left 20' to a short headwall (last gear). Step left and climb through the headwall at a vague, right-angling seam. Once above this the slab is peppered with small features that allow for pleasant but unprotected climbing. Aim for the small tree under the looming overlap barrier. A couple moves of aid are needed to reach the cracks that lead to the top of the cliff.
Seneca 5.9 TR 90'
Begin about 100' right of Mohawk at a rectangular recess in the cliff. Three cracks ascend the left wall of the recess. The leftmost appears to end before reaching any useful terrain. Seneca takes the middle crack. Climb the crack to the sloping ledge (crux) with a small bush. Follow cracks past this to a large ledge. Climb out the prominent crack that goes left across the slab before angling more directly upwards to the top of the cliff.
Onondaga 5.5 A1 90'
Start: At the right-hand crack in the Seneca recess.
P1 5.5 A1: Climb the crack out of the recess to a difficult move (A1, should go free) onto the sloping ledge. Follow cracks to the large ledge (same as Seneca) but finish more directly up easy cracks. 90'
Location: Along the Jay Mountain Road
Aspect: Southwest
Height: 80'
Approach: 4 min, easy
Quality: ★
Summary: A small cliff on Frenyea Mountain.
This small cliff is on Frenyea Mountain, along the Jay Mountain Road, sometimes called the Jay-Lewis Road. There is a good rap line climbers left of all the climbs: a small path at the top leads to an obvious rap tree. You can access the top from the right end of the cliff. There is room for more routes.
Directions: From the intersection of NY 9N and NY 73 in Keene (0.0), follow NY 9N north toward Upper Jay. At 2.9 miles, turn right on Styles Brook Road (CR 52) and fol low this to its end, where it Ts into Jay Mountain Road at 7.0 miles. Turn right and follow this to a parking area at 8.8 miles and the beginning of the seasonal road. Con tinue straight to reach a small pullout on the left at 9.2 miles 605144,4903955. Walk east along Jay Mountain Road for 400' to a cairn on the left (north) side of the road. Enter the woods and follow an approach path straight up hill for 2 min. Swing left to pass below a low buttress and a small chimney, and reach the right end of cliff at Chicken Lips 605273,4903937.
The Tower 5.6 G 70' ★★
Start: At a short buttress with two diagonal cracks. This is 50' left of Chicken Lips, and 25' left of a shallow alcove with a series of three ledges above.
P1 5.6 G: Climb up the short face to a ledge, then up the face above to the top of a tower. (Avoid going too far right; there is loose rock in the gully.) From the top of tower, continue easily to the top of the cliff. 70'
Chicken Lips 5.8- G 65' ★★
Start: At a large incut hold 6' up. This is 25' right of a shallow alcove with a series of three ledges above.
P1 5.8- G: Pull a strenuous move off the ground (hard to protect well unless you are tall). After this move the climbing is much easier. Move up to a small tree 12' up, then right to climb a short chimney-like crack. Continue up low-angled rock to the top. 65'
Location: Just outside of Elizabethtown accessed from NY 9N.
Aspect: Southwest
Height: 40-60'
Quality:
Approach: 5-10 min; easy
Summary: Two small cliffs, one of which is excellent for toproping kids, in a multi-use trail system.
The Blueberry Hill Trails is a property owned by the local town, and developed for hiking, snowshoeing, mountain biking, horseback riding, and cross-country skiing. The trail network is well marked and accessed from many different trailheads.
There are two small cliffs on the property. Blueberry Wall is a low-angle slab perfect for children. There are fixed anchors along the top, and one beginner sport route. The Wonka Wall is steeper and also well-equipped for toproping.
Directions: From the intersection of US 9 and NY 9N in Elizabethtown (0.0 mile), across the street from the Buick dealership, go west (towards Keene). At 1.1 miles, turn sharp right onto Lord Road. At 1.5 miles turn left onto Roscoe Road, then another left at 2.0 miles onto Bronson Way, a dirt road passable by low clearance vehicles. At 2.9 miles park on the left in a grassy pullout suitable for several cars 609508,4897574.
A great cliff for beginners and children. Everything can be easily toproped from fixed anchors, and there is a beginner sport route. The base of the cliff is terraced.
Directions: There are two trails that begin at the parking area: the Sugarhouse Trail (green markers) and the Dick Olcott Trail (orange markers). Follow the Dick Olcott Trail (0 hr 0 min). Stay left at the first fork and right at the second, always following the orange markers. At 5 min, the slabby cliff is on your left, about 40' from the trail and clearly visible 609753,4897473.
Pancakes 5.2 G 40' ★★
Start: On the left side of the cliff below a large, overlapping flake.
P1 5.2 G: Climb up the slab to the flake. Over this, then straight up to a fixed anchor. 40'
Muffin 5.2 TR 40' ★
Begin at the height of land at a large dead tree. Go straight up the slab to a fixed anchor.
Sprinkles 5.3 G 40' ★★
Start: On the right side of the cliff at a right-leaning crack.
● P1 5.3 G: Go up the face to a ledge, then up a short steeper section to a fixed anchor. 40'
Crumble 5.3 G 40'
Start: Same as Sprinkles.
P1 5.3 G: Follow the right-leaning crack past a ledge with a tree to the top. Step left to the fixed anchor of Sprinkles. 40'
This small cliff is steeper than the Blueberry Wall with several toprope lines from fixed anchors. The left side is split horizontally be a ledge 20' up. There is a lean-to above this cliff.
Directions: From the Blueberry Wall, continue on the Dick Olcott Trail (orange markings). Go right at the first fork staying on the orange markings. At the T intersection with the Blueberry Hill Trail, go left and uphill. Just before the trail levels out, look for a right turn onto the Cliffside Trail, which is signposted. Follow the white markers for a couple minutes to the cliff, which is 30' to your left 610011,4897246, about 10 min from the parking.
Everlasting Gobstopper 5.10a R 40' ★
Start: Scramble up to the ledge that horizontally splits the left end of the cliff. Walk left on this ledge to a left-facing open book corner with a crack.
P1 5.10a R: Climb the crack in the open book corner to its top. Continue up the steep wall above to a ledge with a fixed anchor. 40'
Charlie's Buckets 5.3 TR 40'
Begin just right of Everlasting Gobstopper and move up a blocky corner to the top.
Snozberries 5.7 TR 25'
Right of the mail cliff is a small prow of rock with many possibilities. Toprope from trees.
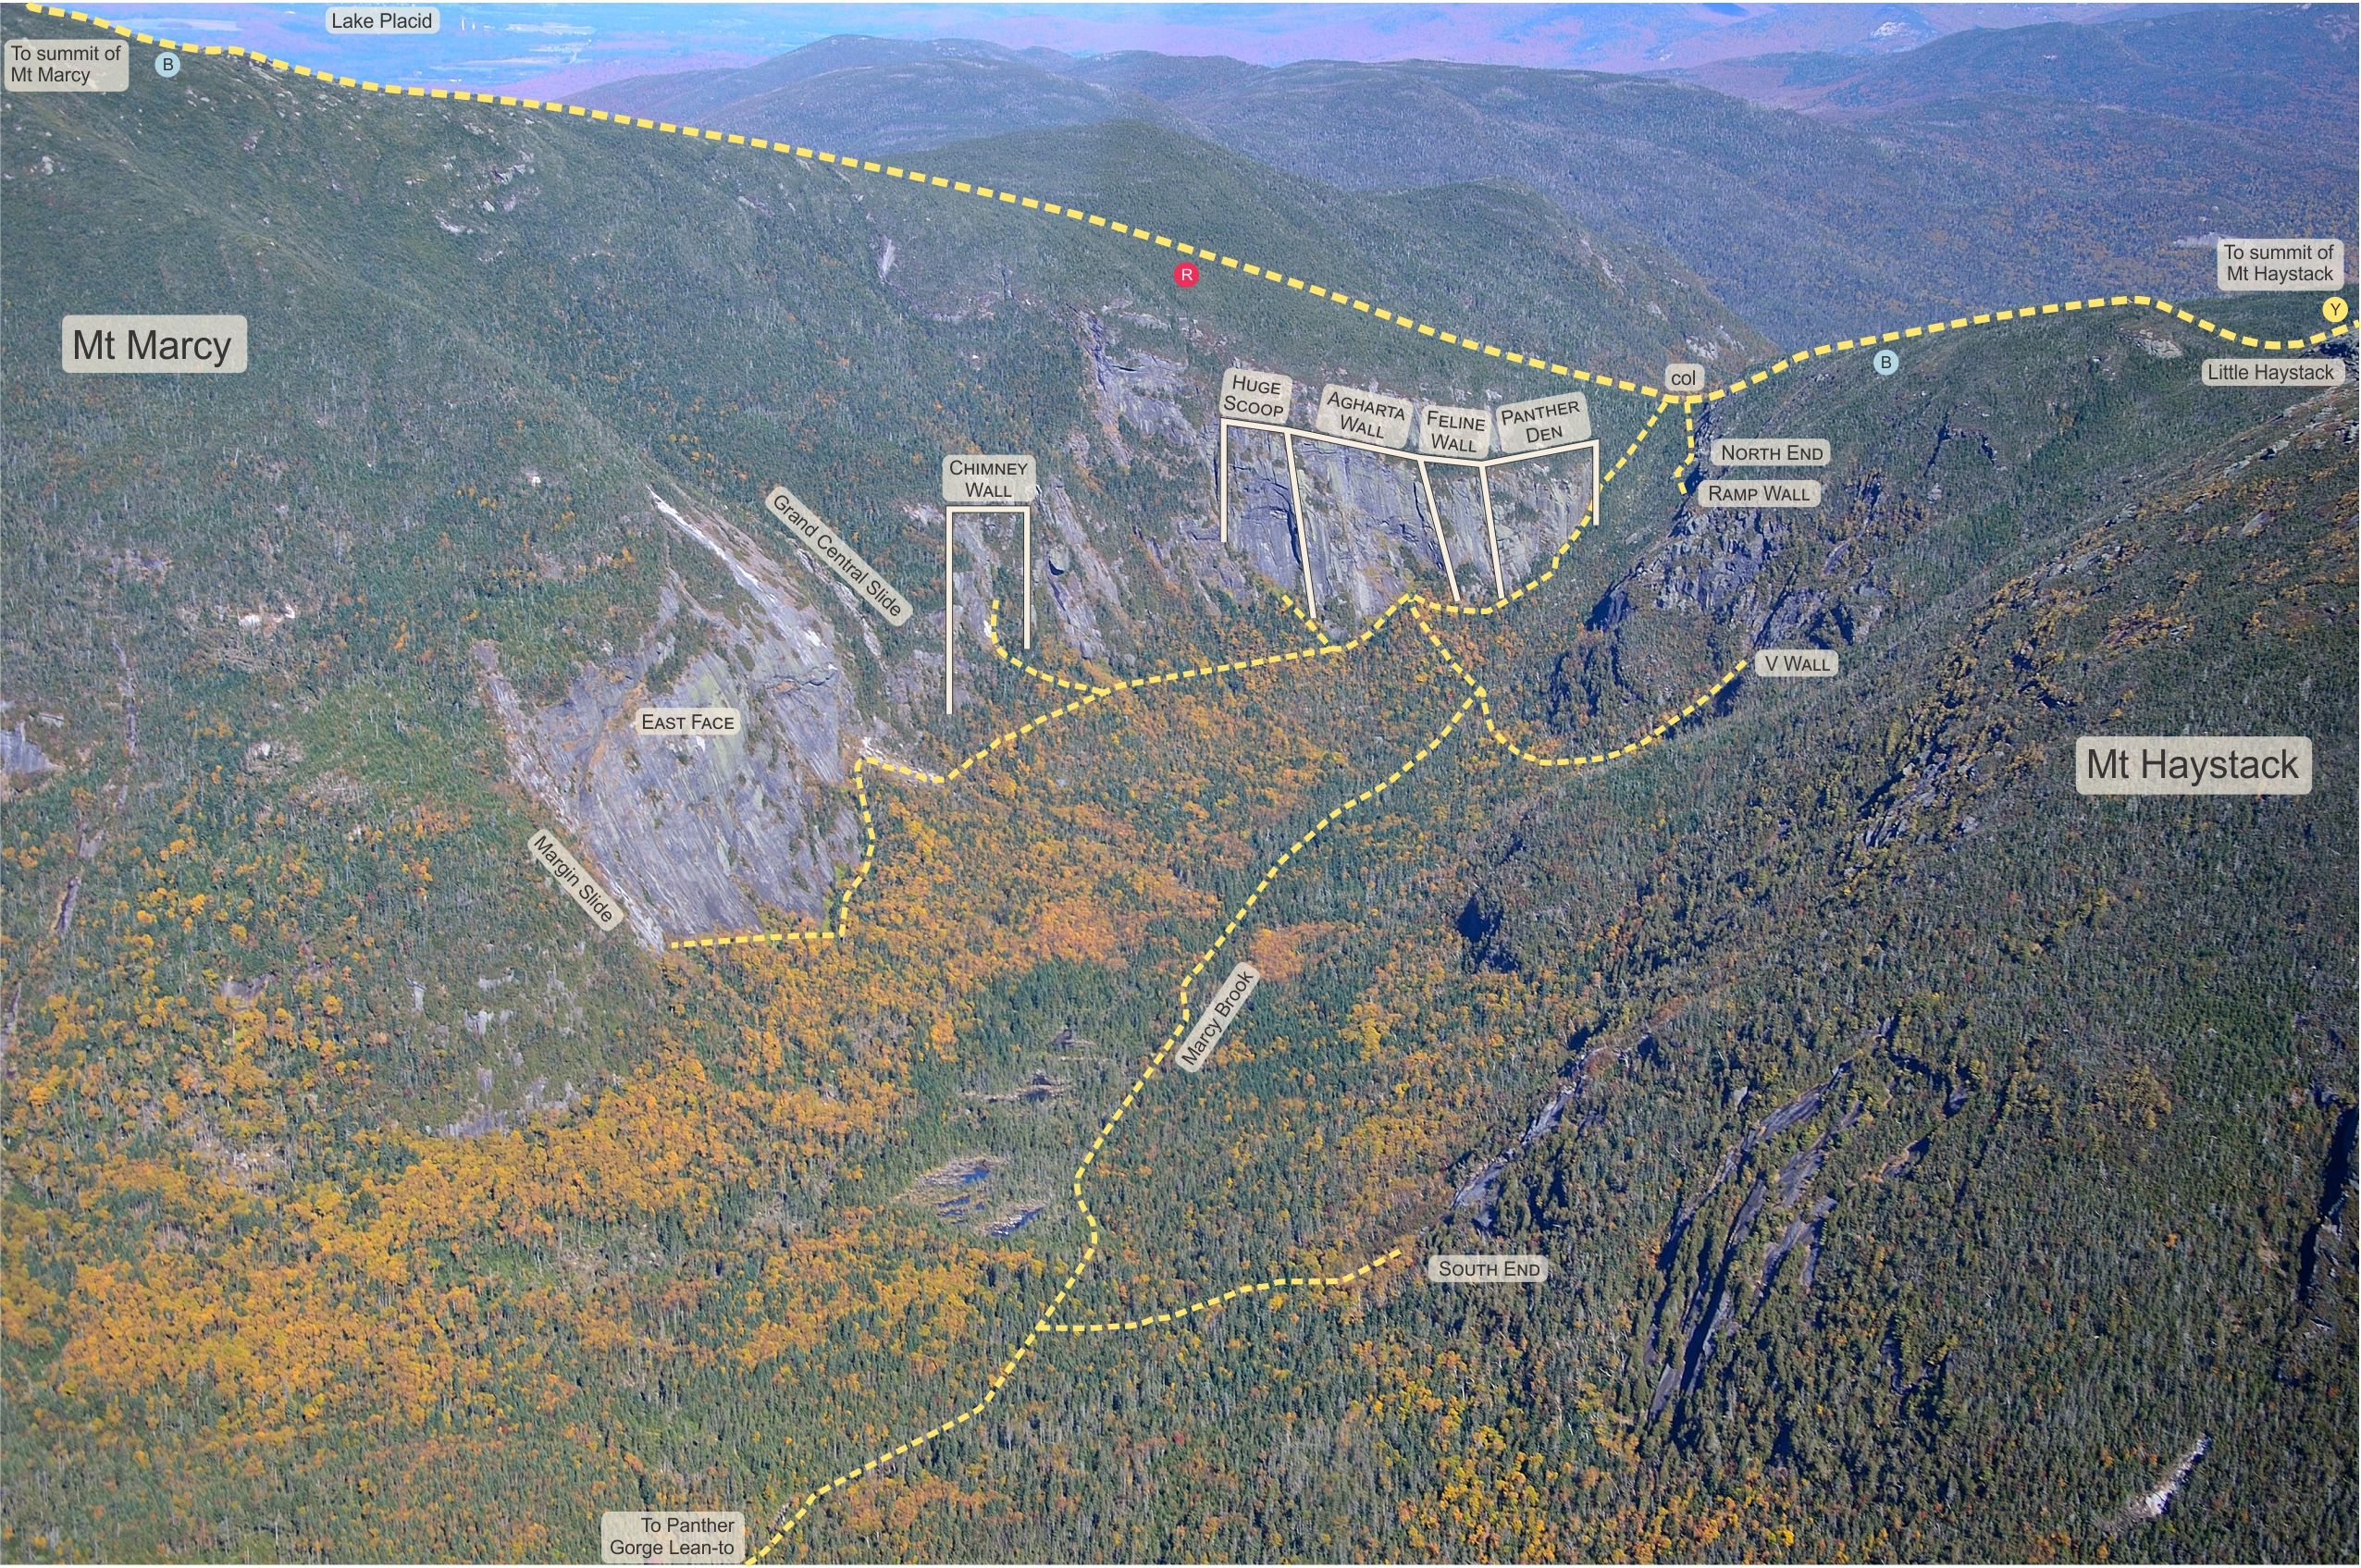
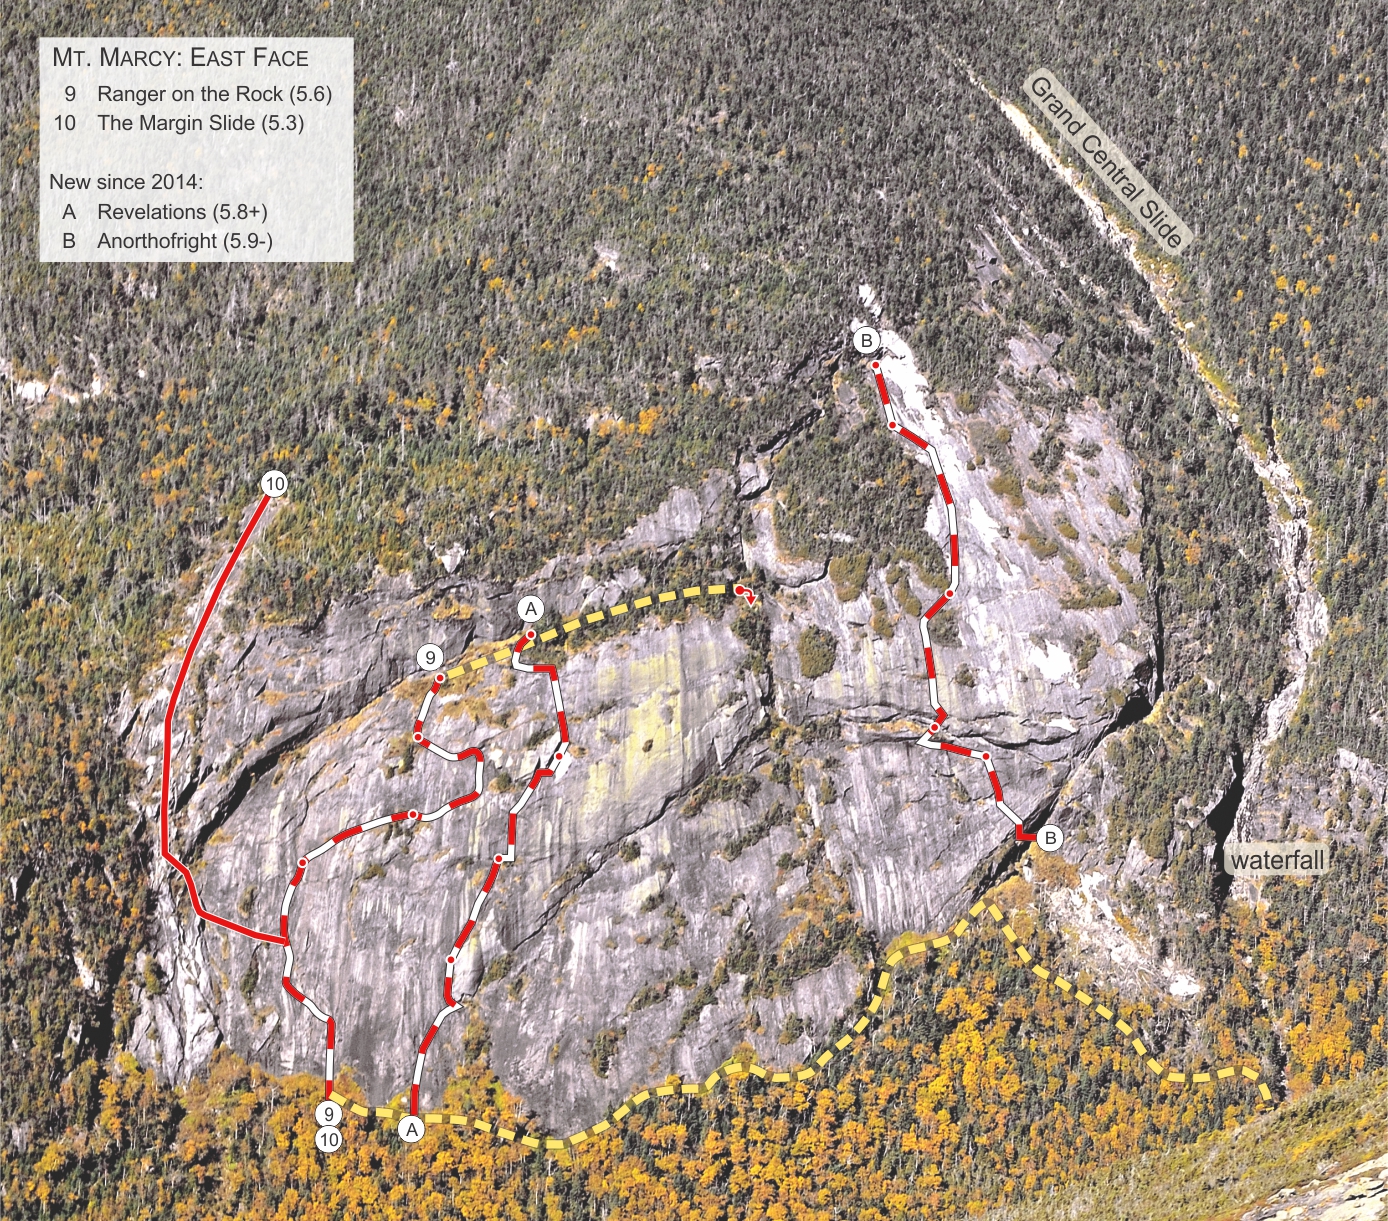
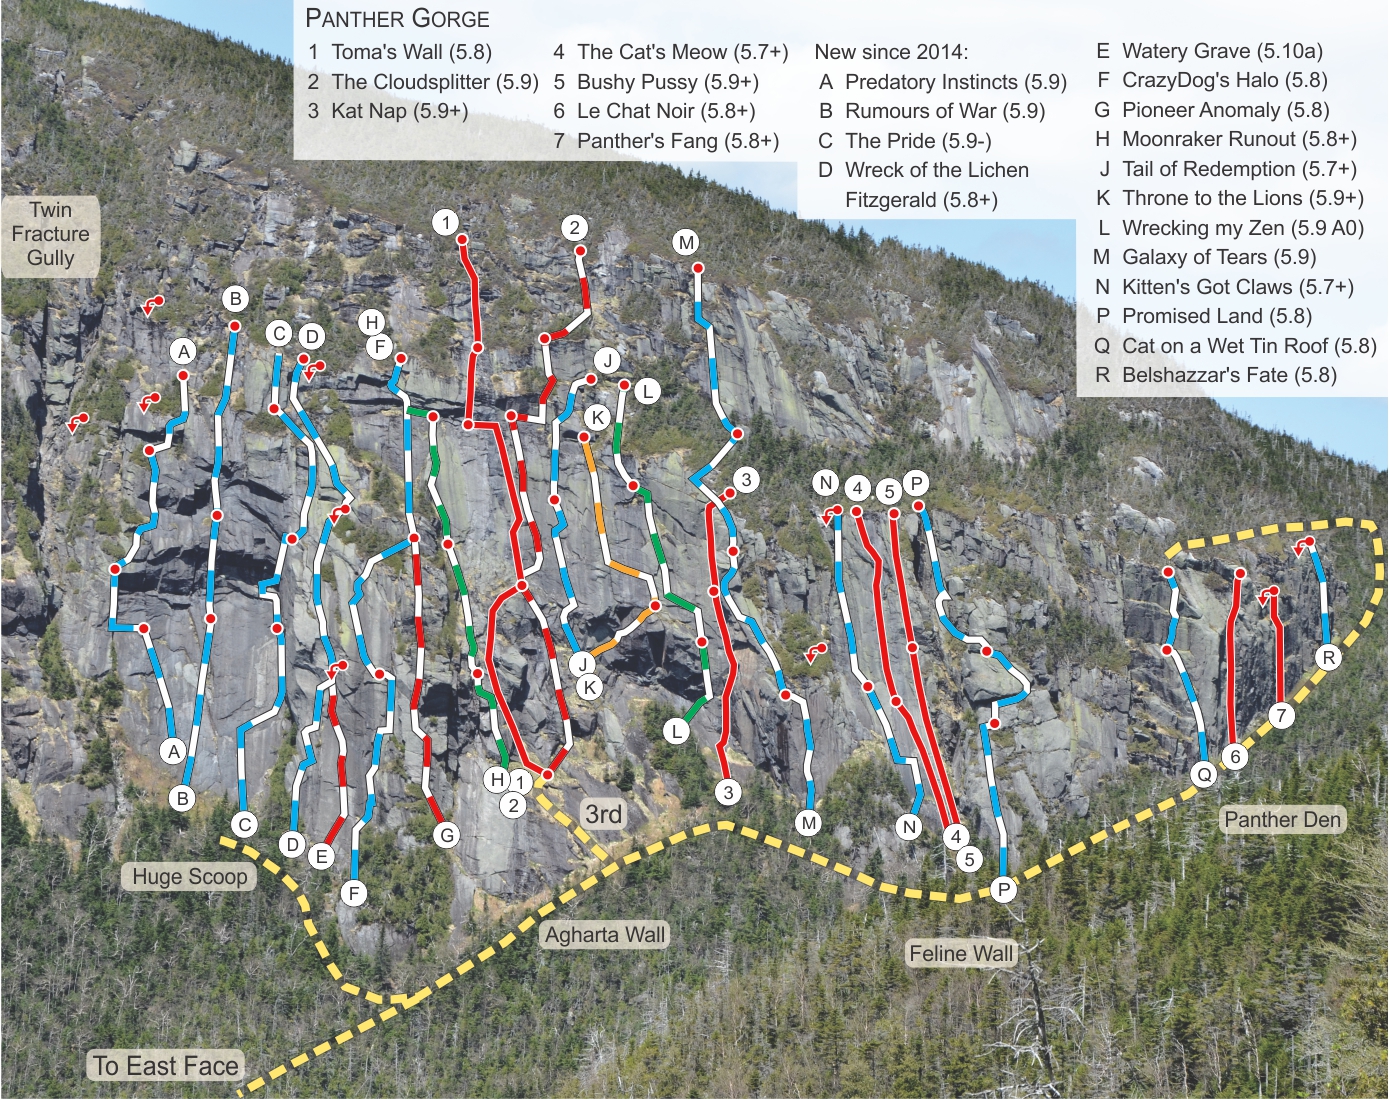
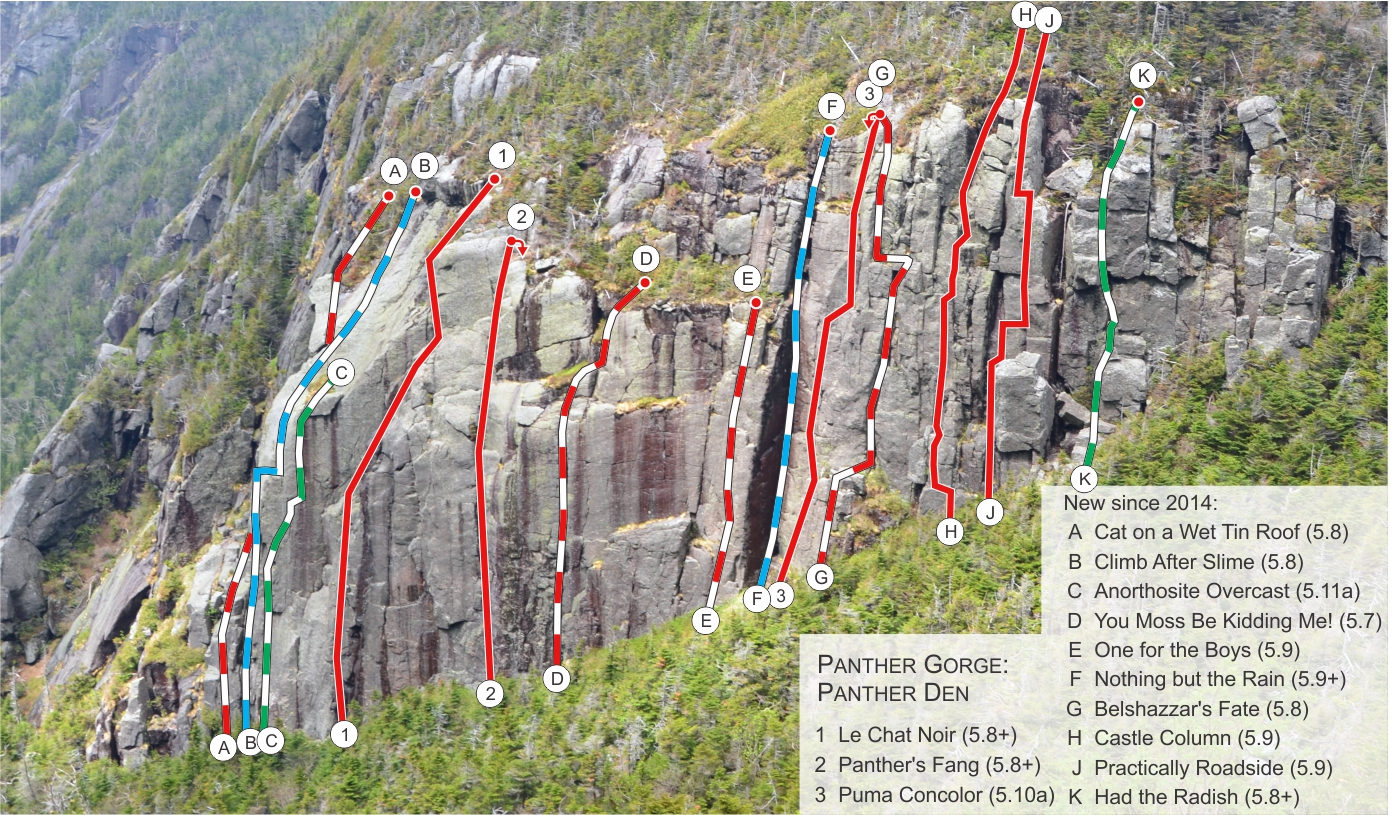
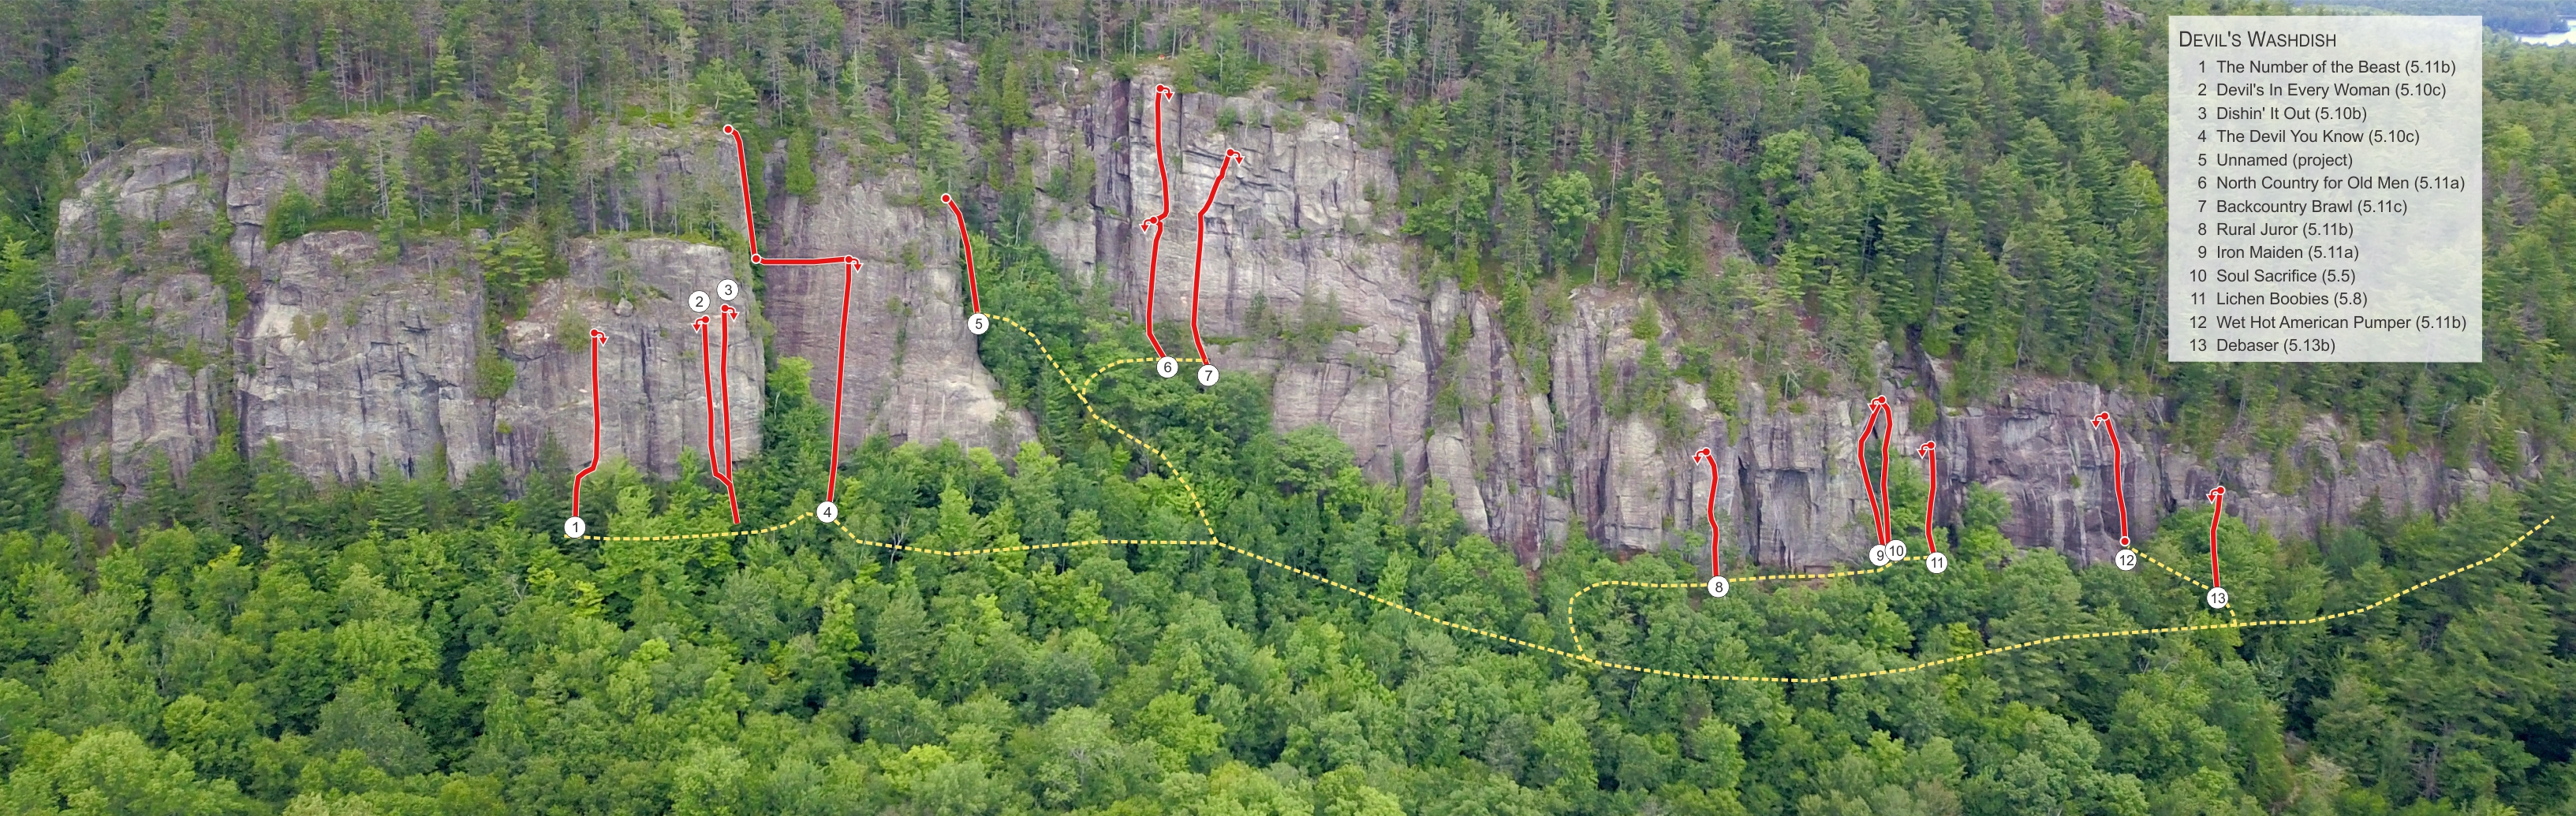